
!["[New] 2024 Approved Cutting-Edge Strategies for Saving Telecasts on Workstations"](https://www.lifewire.com/thmb/2mfMkf9Nh38PrId0xERnppf9iAg=/400x300/filters:no_upscale():max_bytes(150000):strip_icc():format(webp)/how-to-view-instagram-without-an-account-5271416-505eeceaf0e142ed8674d2ce2244a8be.jpg)
"[New] 2024 Approved Cutting-Edge Strategies for Saving Telecasts on Workstations"
Cutting-Edge Strategies for Saving Telecasts on Workstations
Now a days, it’s pretty easy to transform your computer into a PC TV, and many homes used this method as a DVR alternative in the past. Connect the connection from the signal source to the external TV tuner, such as cable, satellite, or antenna service. A coaxial wire with a coupler on the end is the most typical connection. Turning the coupler clockwise around the threaded jack connects the cable to the tuner. However, the way we watch television is evolving, with most stations and sporting events now offering their applications through streaming applications and platforms. Some of them demand a membership, while others are completely free.
Plug the USB cable from the external TV tuner into any accessible USB port on the computer to connect it to the computer. In the information era, there is little time to sit in front of the TV and watch our favourite application. We urgently want the ability to record television applications and view them whenever we want. Because of its adaptability and mobility, a laptop is the finest device for recording television to a computer. Many PC users no longer use their PCs as DVRs due to the abundance of streaming tools accessible at any time, and the once-popular DVR apps have gone out of favor. A PC may record TV applications using the Windows Media Center application, which was included in various Windows versions. Despite this, Windows PC customers who wish to record shows on their laptops may use DVR options.
Part 1. How to Receive TV Signal on Computer
Recording TV shows will need some specialized hardware and software, but nothing prohibitive. Your PC will first need a TV tuner. If your computer does not come with one, you may purchase an external TV tuner that connects to your computer through USB or a TV tuner card that is placed inside. The next step is to connect a television signal to your computer. Discuss your exact choices for getting your TV signal to your computer with your TV signal provider for instance, cable or satellite company. You may require a set-top box from them, or you may be able to just plug a wire into your computer from your wall.
That concludes the hardware section. Now you’ll need software that lets you view and record live television on your computer. There are many similar applications available, so look into them. Some operating systems, once again, will already have such a factory installed. If that’s the case, start with that package. You don’t need to purchase anything else if it meets your needs. There are third-party solutions with a variety of features if you like. Using your PC to record shows may remove the requirement for a digital video recorder. Newer computers, such as Windows Media Center, may come with video recording software, requiring just a TV tuner to obtain a signal that may be recorded. External TV tuners with simple USB connections are also available, eliminating the need to open the computer tower or laptop to install special cards.
Many have DVR-like features, such as the ability to pause live TV. Others may have even more features, such as the ability to create your own transcripts or the ability to search for a specific phrase to start the recording. Some will also allow you to connect the application to your actual television. You can now watch what you’ve recorded on your PC on your television. The point is that each application has its own set of options, so decide which are most important to you before choosing one. Keep in mind that these software options are quite resource intensive, so make sure your computer’s hardware specs meet the software program’s minimum requirements.
Part 2. Best Way to Record TV on PC/Mac
Filmora is a screen recorder that supports high-definition screen capture as well as recording yourself using the Web cam and Overlay options. Filmora screen recorder is a simple screen recorder software that is ideal for recording games or anything else you want to capture. It includes a video editing suite specifically designed for screen accounts, which is far more than the typical basic screen capture application. Someone can cut, revolve, and make their own clasps. You can also add a description and customize the cursor effects. Screen recordings made with the Filmora screen recorder can be exported as MP4s, MKVs, MOVs, or even GIFs.
For Win 7 or later (64-bit)
For macOS 10.12 or later
Steps to Use Filmora TV Screen Recorder
**Step 1: Download and Install the Software
To begin, you must first download and install Wondershare Filmora on your computer. You can use this TV Recorder on the go for your needs. Simply go to the Wondershare established platform on the internet and you’ll be able to find every version of Filmora software, including Windows and Mac versions, along with the most recent version.
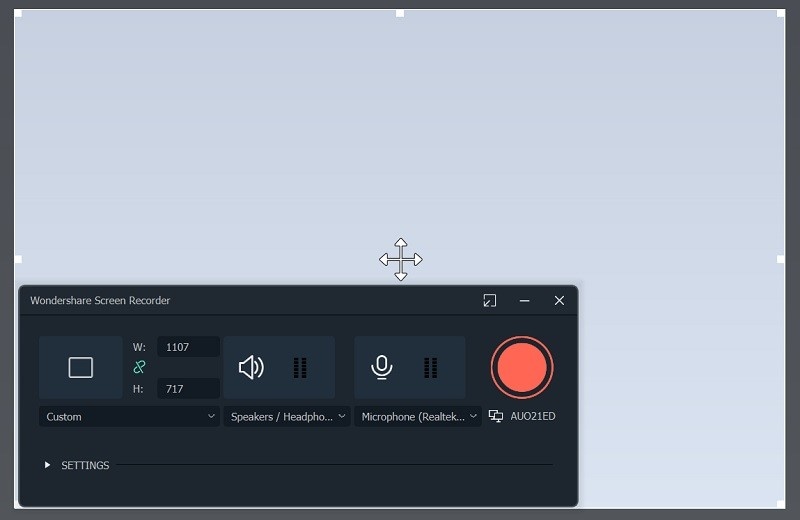
After that, go to File > Record Media and select your desired screen documenting file format from the list, as shown right here. It will take you to Filmora’s user-friendly UI, where you can immediately access the documenting feature, as shown in the diagram below:
**Step 2: Begin and End Recording
Following the customizations to the recording display, such as webcam, mic, system, and much more, simply press the Record button, and it will immediately begin recording your own personalized screen. Now that you’ve finished the recording, press the Cease button in the same way you did when you started it. A person can edit specific information with complete features within the editor because Filmora provides you with numerous modifying tools to use.
**Step 3: Save/Share Recordings
Now, once you’ve finished editing with Filmora and have everything summed up, you can save your modified recordings directly through there. After you’ve finished with the modifying part, you have a lot of options when it comes to screen capturing and webcam recordings. To do so, press the Export button in the top-right corner of the item interface as follows:
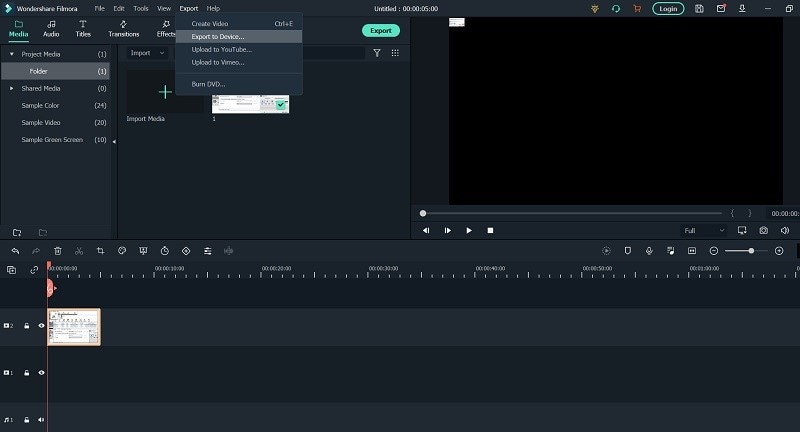
The best part about this TV Recorder is that Wondershare Filmora also allows you to upload your own recorded and modified content directly to YouTube or a few other well-known platforms; you can easily select your preferred platform to share from there.
Part 3. Other Ways to Record TV Shows on Computer
1. OBS Screen Recorder
OBS Studio (Open Broadcaster Software) is a free application that works with Windows, macOS, and Linux and has a lot of features. Start and stop your recording using the program’s floating control panel. OBS Studio can record screen activity, your microphone, and computer audio along the way. The output is then saved as an MP4 file by the application. You can also use Studio Mode to add cuts, fades, and other transitions to your video while streaming it live. You can change the format and other criteria for both the video and audio portions of the recording using the program’s settings. OBS Studio may appear intimidating at first, but with practice, you should be able to master it.
**Steps to Record TV Shows with OBS:
After you’ve downloaded it to your computer, follow these instructions to record your screen:
Step 1. Launch OBS Studio
Activate OBS Studio. After the software has been launched, it will usually add a Scene. If not, go to the bottom-left corner of the screen and click the + icon in the Scenes box.
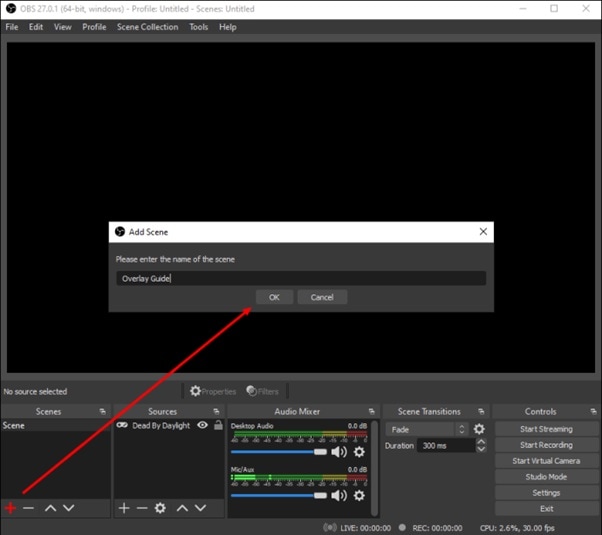
Step 2: Customize TV as Source
Click the + icon at the bottom of the Sources box, which is located next to Scenes.
![]()
Step 3: Start TV Recording
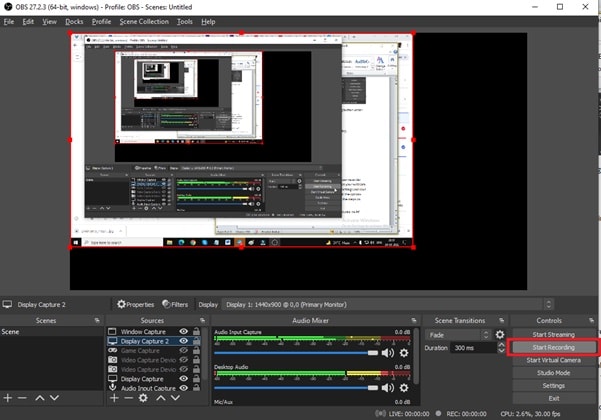
From the options menu, choose Display Capture. Click the blue Start Recording button in the lower-right corner of the screen when you’re finished.
2. Movavi Screen Recorder
This application is one of the best for capturing anything on your screen. Users can record their computer screen, webcam, internal and external sound, edit the video, and upload it directly to YouTube and Google Drive from the application interface. The recording scheduler is the most important feature that sets Movavi Screen Recorder apart from other apps. Simply tell the application when you want your screen to be recorded, and it will do the rest. You’ll have access to a wide range of editing tools, including the ability to add customizable text, improve video quality, cut and join video segments, apply special effects or filters, add audio tracks, and much more.
**Steps to Record TV Shows in Movavi:
Step 1: Select Record screen from the menu in Movavi Screen Capture Studio.
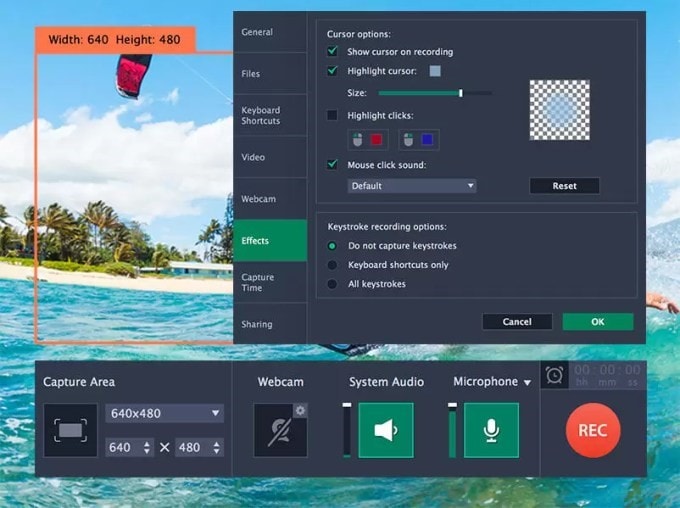
Step 2: Click and drag the mouse cursor over the area you want to capture to draw a frame around it, or use the list under Capture Area.

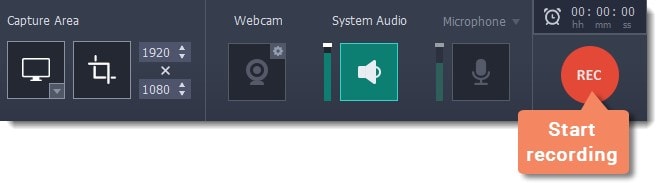
Step 3: Make sure the System Audio or Microphone icons are highlighted when selecting an audio source. After a 5-second delay, click REC to begin recording.
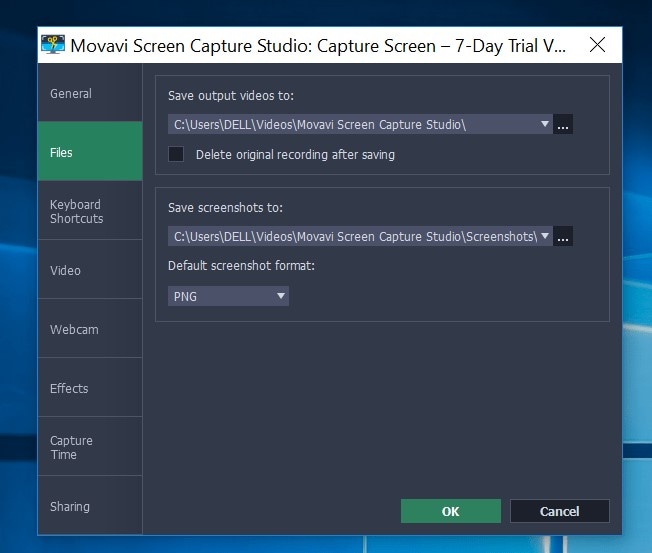
Step 4: When you’re finished recording, click Stop. To save the video, click Save As.
3. Windows Xbox
Game Bar is a feature of Windows 10 that allows you to record games that you play on your PC or that you stream from an Xbox console. It can, however, easily capture screen activity from other applications. To enable the Xbox Game Bar, go to Settings > Gaming > Xbox Game Bar and toggle the Enable Xbox Game Bar switch on. You can also change the keyboard shortcuts for opening the Game Bar, taking a screenshot, and recording a video from this screen. You can also activate the Game Bar by pressing the Xbox button on your Xbox Controller while connected to your PC
**Steps to Record TV via Windows Xbox:
Step 1: Except for the Windows desktop, File Explorer, and certain Windows apps like Weather, you’ll be able to record activity in most applications and windows. To open Game Bar, go to the screen you want to record and press Win + G. On the screen, there are several Game Bar widgets with controls for taking screenshots, recording video and audio, and broadcasting your screen activity.

Step 2: To record your screen activity, click the Start Recording button or use the Win + Alt + R keyboard shortcut. Now you can capture whatever screen actions you want. The Game Bar widgets vanish after you click on the screen, and are replaced by a small floating bar in the upper-right corner of the screen that allows you to control the recording.
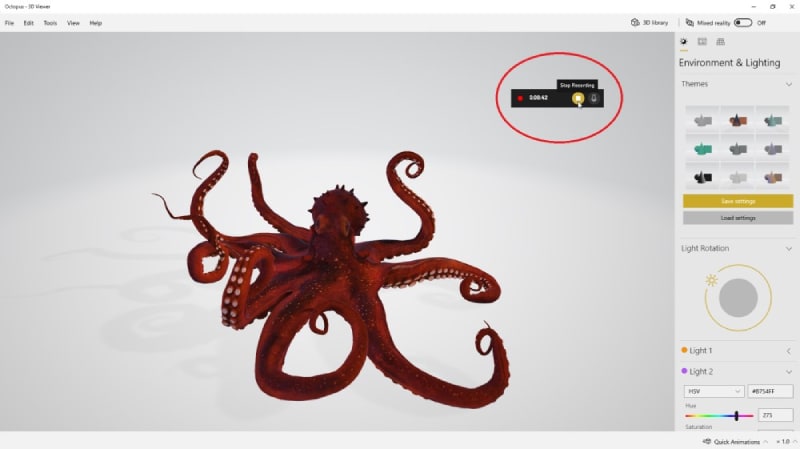
Step 3: Click the Recording button on the floating bar to stop the recording. When the recording is finished, you’ll receive a notification that the game clip has been recorded. To see your video in the Game Bar, click the notification. To watch the video, press the Play button.
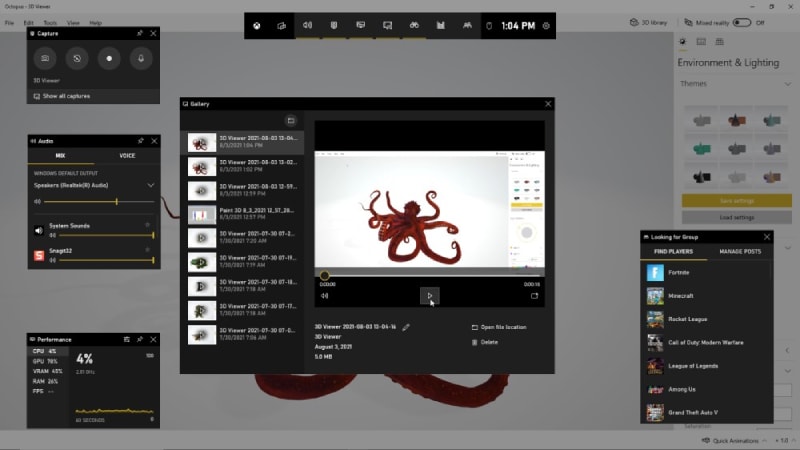
Step 4: In File Explorer, you can also access and play your video from its default location: C:\Users\[username]\Videos\Captures. Your videos will be saved as an MP4 file, which you can then share wherever you want.
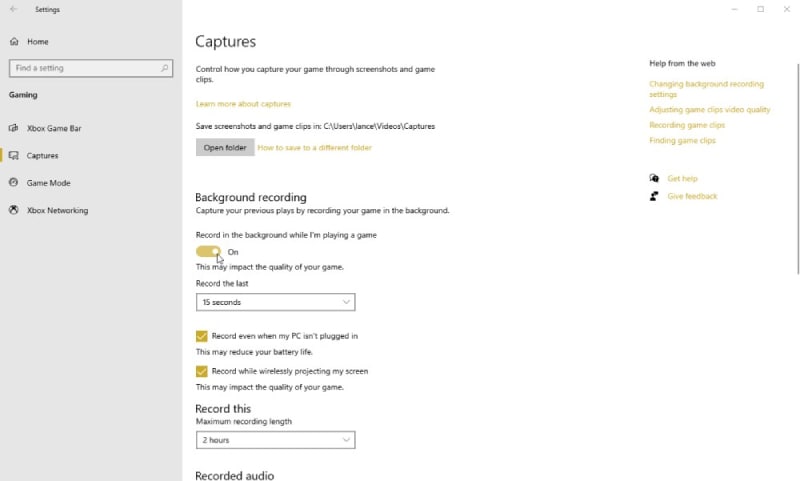
Step 5: If you go to Settings > Gaming > Captures, you can adjust the Game Bar. You can change the default file location for your videos, enable background recording to capture activity after the fact, choose to record video and audio, and change the frame rate between 30 and 60 frames per second from here.
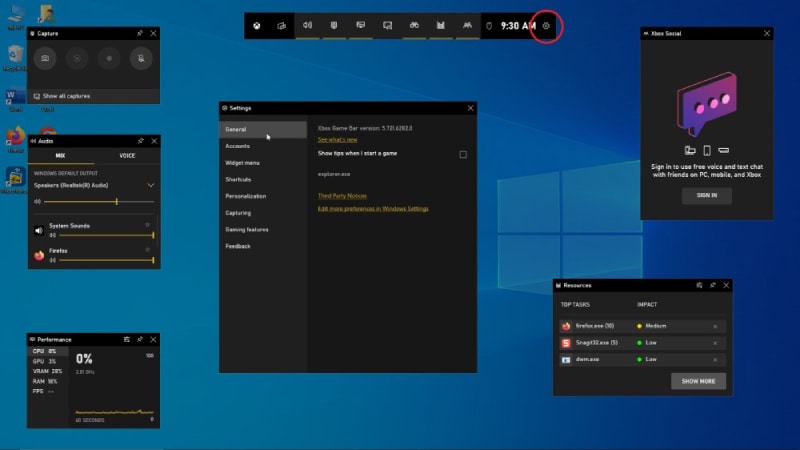
Click the Settings icon to the right of the top bar in the Game Bar. Modify the shortcuts, change the theme, tweak the widgets, set up background recording, and record the audio with the video by browsing the various categories under Settings.
4. QuickTime Player
QuickTime Player is a free piece of software that allows you to record and live stream video on your computer. Streamers and video content creators from all over the world use it. It captures and combines media from multiple sources in real time, including the computer screen, webcam, and microphone.
**Steps to Record TV in QuickTime Player:
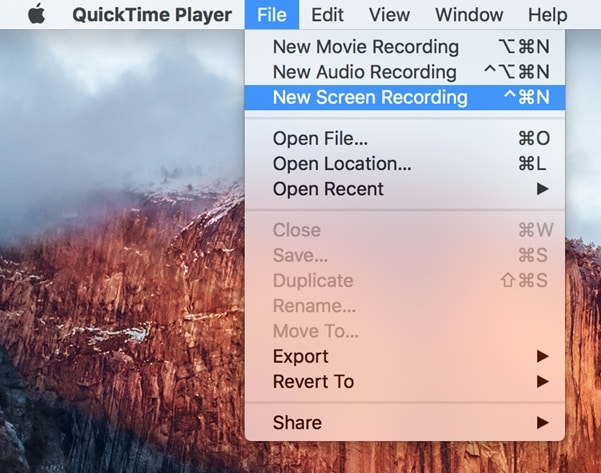
Step 1: Go to File > New Screen Recording in QuickTime Player. A prompt for screen recording will appear.
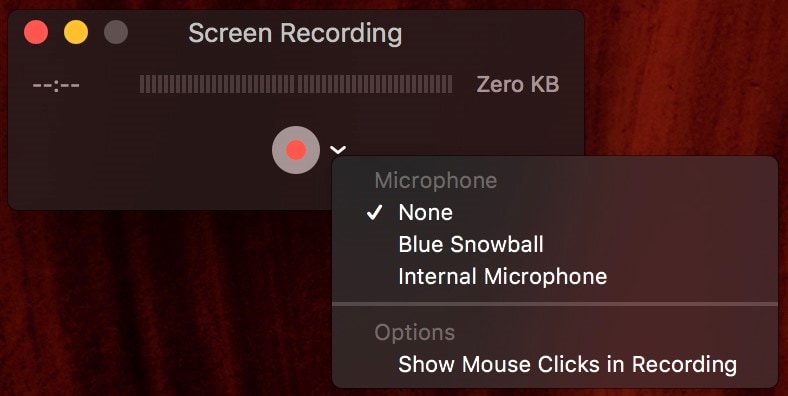
Step 2: To make sure you’re set up properly, click the down arrow next to the record button before pressing the button. Choose the microphone you want to use if you want your voice to be recorded. For recording, you’ll need an internal or external microphone. If you want to emphasize your mouse clicks, select “Show Mouse Clicks in Recording.” When checked, the cursor is highlighted with a black circle when you click. When the checkbox is unchecked, the cursor is not highlighted.
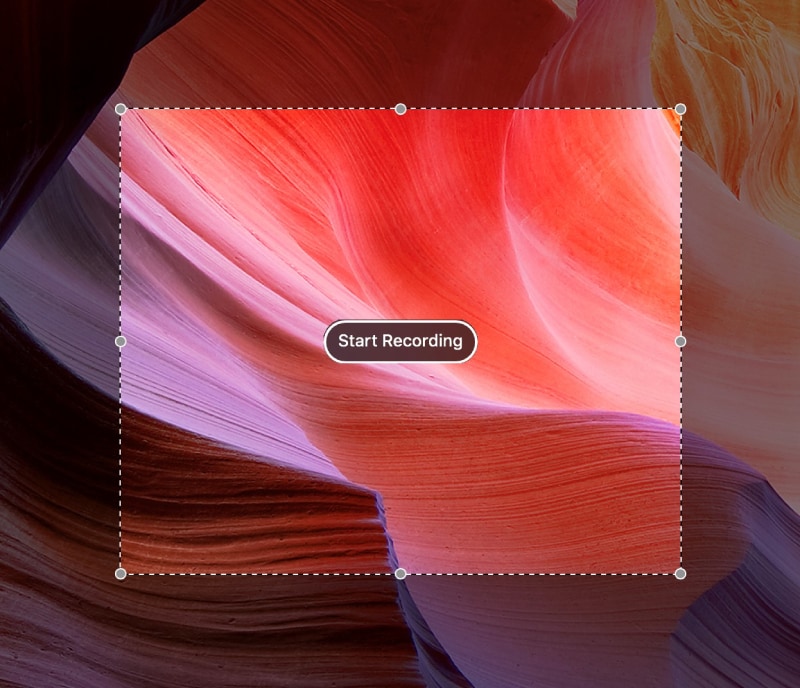
Step 3: Click the record button when you’re ready. In the center of your screen, a popup will appear. If you want your entire screen recorded, click anywhere on the screen. If you only want a portion of your screen recorded, click and drag the section you want to record over the “Start Recording” button.
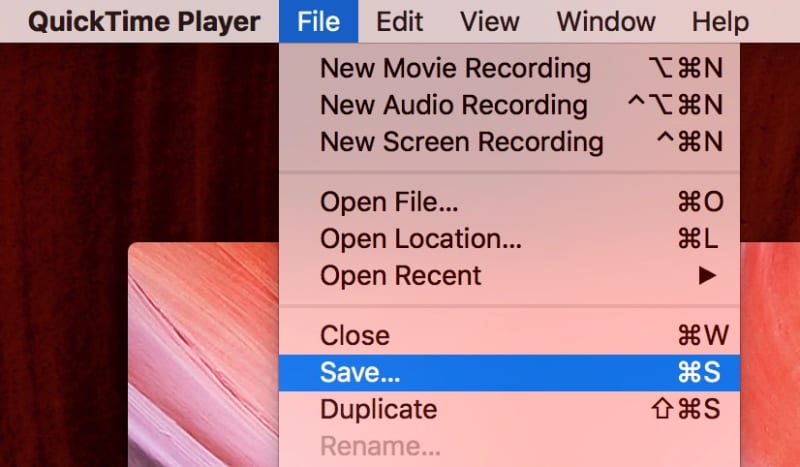
Step 4: When you’re ready to stop recording, click the Stop Icon in the top menu bar. You can review your recording on your computer screen. If you’re happy with the result and want to save the recording, select File > Save. A pop-over will appear over your video; name it and save it.
Part 4. How to Record TV on Mobile
For iPhone: iPhone Built-In Recording Feature
A built-in screen capturing tool is available on iOS 11 and later devices. Here’s how to use it to record your iPhone or iPad’s screen. To begin, go to Settings, Control Center, and Customize Controls. Tap the Plus sign next to the Screen Recording widget to add the screen capturing tool to the Control Center. To open the Control Center, close Settings and swipe down from the top-right corner of the screen. Simply tap the Screen Recording button to begin capturing the screen. After a countdown, the process will begin, and a timer will appear at the top of the screen. Open the Control Center and tap the Screen Recording button again to stop recording. The recording can be found in your Photos folder.
**Steps to Record TV via iPhone Recorder:
**Step 1: Go to Settings > Control Center > Customize Controls to enable screen recording. Tap the Screen Record icon in the Control Center. It’s a white circle surrounded by a circular ring.

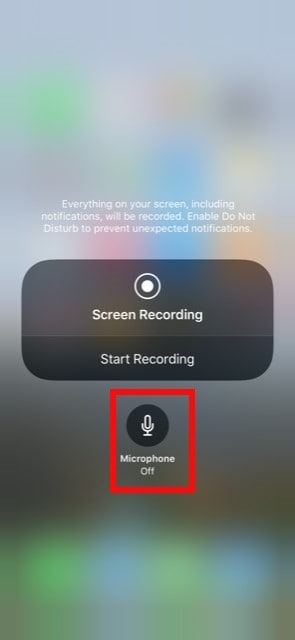
**Step 2: You’ll have three seconds to close the Control Center after tapping it before your phone starts recording. To indicate that you’re recording, a red bar will appear at the top of your screen. As shown here, press the Microphone Audio icon:
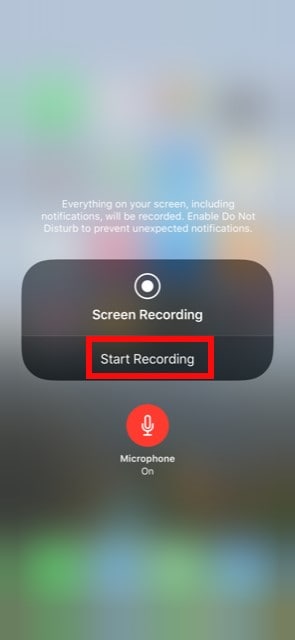
**Step 3: To begin, simply press the Start Recording button. The fastest way to stop recording is to tap on the red timer at the top of the screen when you’re done. In your Notification Center, you’ll see the message Screen Recording video saved to Photos, which you can tap to open the Photos app and watch your video. To stop recording, go to the Control Center and tap on the Screen Record icon.
For Android: DU Screen Recorder
DU Recorder is a free app that allows you to livestream and record your screen while playing games, watching live shows, and other activities. Although the basic app is free, there is a premium version that includes advanced features like custom watermarks, VIP feedback channels, and other options.
**Steps to Record TV via Android Recorder:
Step 1: From Google Play or other sources, download and install DU Screen Recorder for your Android phone. Start the app on your Android phone.
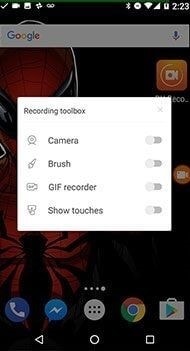
Step 2: For recording Android devices, adjust the video quality, video resolution, record audio, show touch, share videos, and other options.
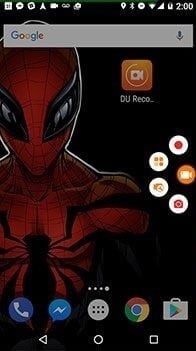
Step 3: With DU Screen Recorder, click the “Record” button on the left side to record everything, including video tutorials, game play, and all other activities.
Step 4: Trim, crop, blur, stitch, and add audio narration to the videos captured by DU Screen Recorder to create an outstanding video.

Conclusion
Having a powerful TV screen recorder is essential these days, and finding the best tool to meet all of your needs can be difficult. Thanks to Wondershare Filmora, which can help you record your TV shows on computer screen in high quality and then edit the footage, add watermarks, insert subtitles, and modify it to your liking. This article explains how to record your screen on iPhone, Android, Windows, and Mac computers.
For macOS 10.12 or later
Steps to Use Filmora TV Screen Recorder
**Step 1: Download and Install the Software
To begin, you must first download and install Wondershare Filmora on your computer. You can use this TV Recorder on the go for your needs. Simply go to the Wondershare established platform on the internet and you’ll be able to find every version of Filmora software, including Windows and Mac versions, along with the most recent version.
After that, go to File > Record Media and select your desired screen documenting file format from the list, as shown right here. It will take you to Filmora’s user-friendly UI, where you can immediately access the documenting feature, as shown in the diagram below:
**Step 2: Begin and End Recording
Following the customizations to the recording display, such as webcam, mic, system, and much more, simply press the Record button, and it will immediately begin recording your own personalized screen. Now that you’ve finished the recording, press the Cease button in the same way you did when you started it. A person can edit specific information with complete features within the editor because Filmora provides you with numerous modifying tools to use.
**Step 3: Save/Share Recordings
Now, once you’ve finished editing with Filmora and have everything summed up, you can save your modified recordings directly through there. After you’ve finished with the modifying part, you have a lot of options when it comes to screen capturing and webcam recordings. To do so, press the Export button in the top-right corner of the item interface as follows:
The best part about this TV Recorder is that Wondershare Filmora also allows you to upload your own recorded and modified content directly to YouTube or a few other well-known platforms; you can easily select your preferred platform to share from there.
Part 3. Other Ways to Record TV Shows on Computer
1. OBS Screen Recorder
OBS Studio (Open Broadcaster Software) is a free application that works with Windows, macOS, and Linux and has a lot of features. Start and stop your recording using the program’s floating control panel. OBS Studio can record screen activity, your microphone, and computer audio along the way. The output is then saved as an MP4 file by the application. You can also use Studio Mode to add cuts, fades, and other transitions to your video while streaming it live. You can change the format and other criteria for both the video and audio portions of the recording using the program’s settings. OBS Studio may appear intimidating at first, but with practice, you should be able to master it.
**Steps to Record TV Shows with OBS:
After you’ve downloaded it to your computer, follow these instructions to record your screen:
Step 1. Launch OBS Studio
Activate OBS Studio. After the software has been launched, it will usually add a Scene. If not, go to the bottom-left corner of the screen and click the + icon in the Scenes box.
Step 2: Customize TV as Source
Click the + icon at the bottom of the Sources box, which is located next to Scenes.
![]()
Step 3: Start TV Recording
From the options menu, choose Display Capture. Click the blue Start Recording button in the lower-right corner of the screen when you’re finished.
2. Movavi Screen Recorder
This application is one of the best for capturing anything on your screen. Users can record their computer screen, webcam, internal and external sound, edit the video, and upload it directly to YouTube and Google Drive from the application interface. The recording scheduler is the most important feature that sets Movavi Screen Recorder apart from other apps. Simply tell the application when you want your screen to be recorded, and it will do the rest. You’ll have access to a wide range of editing tools, including the ability to add customizable text, improve video quality, cut and join video segments, apply special effects or filters, add audio tracks, and much more.
**Steps to Record TV Shows in Movavi:
Step 1: Select Record screen from the menu in Movavi Screen Capture Studio.
Step 2: Click and drag the mouse cursor over the area you want to capture to draw a frame around it, or use the list under Capture Area.
Step 3: Make sure the System Audio or Microphone icons are highlighted when selecting an audio source. After a 5-second delay, click REC to begin recording.
Step 4: When you’re finished recording, click Stop. To save the video, click Save As.
3. Windows Xbox
Game Bar is a feature of Windows 10 that allows you to record games that you play on your PC or that you stream from an Xbox console. It can, however, easily capture screen activity from other applications. To enable the Xbox Game Bar, go to Settings > Gaming > Xbox Game Bar and toggle the Enable Xbox Game Bar switch on. You can also change the keyboard shortcuts for opening the Game Bar, taking a screenshot, and recording a video from this screen. You can also activate the Game Bar by pressing the Xbox button on your Xbox Controller while connected to your PC
**Steps to Record TV via Windows Xbox:
Step 1: Except for the Windows desktop, File Explorer, and certain Windows apps like Weather, you’ll be able to record activity in most applications and windows. To open Game Bar, go to the screen you want to record and press Win + G. On the screen, there are several Game Bar widgets with controls for taking screenshots, recording video and audio, and broadcasting your screen activity.
Step 2: To record your screen activity, click the Start Recording button or use the Win + Alt + R keyboard shortcut. Now you can capture whatever screen actions you want. The Game Bar widgets vanish after you click on the screen, and are replaced by a small floating bar in the upper-right corner of the screen that allows you to control the recording.
Step 3: Click the Recording button on the floating bar to stop the recording. When the recording is finished, you’ll receive a notification that the game clip has been recorded. To see your video in the Game Bar, click the notification. To watch the video, press the Play button.
Step 4: In File Explorer, you can also access and play your video from its default location: C:\Users\[username]\Videos\Captures. Your videos will be saved as an MP4 file, which you can then share wherever you want.
Step 5: If you go to Settings > Gaming > Captures, you can adjust the Game Bar. You can change the default file location for your videos, enable background recording to capture activity after the fact, choose to record video and audio, and change the frame rate between 30 and 60 frames per second from here.
Click the Settings icon to the right of the top bar in the Game Bar. Modify the shortcuts, change the theme, tweak the widgets, set up background recording, and record the audio with the video by browsing the various categories under Settings.
4. QuickTime Player
QuickTime Player is a free piece of software that allows you to record and live stream video on your computer. Streamers and video content creators from all over the world use it. It captures and combines media from multiple sources in real time, including the computer screen, webcam, and microphone.
**Steps to Record TV in QuickTime Player:
Step 1: Go to File > New Screen Recording in QuickTime Player. A prompt for screen recording will appear.
Step 2: To make sure you’re set up properly, click the down arrow next to the record button before pressing the button. Choose the microphone you want to use if you want your voice to be recorded. For recording, you’ll need an internal or external microphone. If you want to emphasize your mouse clicks, select “Show Mouse Clicks in Recording.” When checked, the cursor is highlighted with a black circle when you click. When the checkbox is unchecked, the cursor is not highlighted.
Step 3: Click the record button when you’re ready. In the center of your screen, a popup will appear. If you want your entire screen recorded, click anywhere on the screen. If you only want a portion of your screen recorded, click and drag the section you want to record over the “Start Recording” button.
Step 4: When you’re ready to stop recording, click the Stop Icon in the top menu bar. You can review your recording on your computer screen. If you’re happy with the result and want to save the recording, select File > Save. A pop-over will appear over your video; name it and save it.
Part 4. How to Record TV on Mobile
For iPhone: iPhone Built-In Recording Feature
A built-in screen capturing tool is available on iOS 11 and later devices. Here’s how to use it to record your iPhone or iPad’s screen. To begin, go to Settings, Control Center, and Customize Controls. Tap the Plus sign next to the Screen Recording widget to add the screen capturing tool to the Control Center. To open the Control Center, close Settings and swipe down from the top-right corner of the screen. Simply tap the Screen Recording button to begin capturing the screen. After a countdown, the process will begin, and a timer will appear at the top of the screen. Open the Control Center and tap the Screen Recording button again to stop recording. The recording can be found in your Photos folder.
**Steps to Record TV via iPhone Recorder:
**Step 1: Go to Settings > Control Center > Customize Controls to enable screen recording. Tap the Screen Record icon in the Control Center. It’s a white circle surrounded by a circular ring.
**Step 2: You’ll have three seconds to close the Control Center after tapping it before your phone starts recording. To indicate that you’re recording, a red bar will appear at the top of your screen. As shown here, press the Microphone Audio icon:
**Step 3: To begin, simply press the Start Recording button. The fastest way to stop recording is to tap on the red timer at the top of the screen when you’re done. In your Notification Center, you’ll see the message Screen Recording video saved to Photos, which you can tap to open the Photos app and watch your video. To stop recording, go to the Control Center and tap on the Screen Record icon.
For Android: DU Screen Recorder
DU Recorder is a free app that allows you to livestream and record your screen while playing games, watching live shows, and other activities. Although the basic app is free, there is a premium version that includes advanced features like custom watermarks, VIP feedback channels, and other options.
**Steps to Record TV via Android Recorder:
Step 1: From Google Play or other sources, download and install DU Screen Recorder for your Android phone. Start the app on your Android phone.
Step 2: For recording Android devices, adjust the video quality, video resolution, record audio, show touch, share videos, and other options.
Step 3: With DU Screen Recorder, click the “Record” button on the left side to record everything, including video tutorials, game play, and all other activities.
Step 4: Trim, crop, blur, stitch, and add audio narration to the videos captured by DU Screen Recorder to create an outstanding video.
Conclusion
Having a powerful TV screen recorder is essential these days, and finding the best tool to meet all of your needs can be difficult. Thanks to Wondershare Filmora, which can help you record your TV shows on computer screen in high quality and then edit the footage, add watermarks, insert subtitles, and modify it to your liking. This article explains how to record your screen on iPhone, Android, Windows, and Mac computers.
Also read:
- "\"[New] Top 9 Cross-Platform Communication Apps IPhone vs Android Comparison\""
- "\"[New] Elevate Your Farm The Top 7 Stardew Modifications\""
- "\"In 2024, Effortlessly Integrating OBS Into Your Mac Step by Step Guide\""
- "\"[New] 2024 Approved Calendar Integration for Efficient Google Meets\""
- "\"[New] 2024 Approved Unleashing Screen Content with ZDSoft's Magic\""
- "[New] Expertly Selected 8 Recording Software for 2024"
- "\"2024 Approved Essential Guide to Documenting Mac's Roblox Playthroughs\""
- "\"[Updated] Easy Routines Keeping a Transcript of Google Voice Calls for 2024\""
- "[Updated] ProfessionalScreenX Insider’s Take on Software"
- "\"In 2024, Exploring Online Collaboration Google Meet\""
- "\"Pro's Picks The Best 11 Soundstreamers Reviewed for 2024\""
- "In 2024, The Ultimate iOS Guide to Superior PSP Emulators"
- "\"[New] Capturing Slideshows on Screen Webcam Tips and Tricks for 2024\""
- "In 2024, Evaluating the Functionality of Vidma Screen Replayer"
- "[New] Top 5 Timelapse Recording Software for 2024"
- "\"Snapshot Excellence The Finest Software on Market for 2024\""
- "[New] Avoiding Common Nocturnal Photography Errors"
- "\"Begin with VRecorder Seamless Downloads and Installs\""
- "\"In 2024, QuickCapture Pro - Efficient Win11 Video Recorder\""
- "\"[Updated] Conquer EZ Grabber in Minutes Download & Setup Made Simple\""
- "[Updated] The Ultimate List of iOS Solutions to Play Your Favorite PSP Games for 2024"
- "\"[Updated] Get Real In-Depth Recording with MacBook's Cam for 2024\""
- "[New] Premium 5 Conferencing Recording Equipment Guide for 2024"
- "In 2024, Streamline Your iPhone/iPad Screenshots with 2023 Tricks"
- "VSDC Screen Recorder Review and Best Alternative for 2024"
- "\"[New] Ultimate Guide Using VLC for Videos for 2024\""
- "Discovering Win11's Finest Screen Grabbers"
- "\"2024 Approved CamStudio Screen Capturing A Comprehensive Analysis Users\""
- "\"In 2024, Expert Video Capture Maximizing Performance with Logitech Webcam Tech\""
- "Premier Online Videography Tools to Eye for 2024"
- "[Updated] Advanced Practices for Capturing IPTV Visuals for 2024"
- "\"2024 Approved Streamlined Screencasting with Top 10 Apps Reviewed\""
- "In 2024, How to Combat Sync Issues Between Cameras and OBS"
- "\"[New] 2024 Approved Exploring Realms of Patience in iPhone Filmmaking\""
- "\"2024 Approved Efficiently Archiving .mov Movies on Windows 10 PCs\""
- "\"[New] In 2024, The Zen of Zoom Talk Top Strategies for Smooth Virtual Dialogue\""
- "\"[Updated] In 2024, Evaluate Apps in Depth AZ Screen Logger\""
- "\"[New] 2024 Approved Unveiling the Leaders in Webinar Tech\""
- "\"Record Everything, Pay Nothing - Screen Tools for All Users\""
- "\"[New] 2024 Approved Fundamental Guidelines for Saving LOL Scores\""
- "[New] Top Techniques for Capturing PS3 Gaming Moments for 2024"
- In 2024, Unlocking iPhone 11 Passcode without a Computer
- In 2024, Here are Some Pro Tips for Pokemon Go PvP Battles On Lenovo ThinkPhone | Dr.fone
- New In 2024, Best Free Online Face Generators
- 2024 Approved Best WhatsApp Status Video Generator Apps
- In 2024, Elevate Your Videos The Top-Rated iPad Video Editing Apps
- Your Account Has Been Disabled in the App Store and iTunes On Apple iPhone 13 Pro?
- New In 2024, Image Dimensions Made Simple How to Use a Ratio Calculator
- New In 2024, How to Merge Audio and Video in VLC Media Player
- New 20 Must-Have Graduation Songs for 2024
- Updated In 2024, Audio Fading Implementing the Latest 2023 Methods and Trends
- Remove the Lock Screen Fingerprint Of Your Infinix Hot 30i
- In 2024, Lock Your Vivo V30 Phone in Style The Top 5 Gesture Lock Screen Apps
- Title: "[New] 2024 Approved Cutting-Edge Strategies for Saving Telecasts on Workstations"
- Author: Agatha
- Created at : 2024-05-19 19:42:07
- Updated at : 2024-05-20 19:42:07
- Link: https://video-screen-grab.techidaily.com/new-2024-approved-cutting-edge-strategies-for-saving-telecasts-on-workstations/
- License: This work is licensed under CC BY-NC-SA 4.0.
