![[New] In 2024, Quick Strategies Logging Lectures in PPT](https://thmb.techidaily.com/a362218194355c666b0860326aa79761dfe27d2518f12f424f4610cd1ffe517b.jpg)
"[New] In 2024, Quick Strategies Logging Lectures in PPT"
Quick Strategies: Logging Lectures in PPT
If you’re looking for some handy ways for how to record a PowerPoint presentation, then put on your PowerPoint slideshows for recordings as we will start you into the insider facts of getting watchers and keeping them as excited for this PowerPoint screen recording guide. To get to the ppt screen recording on-board, you want to figure out some method for getting your meeting’s musings withdrawing in accounts. Let your video show communicate everything for you. You can amaze your classmates or partners by sorting out some way to video record yourself presenting a PowerPoint show. Anyway, certain people thoroughly understand it, making, presenting, and recording a quality PowerPoint show takes work. But here we’ve sorted it out for you.
A PowerPoint show is among the most well-known tool for sharing content that can attract your watchers and help them with further developing an appreciation of various thoughts. Sometimes, it’s severely organized to have a very close show, especially in a period of Covid pandemic. In any case, you can do that endeavour through a Zoom meeting or record a PowerPoint presentation with audio. Accepting that you’re wanting to record yourself going through a slide deck without depleting your group or failing to bestow effectively, you ought to acknowledge how to present yourself in a good way. And for How to record voice on PowerPoint? Expecting that you are worried about those issues, keep on examining this post, and you can see all of the arrangements in the going with parts.

Way 1. Record with PowerPoint’s Built-In Feature
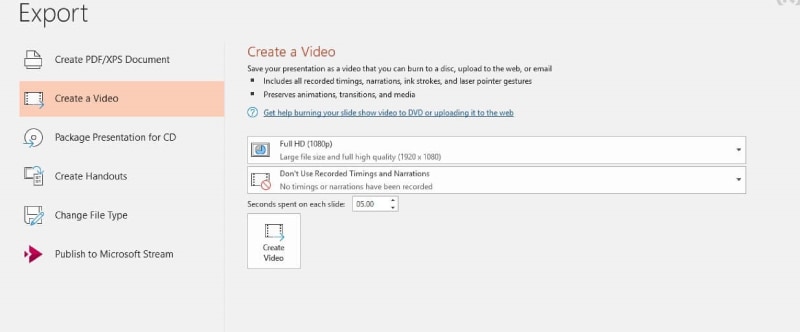
Microsoft’s PowerPoint program for Windows goes with a variety of customization decisions for making a show. Regardless of the message, you can put pictures, tables, outlines, accounts, joins, and various kinds of content in your PowerPoint show to make it pop. The program has easy-to-use incorporates and gives formats so you can make a specialist looking show whether or not you’re not the most very much educated person. It is important to offer significantly more imperative flexibility for swarms since they can watch the video and focus on the content in their spare energy. You can record a show constantly as you present, or do it early to utilize the flipped model or make your show open on demand. We’ll unveil how to make a basic PowerPoint show, how to change your PowerPoint slides into a video, and how to record a PowerPoint show in HD.
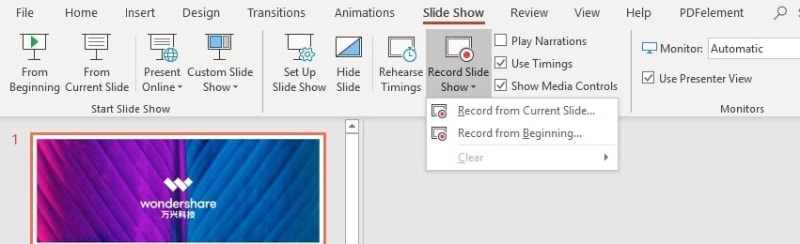
Step 1: Open Slideshow Tab for Recording
Select the Slideshow tab and snap Record Slide Show. Pick from what slide you want to start recording your slideshow.
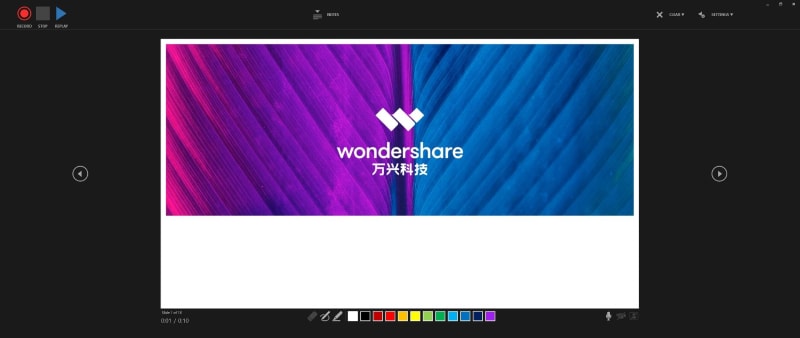
Step 2: Start Recording
A slideshow recording window will open. Click on the red Record button (or press R on your control centre). Later the three-second beginning recording begins. While recording your slideshow, you can highlight explicit concentrations with various tones from the lower board.

Step 3: Stop Recording
Stop recording by crushing Stop on the control centre or tapping on the square Stop button. Exactly when your watchers understand that you’re recording the meeting, they’ll likely end up being more locked in. Accepting that you’re wanting to evade a lengthy social occasion, you could similarly use mechanical assemblies like Filmora, particularly our screen recorder incorporates, to record your get-together.
Way 2. Record Presentation with Filmora Recorder
With various elements and a lot of accessible customizations for your PowerPoint show and webcam and screen accounts, Wondershare Filmora has the restraining infrastructure while referencing the first-rate video manager and screen recorder in this cutting-edge time as it has every one of the elements summarized inside one software bundle. Filmora is our top choice for video recording application. It’s easy to use, and it’ll take you no time using any means to figure out some method for recording a PowerPoint show. What isolates this Step from others is the wide extent of features available and the idea of the sound and video you can record.
Filmora records locally and simultaneously move your PPT sound and video. Also, tools like cutting, trimming and altering the PowerPoint recordings licenses you to design amazingly better for your show. You could play it back and see areas where you can make changes and make your show genuinely intriguing and lock-in. With Filmora recorder, the most developed free video and screen recorder accessible today, it’s not difficult to record yourself and your PowerPoint slides one next to the other with simply your PC and its underlying webcam and receiver. Let’s learn how you can do it in a much easier way with Wondershare Filmora.
For Win 7 or later (64-bit)
For macOS 10.12 or later
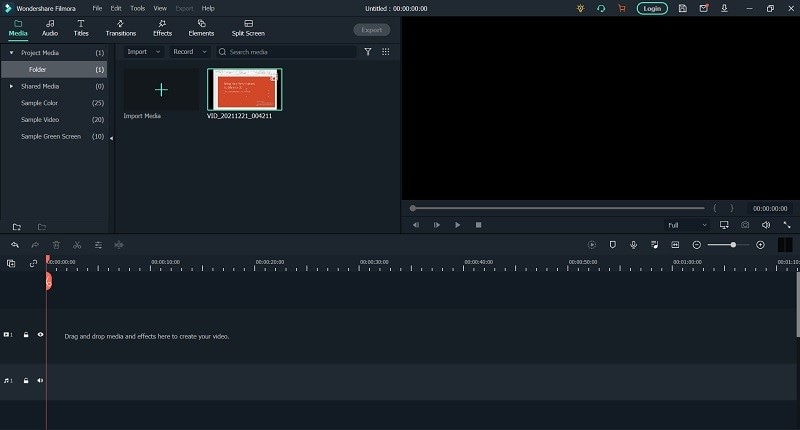
Step 1: Download and Install Wondershare Filmora
You probably have downloaded this software due to its simplistic all-in-one approach to video editing and recording solutions. Well, if you haven’t, then this is the time and links as mentioned below to download it hassle-free:
Right after the downloading and installation/updating process finishes, you can launch it directly from your desktop. Wondershare Filmora comes with a speciality of two methods to make a slideshow video, which includes:
- By importing your media files
- By recording your screen presentation
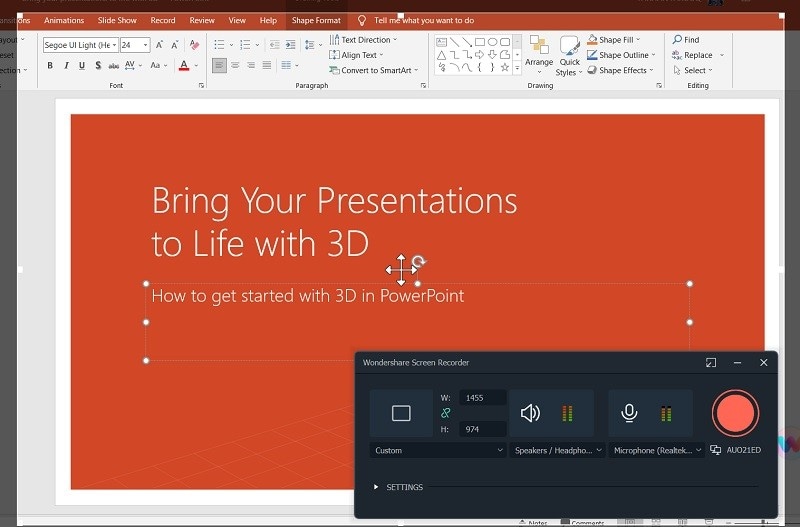
Step 2: Record the PowerPoint Presentation with Audio
In the next step, you can do the settings on your own without having any prior expertise in this regard. To do that, simply hit the New Recording button, and inside the recording interface, enable Webcam and microphone settings right on your fingertips.
Step 3: Edit Your Presentation Video
From the video catching to the video altering, this product from Wondershare is the hub of vital and significant editing features you would require in your video project as per your expectations. Wondershare Filmora is viable with modest frameworks, its video editor has a lot of implicit items to be utilized in the video projects. Planned explicitly for the recordings, this product thinks of a streamlined interface to take your recordings to the next level through its professional editing features.
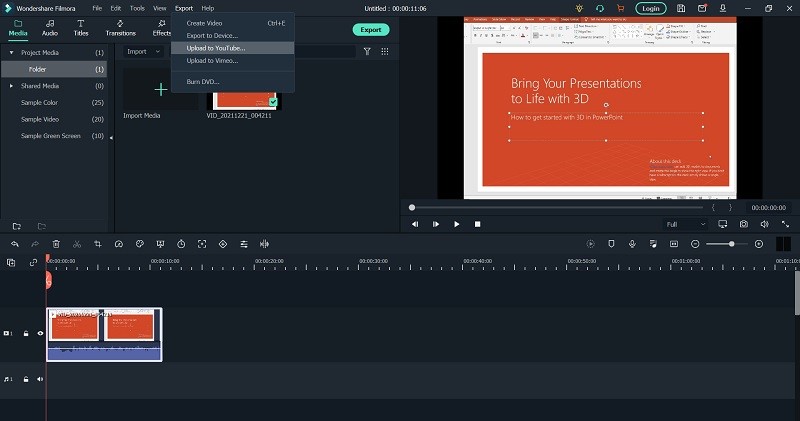
Step 4: Export the Masterpiece
Once you have finished creating the informational video and editing it, you can now save it to share on social media. Filmora allows embedded sharing platforms like YouTube on the go. The file can be saved into the format as; MP4, WMV, AVI, MOV, GIF, MP3.
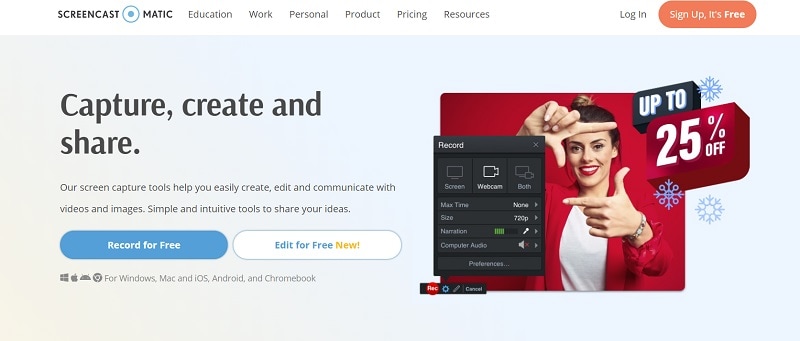
Way 3. Use Screencast-o-Matic
Screencast O Matic is a web-based program that catches your PC screen in a video design. This permits you to record what’s going on your PC screen to impart to other people. It is valuable for making instructional exercises or sharing an interaction for achieving an undertaking on your PC. Screencast-O-Matic can record what’s on your screen, what’s on your PC’s camera, or both. You can import and share recordings that you have recorded outside of Screencast-O-Matic also. Investigate to figure out how you can make your narratives besides delighting and keep your meeting seeing. The web is soaked with content, and backers who consider noteworthy contemplations are the ones who beat the resistance. These can be altered into your screencast recordings, or transferred as entire recordings.
Step 1. Head to Screencast-O-Matic Website
Dispatch the Screencast-O-Matic application on your PC To begin recording, open the applications you might want to use in your recording (for example PowerPoint, web program, and so on), A window will show up for certain fundamental settings you should pick before beginning, beneath is a breakdown of these settings. Pick what you are hoping to record, the PC screen, the webcam, or a blend of both
Parental Control Software
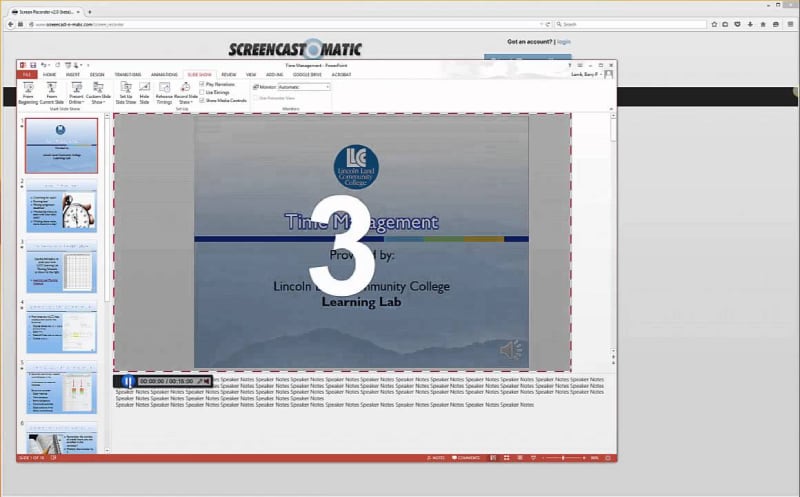
Step 2. Begin Recording
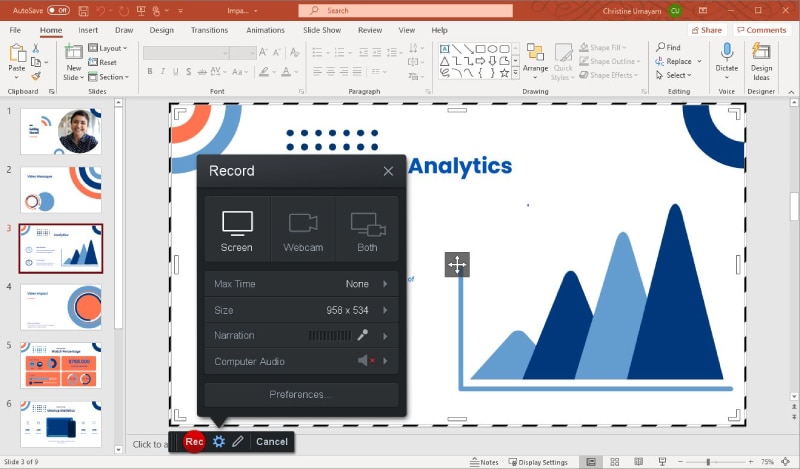
To guarantee the recording window is set to catch the whole region you want, straighten out the size of the catch box by clicking and hauling the corners to resize the catch window. then, at that point, click the red “Rec” button to start the recording. Assuming your recording will incorporate a PowerPoint with sound or some other application/video that necessities to have sound caught, make certain to set the “PC Audio” to “Yes”

Step 3 Stop and Save Recording
At the point when you are done, click the Pause button, and afterwards click “Done.” From here, you are prepared to subtitle, alter, and share your video. When your recording is done, you can without much of a stretch manage and alter the video utilizing Screencast-O-Matic’s inherent video proofreader. Click Save As Video File to save your recording to your PC as an MP4 document.
The simplest method for imparting recordings to your understudies is by transferring them to Screencast-O-Matic and afterwards offering the connection to your understudies
Conclusion
From study halls to meeting rooms, PowerPoint slides are the go-to vehicle for sharing supporting content that assists watchers with retaining and associating with the ideas and thoughts partook in a show. By and large, PowerPoint slides all alone, without the comparing show, are deficient and don’t do the best occupation of imparting the ideas from the real show. Hence, we recommend going for Filmora solution for that as it comes in handy with a pack full of features. For those on the end offer and file accounts of their full introductions.
For macOS 10.12 or later
Step 1: Download and Install Wondershare Filmora
You probably have downloaded this software due to its simplistic all-in-one approach to video editing and recording solutions. Well, if you haven’t, then this is the time and links as mentioned below to download it hassle-free:
Right after the downloading and installation/updating process finishes, you can launch it directly from your desktop. Wondershare Filmora comes with a speciality of two methods to make a slideshow video, which includes:
- By importing your media files
- By recording your screen presentation
Step 2: Record the PowerPoint Presentation with Audio
In the next step, you can do the settings on your own without having any prior expertise in this regard. To do that, simply hit the New Recording button, and inside the recording interface, enable Webcam and microphone settings right on your fingertips.
Step 3: Edit Your Presentation Video
From the video catching to the video altering, this product from Wondershare is the hub of vital and significant editing features you would require in your video project as per your expectations. Wondershare Filmora is viable with modest frameworks, its video editor has a lot of implicit items to be utilized in the video projects. Planned explicitly for the recordings, this product thinks of a streamlined interface to take your recordings to the next level through its professional editing features.
Step 4: Export the Masterpiece
Once you have finished creating the informational video and editing it, you can now save it to share on social media. Filmora allows embedded sharing platforms like YouTube on the go. The file can be saved into the format as; MP4, WMV, AVI, MOV, GIF, MP3.
Way 3. Use Screencast-o-Matic
Screencast O Matic is a web-based program that catches your PC screen in a video design. This permits you to record what’s going on your PC screen to impart to other people. It is valuable for making instructional exercises or sharing an interaction for achieving an undertaking on your PC. Screencast-O-Matic can record what’s on your screen, what’s on your PC’s camera, or both. You can import and share recordings that you have recorded outside of Screencast-O-Matic also. Investigate to figure out how you can make your narratives besides delighting and keep your meeting seeing. The web is soaked with content, and backers who consider noteworthy contemplations are the ones who beat the resistance. These can be altered into your screencast recordings, or transferred as entire recordings.
Step 1. Head to Screencast-O-Matic Website
Dispatch the Screencast-O-Matic application on your PC To begin recording, open the applications you might want to use in your recording (for example PowerPoint, web program, and so on), A window will show up for certain fundamental settings you should pick before beginning, beneath is a breakdown of these settings. Pick what you are hoping to record, the PC screen, the webcam, or a blend of both

Step 2. Begin Recording
To guarantee the recording window is set to catch the whole region you want, straighten out the size of the catch box by clicking and hauling the corners to resize the catch window. then, at that point, click the red “Rec” button to start the recording. Assuming your recording will incorporate a PowerPoint with sound or some other application/video that necessities to have sound caught, make certain to set the “PC Audio” to “Yes”
Step 3 Stop and Save Recording
At the point when you are done, click the Pause button, and afterwards click “Done.” From here, you are prepared to subtitle, alter, and share your video. When your recording is done, you can without much of a stretch manage and alter the video utilizing Screencast-O-Matic’s inherent video proofreader. Click Save As Video File to save your recording to your PC as an MP4 document.
The simplest method for imparting recordings to your understudies is by transferring them to Screencast-O-Matic and afterwards offering the connection to your understudies
Conclusion
From study halls to meeting rooms, PowerPoint slides are the go-to vehicle for sharing supporting content that assists watchers with retaining and associating with the ideas and thoughts partook in a show. By and large, PowerPoint slides all alone, without the comparing show, are deficient and don’t do the best occupation of imparting the ideas from the real show. Hence, we recommend going for Filmora solution for that as it comes in handy with a pack full of features. For those on the end offer and file accounts of their full introductions.
For macOS 10.12 or later
Step 1: Download and Install Wondershare Filmora
You probably have downloaded this software due to its simplistic all-in-one approach to video editing and recording solutions. Well, if you haven’t, then this is the time and links as mentioned below to download it hassle-free:
Right after the downloading and installation/updating process finishes, you can launch it directly from your desktop. Wondershare Filmora comes with a speciality of two methods to make a slideshow video, which includes:
- By importing your media files
- By recording your screen presentation
Step 2: Record the PowerPoint Presentation with Audio
In the next step, you can do the settings on your own without having any prior expertise in this regard. To do that, simply hit the New Recording button, and inside the recording interface, enable Webcam and microphone settings right on your fingertips.
Step 3: Edit Your Presentation Video
From the video catching to the video altering, this product from Wondershare is the hub of vital and significant editing features you would require in your video project as per your expectations. Wondershare Filmora is viable with modest frameworks, its video editor has a lot of implicit items to be utilized in the video projects. Planned explicitly for the recordings, this product thinks of a streamlined interface to take your recordings to the next level through its professional editing features.
Step 4: Export the Masterpiece
Once you have finished creating the informational video and editing it, you can now save it to share on social media. Filmora allows embedded sharing platforms like YouTube on the go. The file can be saved into the format as; MP4, WMV, AVI, MOV, GIF, MP3.
Screencast O Matic is a web-based program that catches your PC screen in a video design. This permits you to record what’s going on your PC screen to impart to other people. It is valuable for making instructional exercises or sharing an interaction for achieving an undertaking on your PC. Screencast-O-Matic can record what’s on your screen, what’s on your PC’s camera, or both. You can import and share recordings that you have recorded outside of Screencast-O-Matic also. Investigate to figure out how you can make your narratives besides delighting and keep your meeting seeing. The web is soaked with content, and backers who consider noteworthy contemplations are the ones who beat the resistance. These can be altered into your screencast recordings, or transferred as entire recordings.
Step 1. Head to Screencast-O-Matic Website
Dispatch the Screencast-O-Matic application on your PC To begin recording, open the applications you might want to use in your recording (for example PowerPoint, web program, and so on), A window will show up for certain fundamental settings you should pick before beginning, beneath is a breakdown of these settings. Pick what you are hoping to record, the PC screen, the webcam, or a blend of both
Step 2. Begin Recording
To guarantee the recording window is set to catch the whole region you want, straighten out the size of the catch box by clicking and hauling the corners to resize the catch window. then, at that point, click the red “Rec” button to start the recording. Assuming your recording will incorporate a PowerPoint with sound or some other application/video that necessities to have sound caught, make certain to set the “PC Audio” to “Yes”
Step 3 Stop and Save Recording
At the point when you are done, click the Pause button, and afterwards click “Done.” From here, you are prepared to subtitle, alter, and share your video. When your recording is done, you can without much of a stretch manage and alter the video utilizing Screencast-O-Matic’s inherent video proofreader. Click Save As Video File to save your recording to your PC as an MP4 document.
The simplest method for imparting recordings to your understudies is by transferring them to Screencast-O-Matic and afterwards offering the connection to your understudies
Conclusion
From study halls to meeting rooms, PowerPoint slides are the go-to vehicle for sharing supporting content that assists watchers with retaining and associating with the ideas and thoughts partook in a show. By and large, PowerPoint slides all alone, without the comparing show, are deficient and don’t do the best occupation of imparting the ideas from the real show. Hence, we recommend going for Filmora solution for that as it comes in handy with a pack full of features. For those on the end offer and file accounts of their full introductions.
For macOS 10.12 or later
Step 1: Download and Install Wondershare Filmora
You probably have downloaded this software due to its simplistic all-in-one approach to video editing and recording solutions. Well, if you haven’t, then this is the time and links as mentioned below to download it hassle-free:
Right after the downloading and installation/updating process finishes, you can launch it directly from your desktop. Wondershare Filmora comes with a speciality of two methods to make a slideshow video, which includes:
- By importing your media files
- By recording your screen presentation

Step 2: Record the PowerPoint Presentation with Audio
In the next step, you can do the settings on your own without having any prior expertise in this regard. To do that, simply hit the New Recording button, and inside the recording interface, enable Webcam and microphone settings right on your fingertips.
Step 3: Edit Your Presentation Video
From the video catching to the video altering, this product from Wondershare is the hub of vital and significant editing features you would require in your video project as per your expectations. Wondershare Filmora is viable with modest frameworks, its video editor has a lot of implicit items to be utilized in the video projects. Planned explicitly for the recordings, this product thinks of a streamlined interface to take your recordings to the next level through its professional editing features.
Step 4: Export the Masterpiece
Once you have finished creating the informational video and editing it, you can now save it to share on social media. Filmora allows embedded sharing platforms like YouTube on the go. The file can be saved into the format as; MP4, WMV, AVI, MOV, GIF, MP3.
Way 3. Use Screencast-o-Matic
Screencast O Matic is a web-based program that catches your PC screen in a video design. This permits you to record what’s going on your PC screen to impart to other people. It is valuable for making instructional exercises or sharing an interaction for achieving an undertaking on your PC. Screencast-O-Matic can record what’s on your screen, what’s on your PC’s camera, or both. You can import and share recordings that you have recorded outside of Screencast-O-Matic also. Investigate to figure out how you can make your narratives besides delighting and keep your meeting seeing. The web is soaked with content, and backers who consider noteworthy contemplations are the ones who beat the resistance. These can be altered into your screencast recordings, or transferred as entire recordings.
Step 1. Head to Screencast-O-Matic Website
Dispatch the Screencast-O-Matic application on your PC To begin recording, open the applications you might want to use in your recording (for example PowerPoint, web program, and so on), A window will show up for certain fundamental settings you should pick before beginning, beneath is a breakdown of these settings. Pick what you are hoping to record, the PC screen, the webcam, or a blend of both
To guarantee the recording window is set to catch the whole region you want, straighten out the size of the catch box by clicking and hauling the corners to resize the catch window. then, at that point, click the red “Rec” button to start the recording. Assuming your recording will incorporate a PowerPoint with sound or some other application/video that necessities to have sound caught, make certain to set the “PC Audio” to “Yes”
Step 3 Stop and Save Recording
At the point when you are done, click the Pause button, and afterwards click “Done.” From here, you are prepared to subtitle, alter, and share your video. When your recording is done, you can without much of a stretch manage and alter the video utilizing Screencast-O-Matic’s inherent video proofreader. Click Save As Video File to save your recording to your PC as an MP4 document.
The simplest method for imparting recordings to your understudies is by transferring them to Screencast-O-Matic and afterwards offering the connection to your understudies
Conclusion
From study halls to meeting rooms, PowerPoint slides are the go-to vehicle for sharing supporting content that assists watchers with retaining and associating with the ideas and thoughts partook in a show. By and large, PowerPoint slides all alone, without the comparing show, are deficient and don’t do the best occupation of imparting the ideas from the real show. Hence, we recommend going for Filmora solution for that as it comes in handy with a pack full of features. For those on the end offer and file accounts of their full introductions.
- Title: [New] In 2024, Quick Strategies Logging Lectures in PPT
- Author: Agatha
- Created at : 2024-07-18 10:26:08
- Updated at : 2024-07-19 10:26:08
- Link: https://video-screen-grab.techidaily.com/new-in-2024-quick-strategies-logging-lectures-in-ppt/
- License: This work is licensed under CC BY-NC-SA 4.0.