![[New] In 2024, Step-by-Step for Efficient iPad Screen Recordings](https://thmb.techidaily.com/900dc848292f751f63b27f646fc76a619bc7384a4aedd9106177497020dbae72.jpg)
"[New] In 2024, Step-by-Step for Efficient iPad Screen Recordings"
Step-by-Step for Efficient iPad Screen Recordings
This is the tech era, where every person uses widgets and different devices to entertain and facilitate them. Among laptops, PC and mobile devices, iPads are the ones with a slightly greater edge. The shape and size of an iPad is its most convenient factor. Not too bad to carry and neither too small to work on it. iPads are the perfect mix for laptops and mobiles.
Screen recording is one crucial thing that every device should offer. People prefer to do iPad screen recording while they create any application demo, gaming video, or maybe any kind of tutorial. If you plan to learn more about screen recording on iPad, then stay with us.
In this article
01 How Can You Do Screen Recording on iPad?
02 5 Popular Screen Recorder for iPad
03 Recommend Desktop Screen Recorder -Wondershare Filmora
Part 1. How Can You Do Screen Recording on iPad?
iOS devices work differently. Like iPhones, the iPad also lets you do screen recording, but there is definitely some specific procedure that you should follow. Let us introduce the steps to you that you should follow in recording fun stuff, cool gaming videos, and other kinds of tutorials with an iPad.
Enable Screen Recording Settings
The screen recording process for iPad starts with enabling the Screen recording feature from the Settings. You can never record anything on iOS devices until the feature has been enabled. Follow the steps shared below to get this done.
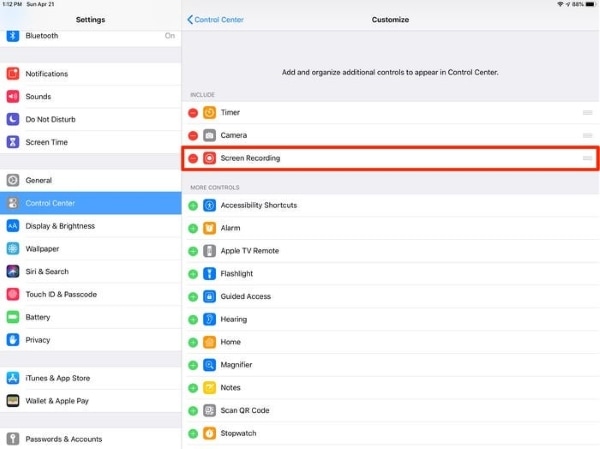
Step 1: Firstly, move to the Settings app and then look for the ‘Control Center’ option. Tap on the ‘Customize Controls’ option from the Control Center screen. Hit on it.
Step 2: Now, from the ‘Customize’ section, locate ‘Screen Recording.’ If it has a green plus sign next to it, then it means that it is not enabled. Hit the plus sign to enable it, but if it has a red minus sign next to it, that means it is already enabled.


Initiate Screen Recording on iPad
If how to record screen on iPad is the question you are worried about, then the wait is over. This section of the article will guide you by sharing elaborated steps that are required for iPad screen recording.
Step 1: To start screen recording on your iPad, swipe down the ‘Control Center’ from the upper right corner of your screen.
Step 2: Then, you need to hit on the ‘Record’ button that shall start the recording. The ‘Record’ button appears like a big circle with a small shaded circle. After 3 seconds of the countdown, the button will turn red, indicating that the recording has been started.
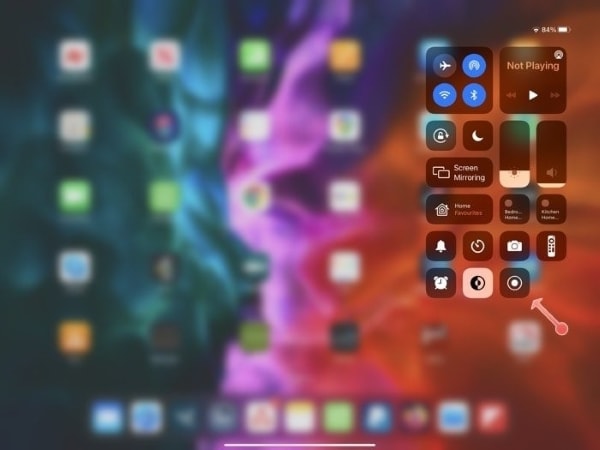
Step 3: Lastly, when you are done with screen recording, just hit on the recording indicator and select the ‘Stop’ option. You can also stop the recording from the Control Center by tapping on the Record button again.
Part 2. 5 Popular Screen Recorder for iPad
The above section walked you through the steps that are necessary for iPad screen recording. Now, it’s time to go big and share regarding screen recorder iPad. We will introduce you to 5 popular screen recording applications for iPad in the coming section.
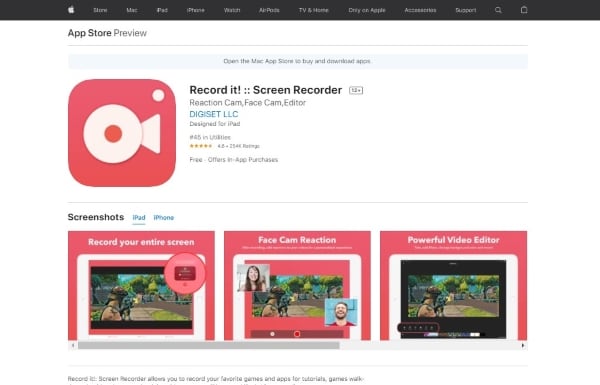
1. Record it! :: Screen Recorder
The Record it application lets you record application demos, gaming videos, or any other kind of tutorial. The application allows you to add reaction videos and commentary to your recording once it is complete. A few of the Record it applications features are:
- You can share your recorded video files directly to YouTube.
- The application exports media very fast and easily
- The Record application supports videos from the camera roll.
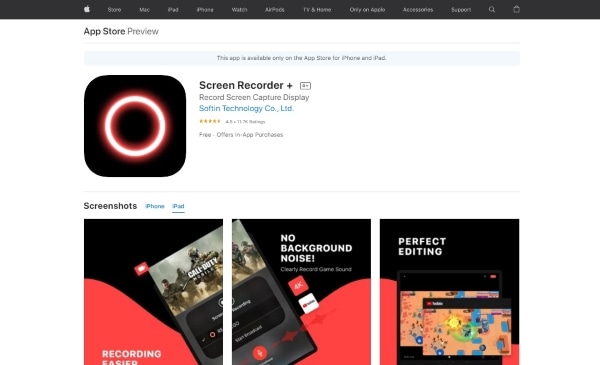
2. Screen Recorder +
Another best screen recorder for iPad is ‘Screen Recorder +.’ The screen recorder promises to deliver high-quality recorded videos. Alongside that, it also allows video editing. The application has its own fan base because of its features. Let us highlight them for you:
- Use Face Cam to record and add your reaction to the video.
- With this application, you can use the microphone to add commentary and voiceover to your videos.
- You can play and personalize your reaction part by setting the position as you want it.
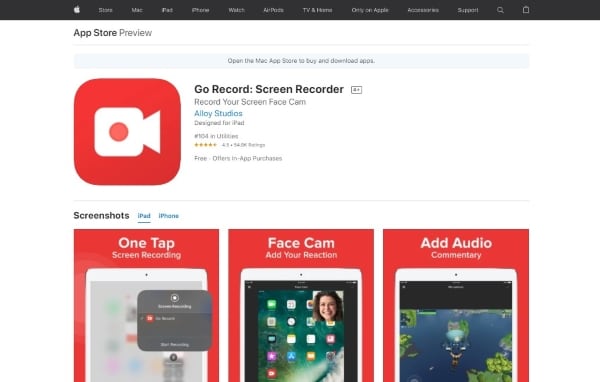
3. Go Record: Screen Recorder
Let’s talk about another screen recorder for iOS users to record fun stuff, tutorials, and application demos is Go Record. It offers a very consistent set of features which are stated as follows:
- One of the unique features that this application offers is the Face Cam’s involvement.
- By using the Face Cam, you can record your facial expressions, which could be added to your final demo or tutorial. This will make your content interesting and captivating.
- The microphone could be used to add commentary to your video.
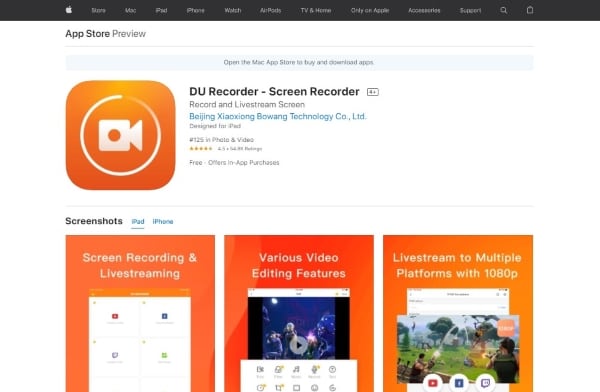
4. DU Recorder – Screen Recorder
In the recording world, we cannot move forward without discussing DU Recorder for screen recording in iPads. This iPad recorder is very reliable and even very simple to use. The application is powerful, and it promises high-quality screen recording on iPad. Its crazy features will amaze you.
- The application allows you to Livestream your screen to different platforms like YouTube, Facebook, and Twitch.
- With a DU recorder, you can also perform audio recordings.
- It supports the simultaneous use of a microphone and internal audio for recording purposes.
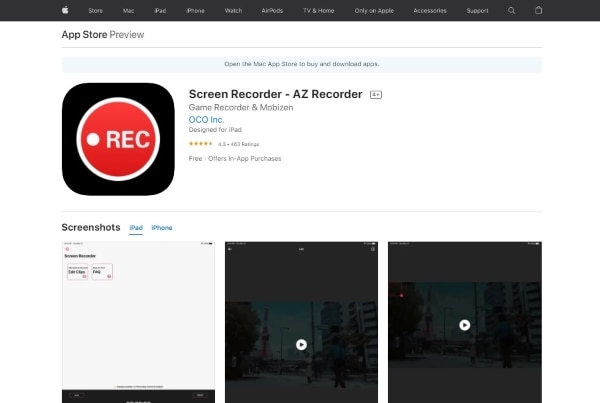
5. Screen Recorder – AZ Recorder
Lastly, another best screen recorder for iPad is the AZ Recorder. By using this application, you can add audio sounds as well as reaction videos to your screen. The AZ Recorder has some wowing features; let’s talk about them.
- With AZ recorder, you can import and edit external videos without any trouble.
- You can multi-task with this efficient application by capturing reactions and recording audio.
- AZ recorder allows its users to adjust and set the size of the Face Cam.
Part 3. Recommend Desktop Screen Recorder -Wondershare Filmora
Not every person owns an iPhone or an iPad. Even in this tech era, where lightweight and handy laptops have taken the whole market, some people still love to work on PCs. Gamers, YouTubers get their PCs customized so that they can work with greater speed and efficiency. What if someone with a laptop or a PC wants to do screen recording? What options will they have?
Well, the best option for any Windows or Mac user is the Screen Recorder by Wondershare Filmora . The software promises to deliver high-quality recording video to its users. Let us share more about Filmora Screen Recorder.
For Win 7 or later (64-bit)
For macOS 10.12 or later
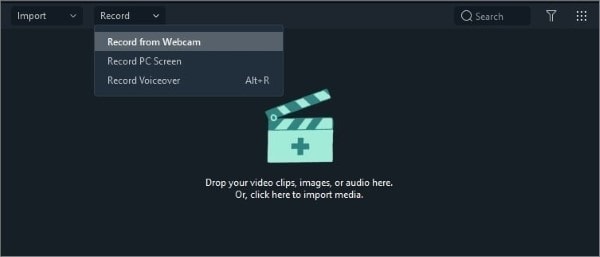
Recording Options
The software has three different screen recording options. It lets you’ Record from Webcam’. With this option, you can record both your video as well as audio. The other option is to ‘Record Voiceover,’ where you can only record your voice to add narration to any video. The last option is ‘Record PC Screen,’ to record whatever is happening on your PC’s screen.
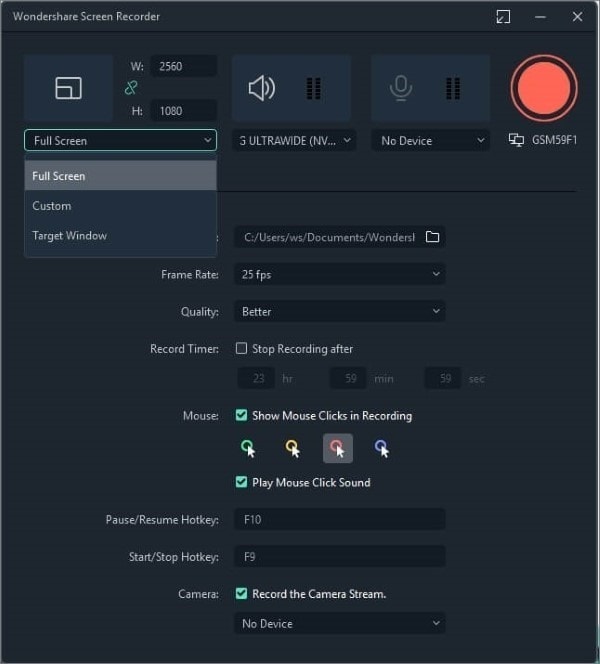
Screen Recording Options
Filmora Screen Recorder lets you record your PC’s ‘Full Screen’. You can also record any specific screen from the ‘Target Window’ option or select the ‘Custom’ option and set things as you prefer.
Recording Settings
The software does not force its users to stick with the default settings for recordings. Instead, it has given a free hand to customize the settings. You can define a ‘Record Quality.’ Users can also set a ‘Record Time,’ after which the recording will automatically stop. With Filmora Screen Recorder, you can set your desired ‘Frame Rate.’
You can press F9 to stop the recording. The final media file will be shared with your Media Library. Now comes the fun part: you can edit the screen recordings with Filomra Video Editor. Users can add various effects and transitions to their recording to enhance its quality. With Wondershare Filmora Video Editor, you can also add text and titles to your video to add more clarity.
Final Words
The article moved slow and steadily, discussing every small component related to screen recording on iPad. We walked you through the process to enable the screen recording from the settings, and also, the steps were shared.
Later we talked about a screen recorder for Windows and Mac. What could be a better option than using Wondershare Filmora screen recorderto record stuff from your laptop or PC screen.
Versatile Video Editor - Wondershare Filmora
An easy yet powerful editor
Numerous effects to choose from
Detailed tutorials provided by the official channel
02 5 Popular Screen Recorder for iPad
03 Recommend Desktop Screen Recorder -Wondershare Filmora
Part 1. How Can You Do Screen Recording on iPad?
iOS devices work differently. Like iPhones, the iPad also lets you do screen recording, but there is definitely some specific procedure that you should follow. Let us introduce the steps to you that you should follow in recording fun stuff, cool gaming videos, and other kinds of tutorials with an iPad.
Enable Screen Recording Settings
The screen recording process for iPad starts with enabling the Screen recording feature from the Settings. You can never record anything on iOS devices until the feature has been enabled. Follow the steps shared below to get this done.
Step 1: Firstly, move to the Settings app and then look for the ‘Control Center’ option. Tap on the ‘Customize Controls’ option from the Control Center screen. Hit on it.
Step 2: Now, from the ‘Customize’ section, locate ‘Screen Recording.’ If it has a green plus sign next to it, then it means that it is not enabled. Hit the plus sign to enable it, but if it has a red minus sign next to it, that means it is already enabled.
Initiate Screen Recording on iPad
If how to record screen on iPad is the question you are worried about, then the wait is over. This section of the article will guide you by sharing elaborated steps that are required for iPad screen recording.
Step 1: To start screen recording on your iPad, swipe down the ‘Control Center’ from the upper right corner of your screen.
Step 2: Then, you need to hit on the ‘Record’ button that shall start the recording. The ‘Record’ button appears like a big circle with a small shaded circle. After 3 seconds of the countdown, the button will turn red, indicating that the recording has been started.
Step 3: Lastly, when you are done with screen recording, just hit on the recording indicator and select the ‘Stop’ option. You can also stop the recording from the Control Center by tapping on the Record button again.
Part 2. 5 Popular Screen Recorder for iPad
The above section walked you through the steps that are necessary for iPad screen recording. Now, it’s time to go big and share regarding screen recorder iPad. We will introduce you to 5 popular screen recording applications for iPad in the coming section.
1. Record it! :: Screen Recorder
The Record it application lets you record application demos, gaming videos, or any other kind of tutorial. The application allows you to add reaction videos and commentary to your recording once it is complete. A few of the Record it applications features are:
- You can share your recorded video files directly to YouTube.
- The application exports media very fast and easily
- The Record application supports videos from the camera roll.
2. Screen Recorder +
Another best screen recorder for iPad is ‘Screen Recorder +.’ The screen recorder promises to deliver high-quality recorded videos. Alongside that, it also allows video editing. The application has its own fan base because of its features. Let us highlight them for you:
- Use Face Cam to record and add your reaction to the video.
- With this application, you can use the microphone to add commentary and voiceover to your videos.
- You can play and personalize your reaction part by setting the position as you want it.
3. Go Record: Screen Recorder
Let’s talk about another screen recorder for iOS users to record fun stuff, tutorials, and application demos is Go Record. It offers a very consistent set of features which are stated as follows:
- One of the unique features that this application offers is the Face Cam’s involvement.
- By using the Face Cam, you can record your facial expressions, which could be added to your final demo or tutorial. This will make your content interesting and captivating.
- The microphone could be used to add commentary to your video.

4. DU Recorder – Screen Recorder
In the recording world, we cannot move forward without discussing DU Recorder for screen recording in iPads. This iPad recorder is very reliable and even very simple to use. The application is powerful, and it promises high-quality screen recording on iPad. Its crazy features will amaze you.
- The application allows you to Livestream your screen to different platforms like YouTube, Facebook, and Twitch.
- With a DU recorder, you can also perform audio recordings.
- It supports the simultaneous use of a microphone and internal audio for recording purposes.
5. Screen Recorder – AZ Recorder
Lastly, another best screen recorder for iPad is the AZ Recorder. By using this application, you can add audio sounds as well as reaction videos to your screen. The AZ Recorder has some wowing features; let’s talk about them.
- With AZ recorder, you can import and edit external videos without any trouble.
- You can multi-task with this efficient application by capturing reactions and recording audio.
- AZ recorder allows its users to adjust and set the size of the Face Cam.
Part 3. Recommend Desktop Screen Recorder -Wondershare Filmora
Not every person owns an iPhone or an iPad. Even in this tech era, where lightweight and handy laptops have taken the whole market, some people still love to work on PCs. Gamers, YouTubers get their PCs customized so that they can work with greater speed and efficiency. What if someone with a laptop or a PC wants to do screen recording? What options will they have?
Well, the best option for any Windows or Mac user is the Screen Recorder by Wondershare Filmora . The software promises to deliver high-quality recording video to its users. Let us share more about Filmora Screen Recorder.
For Win 7 or later (64-bit)
For macOS 10.12 or later
Recording Options
The software has three different screen recording options. It lets you’ Record from Webcam’. With this option, you can record both your video as well as audio. The other option is to ‘Record Voiceover,’ where you can only record your voice to add narration to any video. The last option is ‘Record PC Screen,’ to record whatever is happening on your PC’s screen.
Screen Recording Options
Filmora Screen Recorder lets you record your PC’s ‘Full Screen’. You can also record any specific screen from the ‘Target Window’ option or select the ‘Custom’ option and set things as you prefer.
Recording Settings
The software does not force its users to stick with the default settings for recordings. Instead, it has given a free hand to customize the settings. You can define a ‘Record Quality.’ Users can also set a ‘Record Time,’ after which the recording will automatically stop. With Filmora Screen Recorder, you can set your desired ‘Frame Rate.’
You can press F9 to stop the recording. The final media file will be shared with your Media Library. Now comes the fun part: you can edit the screen recordings with Filomra Video Editor. Users can add various effects and transitions to their recording to enhance its quality. With Wondershare Filmora Video Editor, you can also add text and titles to your video to add more clarity.
Final Words
The article moved slow and steadily, discussing every small component related to screen recording on iPad. We walked you through the process to enable the screen recording from the settings, and also, the steps were shared.
Later we talked about a screen recorder for Windows and Mac. What could be a better option than using Wondershare Filmora screen recorderto record stuff from your laptop or PC screen.
Versatile Video Editor - Wondershare Filmora
An easy yet powerful editor
Numerous effects to choose from
Detailed tutorials provided by the official channel
02 5 Popular Screen Recorder for iPad
03 Recommend Desktop Screen Recorder -Wondershare Filmora
Part 1. How Can You Do Screen Recording on iPad?
iOS devices work differently. Like iPhones, the iPad also lets you do screen recording, but there is definitely some specific procedure that you should follow. Let us introduce the steps to you that you should follow in recording fun stuff, cool gaming videos, and other kinds of tutorials with an iPad.
Enable Screen Recording Settings
The screen recording process for iPad starts with enabling the Screen recording feature from the Settings. You can never record anything on iOS devices until the feature has been enabled. Follow the steps shared below to get this done.
Step 1: Firstly, move to the Settings app and then look for the ‘Control Center’ option. Tap on the ‘Customize Controls’ option from the Control Center screen. Hit on it.
Step 2: Now, from the ‘Customize’ section, locate ‘Screen Recording.’ If it has a green plus sign next to it, then it means that it is not enabled. Hit the plus sign to enable it, but if it has a red minus sign next to it, that means it is already enabled.
Initiate Screen Recording on iPad
If how to record screen on iPad is the question you are worried about, then the wait is over. This section of the article will guide you by sharing elaborated steps that are required for iPad screen recording.
Step 1: To start screen recording on your iPad, swipe down the ‘Control Center’ from the upper right corner of your screen.
Step 2: Then, you need to hit on the ‘Record’ button that shall start the recording. The ‘Record’ button appears like a big circle with a small shaded circle. After 3 seconds of the countdown, the button will turn red, indicating that the recording has been started.
Step 3: Lastly, when you are done with screen recording, just hit on the recording indicator and select the ‘Stop’ option. You can also stop the recording from the Control Center by tapping on the Record button again.
Part 2. 5 Popular Screen Recorder for iPad
The above section walked you through the steps that are necessary for iPad screen recording. Now, it’s time to go big and share regarding screen recorder iPad. We will introduce you to 5 popular screen recording applications for iPad in the coming section.
1. Record it! :: Screen Recorder
The Record it application lets you record application demos, gaming videos, or any other kind of tutorial. The application allows you to add reaction videos and commentary to your recording once it is complete. A few of the Record it applications features are:
- You can share your recorded video files directly to YouTube.
- The application exports media very fast and easily
- The Record application supports videos from the camera roll.
2. Screen Recorder +
Another best screen recorder for iPad is ‘Screen Recorder +.’ The screen recorder promises to deliver high-quality recorded videos. Alongside that, it also allows video editing. The application has its own fan base because of its features. Let us highlight them for you:
- Use Face Cam to record and add your reaction to the video.
- With this application, you can use the microphone to add commentary and voiceover to your videos.
- You can play and personalize your reaction part by setting the position as you want it.
3. Go Record: Screen Recorder
Let’s talk about another screen recorder for iOS users to record fun stuff, tutorials, and application demos is Go Record. It offers a very consistent set of features which are stated as follows:
- One of the unique features that this application offers is the Face Cam’s involvement.
- By using the Face Cam, you can record your facial expressions, which could be added to your final demo or tutorial. This will make your content interesting and captivating.
- The microphone could be used to add commentary to your video.
4. DU Recorder – Screen Recorder
In the recording world, we cannot move forward without discussing DU Recorder for screen recording in iPads. This iPad recorder is very reliable and even very simple to use. The application is powerful, and it promises high-quality screen recording on iPad. Its crazy features will amaze you.
- The application allows you to Livestream your screen to different platforms like YouTube, Facebook, and Twitch.
- With a DU recorder, you can also perform audio recordings.
- It supports the simultaneous use of a microphone and internal audio for recording purposes.
5. Screen Recorder – AZ Recorder
Lastly, another best screen recorder for iPad is the AZ Recorder. By using this application, you can add audio sounds as well as reaction videos to your screen. The AZ Recorder has some wowing features; let’s talk about them.
- With AZ recorder, you can import and edit external videos without any trouble.
- You can multi-task with this efficient application by capturing reactions and recording audio.
- AZ recorder allows its users to adjust and set the size of the Face Cam.
Part 3. Recommend Desktop Screen Recorder -Wondershare Filmora
Not every person owns an iPhone or an iPad. Even in this tech era, where lightweight and handy laptops have taken the whole market, some people still love to work on PCs. Gamers, YouTubers get their PCs customized so that they can work with greater speed and efficiency. What if someone with a laptop or a PC wants to do screen recording? What options will they have?
Well, the best option for any Windows or Mac user is the Screen Recorder by Wondershare Filmora . The software promises to deliver high-quality recording video to its users. Let us share more about Filmora Screen Recorder.
For Win 7 or later (64-bit)
For macOS 10.12 or later
Recording Options
The software has three different screen recording options. It lets you’ Record from Webcam’. With this option, you can record both your video as well as audio. The other option is to ‘Record Voiceover,’ where you can only record your voice to add narration to any video. The last option is ‘Record PC Screen,’ to record whatever is happening on your PC’s screen.
Screen Recording Options
Filmora Screen Recorder lets you record your PC’s ‘Full Screen’. You can also record any specific screen from the ‘Target Window’ option or select the ‘Custom’ option and set things as you prefer.
Recording Settings
The software does not force its users to stick with the default settings for recordings. Instead, it has given a free hand to customize the settings. You can define a ‘Record Quality.’ Users can also set a ‘Record Time,’ after which the recording will automatically stop. With Filmora Screen Recorder, you can set your desired ‘Frame Rate.’
You can press F9 to stop the recording. The final media file will be shared with your Media Library. Now comes the fun part: you can edit the screen recordings with Filomra Video Editor. Users can add various effects and transitions to their recording to enhance its quality. With Wondershare Filmora Video Editor, you can also add text and titles to your video to add more clarity.
Final Words
The article moved slow and steadily, discussing every small component related to screen recording on iPad. We walked you through the process to enable the screen recording from the settings, and also, the steps were shared.
Later we talked about a screen recorder for Windows and Mac. What could be a better option than using Wondershare Filmora screen recorderto record stuff from your laptop or PC screen.
Versatile Video Editor - Wondershare Filmora
An easy yet powerful editor
Numerous effects to choose from
Detailed tutorials provided by the official channel
02 5 Popular Screen Recorder for iPad
03 Recommend Desktop Screen Recorder -Wondershare Filmora
Part 1. How Can You Do Screen Recording on iPad?
iOS devices work differently. Like iPhones, the iPad also lets you do screen recording, but there is definitely some specific procedure that you should follow. Let us introduce the steps to you that you should follow in recording fun stuff, cool gaming videos, and other kinds of tutorials with an iPad.
Enable Screen Recording Settings
The screen recording process for iPad starts with enabling the Screen recording feature from the Settings. You can never record anything on iOS devices until the feature has been enabled. Follow the steps shared below to get this done.
Step 1: Firstly, move to the Settings app and then look for the ‘Control Center’ option. Tap on the ‘Customize Controls’ option from the Control Center screen. Hit on it.
Step 2: Now, from the ‘Customize’ section, locate ‘Screen Recording.’ If it has a green plus sign next to it, then it means that it is not enabled. Hit the plus sign to enable it, but if it has a red minus sign next to it, that means it is already enabled.
Initiate Screen Recording on iPad
If how to record screen on iPad is the question you are worried about, then the wait is over. This section of the article will guide you by sharing elaborated steps that are required for iPad screen recording.
Step 1: To start screen recording on your iPad, swipe down the ‘Control Center’ from the upper right corner of your screen.
Step 2: Then, you need to hit on the ‘Record’ button that shall start the recording. The ‘Record’ button appears like a big circle with a small shaded circle. After 3 seconds of the countdown, the button will turn red, indicating that the recording has been started.
Step 3: Lastly, when you are done with screen recording, just hit on the recording indicator and select the ‘Stop’ option. You can also stop the recording from the Control Center by tapping on the Record button again.
Part 2. 5 Popular Screen Recorder for iPad
The above section walked you through the steps that are necessary for iPad screen recording. Now, it’s time to go big and share regarding screen recorder iPad. We will introduce you to 5 popular screen recording applications for iPad in the coming section.

1. Record it! :: Screen Recorder
The Record it application lets you record application demos, gaming videos, or any other kind of tutorial. The application allows you to add reaction videos and commentary to your recording once it is complete. A few of the Record it applications features are:
- You can share your recorded video files directly to YouTube.
- The application exports media very fast and easily
- The Record application supports videos from the camera roll.
2. Screen Recorder +
Another best screen recorder for iPad is ‘Screen Recorder +.’ The screen recorder promises to deliver high-quality recorded videos. Alongside that, it also allows video editing. The application has its own fan base because of its features. Let us highlight them for you:
- Use Face Cam to record and add your reaction to the video.
- With this application, you can use the microphone to add commentary and voiceover to your videos.
- You can play and personalize your reaction part by setting the position as you want it.
3. Go Record: Screen Recorder
Let’s talk about another screen recorder for iOS users to record fun stuff, tutorials, and application demos is Go Record. It offers a very consistent set of features which are stated as follows:
- One of the unique features that this application offers is the Face Cam’s involvement.
- By using the Face Cam, you can record your facial expressions, which could be added to your final demo or tutorial. This will make your content interesting and captivating.
- The microphone could be used to add commentary to your video.
4. DU Recorder – Screen Recorder
In the recording world, we cannot move forward without discussing DU Recorder for screen recording in iPads. This iPad recorder is very reliable and even very simple to use. The application is powerful, and it promises high-quality screen recording on iPad. Its crazy features will amaze you.
- The application allows you to Livestream your screen to different platforms like YouTube, Facebook, and Twitch.
- With a DU recorder, you can also perform audio recordings.
- It supports the simultaneous use of a microphone and internal audio for recording purposes.
5. Screen Recorder – AZ Recorder
Lastly, another best screen recorder for iPad is the AZ Recorder. By using this application, you can add audio sounds as well as reaction videos to your screen. The AZ Recorder has some wowing features; let’s talk about them.
- With AZ recorder, you can import and edit external videos without any trouble.
- You can multi-task with this efficient application by capturing reactions and recording audio.
- AZ recorder allows its users to adjust and set the size of the Face Cam.
Part 3. Recommend Desktop Screen Recorder -Wondershare Filmora
Not every person owns an iPhone or an iPad. Even in this tech era, where lightweight and handy laptops have taken the whole market, some people still love to work on PCs. Gamers, YouTubers get their PCs customized so that they can work with greater speed and efficiency. What if someone with a laptop or a PC wants to do screen recording? What options will they have?
Well, the best option for any Windows or Mac user is the Screen Recorder by Wondershare Filmora . The software promises to deliver high-quality recording video to its users. Let us share more about Filmora Screen Recorder.
For Win 7 or later (64-bit)
For macOS 10.12 or later
Recording Options
The software has three different screen recording options. It lets you’ Record from Webcam’. With this option, you can record both your video as well as audio. The other option is to ‘Record Voiceover,’ where you can only record your voice to add narration to any video. The last option is ‘Record PC Screen,’ to record whatever is happening on your PC’s screen.
Screen Recording Options
Filmora Screen Recorder lets you record your PC’s ‘Full Screen’. You can also record any specific screen from the ‘Target Window’ option or select the ‘Custom’ option and set things as you prefer.
Recording Settings
The software does not force its users to stick with the default settings for recordings. Instead, it has given a free hand to customize the settings. You can define a ‘Record Quality.’ Users can also set a ‘Record Time,’ after which the recording will automatically stop. With Filmora Screen Recorder, you can set your desired ‘Frame Rate.’
You can press F9 to stop the recording. The final media file will be shared with your Media Library. Now comes the fun part: you can edit the screen recordings with Filomra Video Editor. Users can add various effects and transitions to their recording to enhance its quality. With Wondershare Filmora Video Editor, you can also add text and titles to your video to add more clarity.
Final Words
The article moved slow and steadily, discussing every small component related to screen recording on iPad. We walked you through the process to enable the screen recording from the settings, and also, the steps were shared.
Later we talked about a screen recorder for Windows and Mac. What could be a better option than using Wondershare Filmora screen recorderto record stuff from your laptop or PC screen.
Versatile Video Editor - Wondershare Filmora
An easy yet powerful editor
Numerous effects to choose from
Detailed tutorials provided by the official channel
- Title: [New] In 2024, Step-by-Step for Efficient iPad Screen Recordings
- Author: Agatha
- Created at : 2024-07-18 09:08:29
- Updated at : 2024-07-19 09:08:29
- Link: https://video-screen-grab.techidaily.com/new-in-2024-step-by-step-for-efficient-ipad-screen-recordings/
- License: This work is licensed under CC BY-NC-SA 4.0.