
!["[Updated] 2024 Approved Navigating Zoom Technology for Professional Use"](https://www.lifewire.com/thmb/NVfSH4Rjse-W0WAejPd1W9V_3ag=/400x300/filters:no_upscale():max_bytes(150000):strip_icc():format(webp)/GettyImages-1253176532-e5ce8e507433489f87c8b37818c13a01.jpg)
"[Updated] 2024 Approved Navigating Zoom Technology for Professional Use"
Navigating Zoom Technology for Professional Use
How to Set Up a Zoom Meeting

Richard Bennett
Mar 27, 2024• Proven solutions
You may need to learn how to set up a Zoom meeting when you are on a leave or are told to work from home, but still need to communicate with your colleagues in order to discuss on serious topics and/or to take import decisions.
Available for Mac, iOS, Android, Windows, and Linux platforms, Zoom lets you easily overcome the barriers of distance as the app allows free video conferencing with up to 100 participants irrespective of their geographical location. The limit of 100 participants can be increased to 300 and 1000 with the paid Business and Enterprise Plus subscription plans respectively.
Going further, this guide explains in detail how to set up a Zoom call or conference, and how to make the entire meeting session simplified and more useful by making minor adjustments to the app. Besides, you will also learn how to set up a Zoom meeting in Outlook and Google Calendar, or how to schedule Zoom meetings for the future.
- Part 1: How to Set Up Zoom Meeting
- Part 2: Tips for Better Zoom Meeting Setup
- Part 3: Schedule and Set Up a Zoom Meeting for the Future
- Part 4: How to Set Up Zoom Meetings on Google Calendar
- Part 5: Set Up a Zoom Meeting in Outlook
You may also like: 8 Best Video Conference App for Android and iPhone (Picked)
Part 1: How to Set Up Zoom Meeting
The good news is, if you are merely a participant of a Zoom meeting that has been hosted by someone else, you don’t necessarily need to download and install the app. You can join the conference by following the URL using your favorite web browser, and typing in the meeting ID and password you are provided with via email or any other method chosen by the host.
On the other hand, if it’s you who is hosting a conference (in other words, starting a conference and want to invite others to join the meeting), Zoom must be installed on your device.
You can learn how to set up a Zoom meeting right from the scratch by following the steps given below:
Step 1: Download and Install Zoom
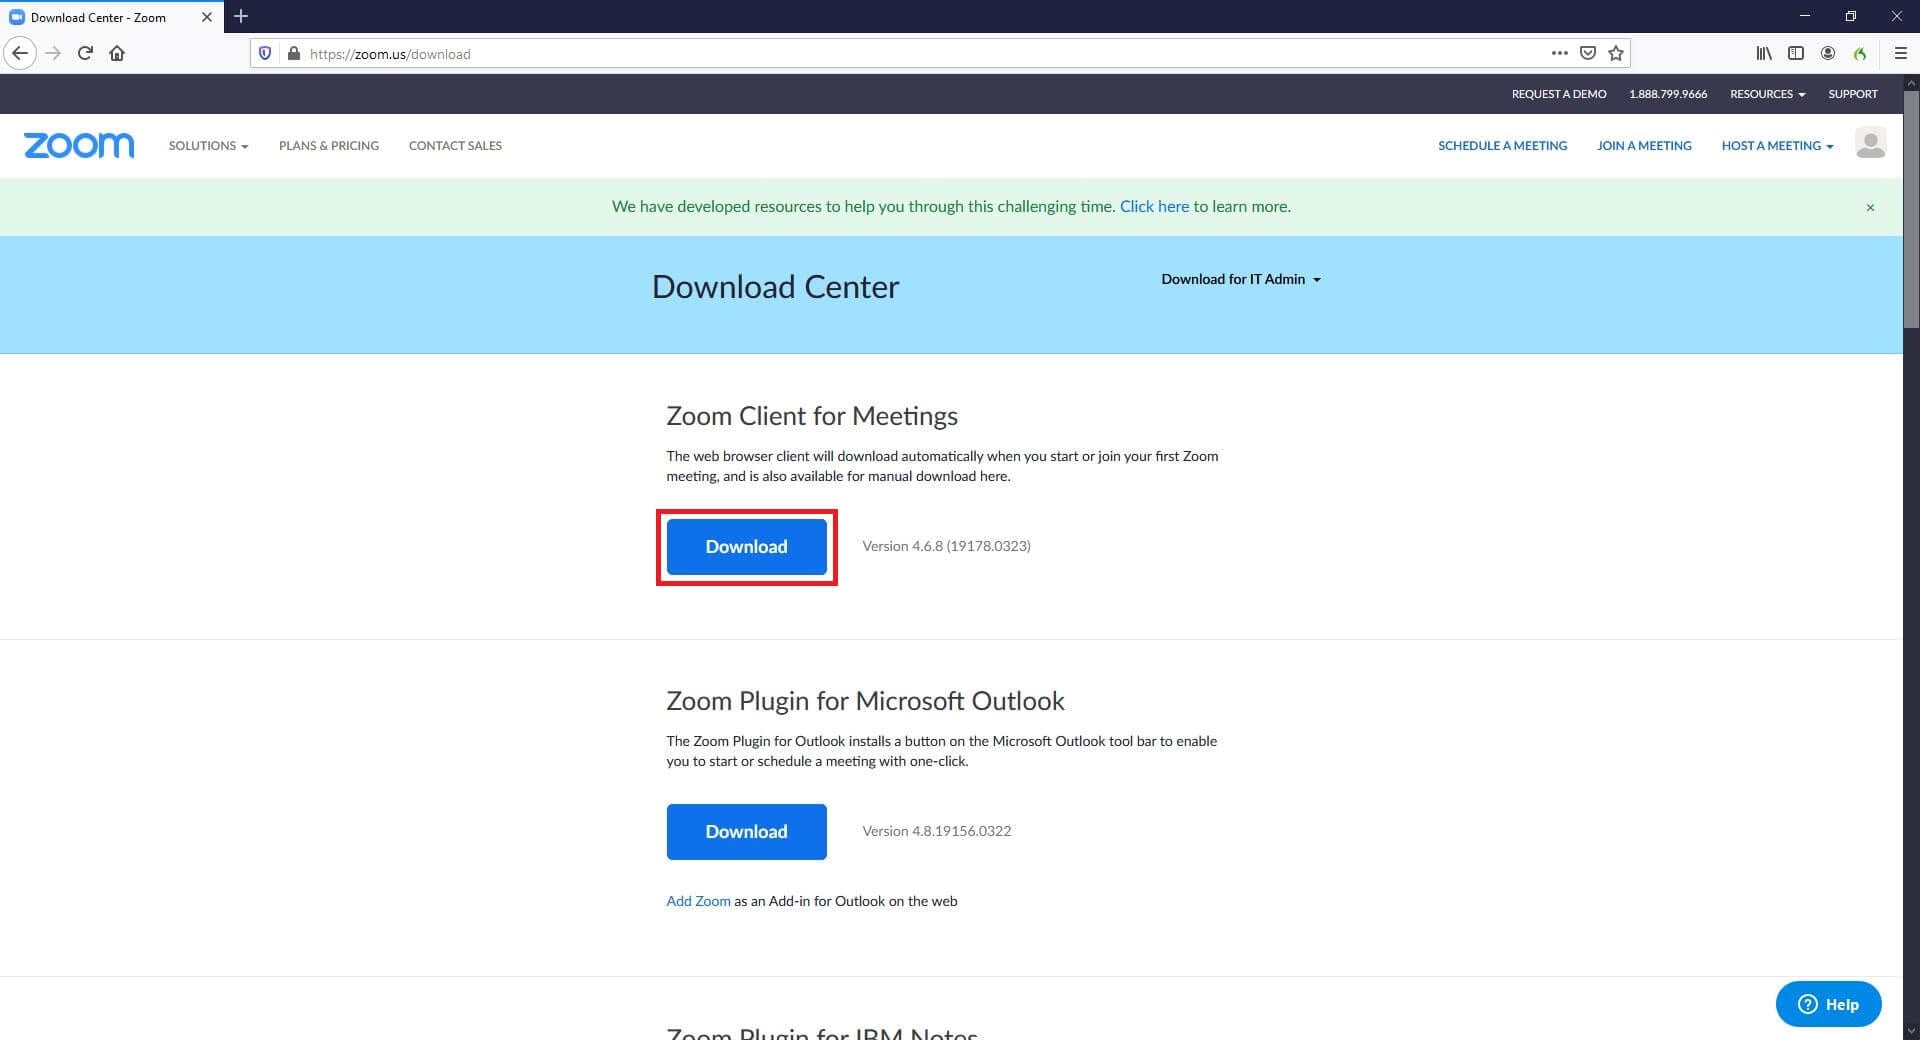
Launch your favorite web browser (Mozilla Firefox here) on your computer (a Windows 10 PC is used here), go to https://zoom.us/download , click Download, and follow the on-screen instructions to download Zoom to your local hard drive. Post this, use the ZoomInstaller.exe file to install the program, and then proceed to the next step.
Step 2: Launch Zoom and Sign Up
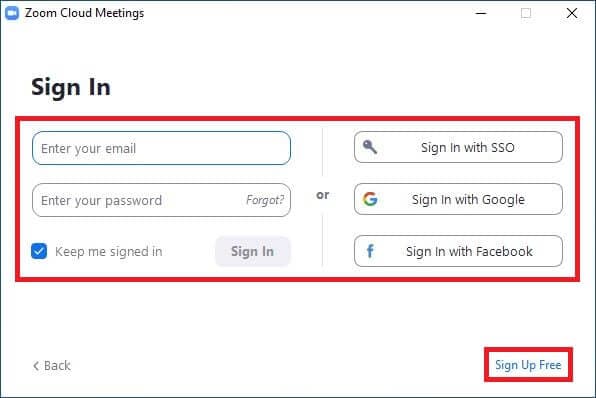
Double-click the Zoom shortcut icon on the desktop, click Sign In, and use any of the options given in the right section of the next box to sign up for a free Zoom account. Once this is done, back on the box, enter your email address and password you signed up with in their corresponding fields in the left, and click Sign In to access your Zoom account.
Step 3: Set Up New Meeting
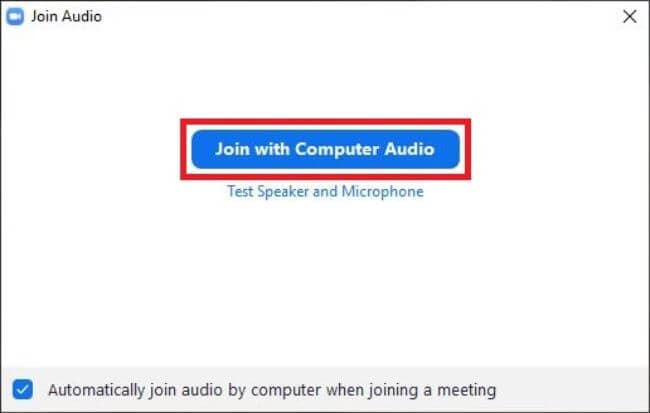
Click New Meeting on the main interface, wait while the app connects to the server, and optionally click Join with Computer Audio to use voice and audio during the conference.
Next, click Invite from the bottom of the screen, go to the Email tab from the top of the next box that comes up, click your email service provider (Gmail for this example), enter the email addresses of the desired participants in the To field on the email draft box, and click Send.
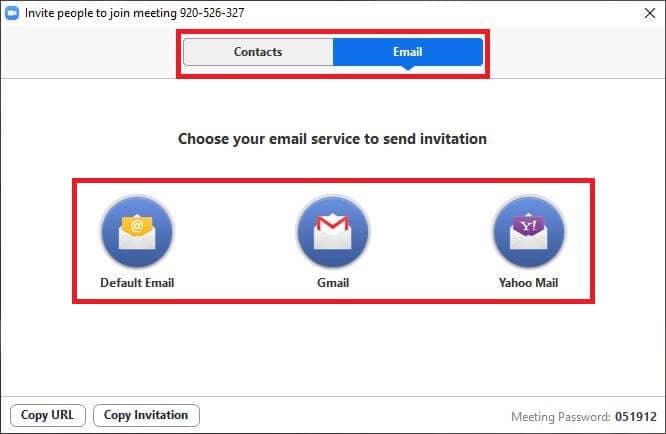
Note: Alternatively, you can use the Contacts tab to invite the participants who are already added in your contact list, or use the Copy URL or Copy Invitation buttons at the bottom to send the invitation manually.
As the target participants receive the mail, they can use the URL and the meeting ID and password to join the Zoom conference. During the process, they can either download the app using the link that the browser displays, or click join from your browser that appears when you click, click here, and follow along using your web browser without installing the program.
Part 2: Tips for Better Zoom Meeting Setup
Learning how to set up a Zoom meeting is fairly easy alright, but do you know that the Zoom meetings can be optimized to get the best remote discussion experience?
Following are a few tips that would help you improve the quality of the conferences, and make the visuals more professionals and/or pleasing to the eyes:
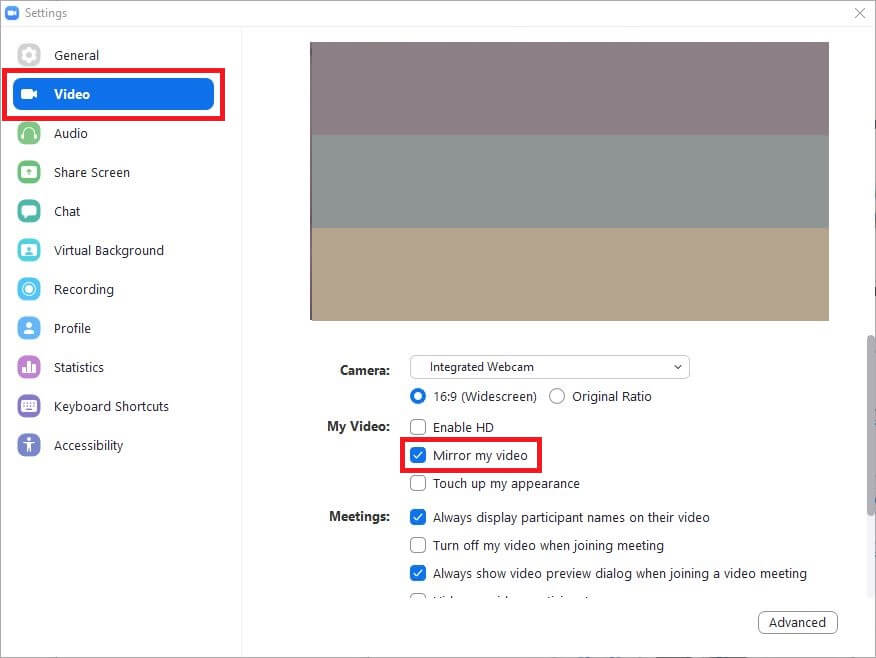
1. Mirror Effect
Enabled by default, the mirror effect lets you flip the video display that the webcam/camera of your device captures during the conference. You can enable or disable the feature by clicking the Settings icon from the top-right corner of the Zoom window (when not in a conference), selecting Video from the left pane, and checking or unchecking the Mirror my video box from the right respectively.
Want to flip or mirror your video footage after recording? Try Filmora to Flip Video Quickly and Easily.
2. Appearance Touchup
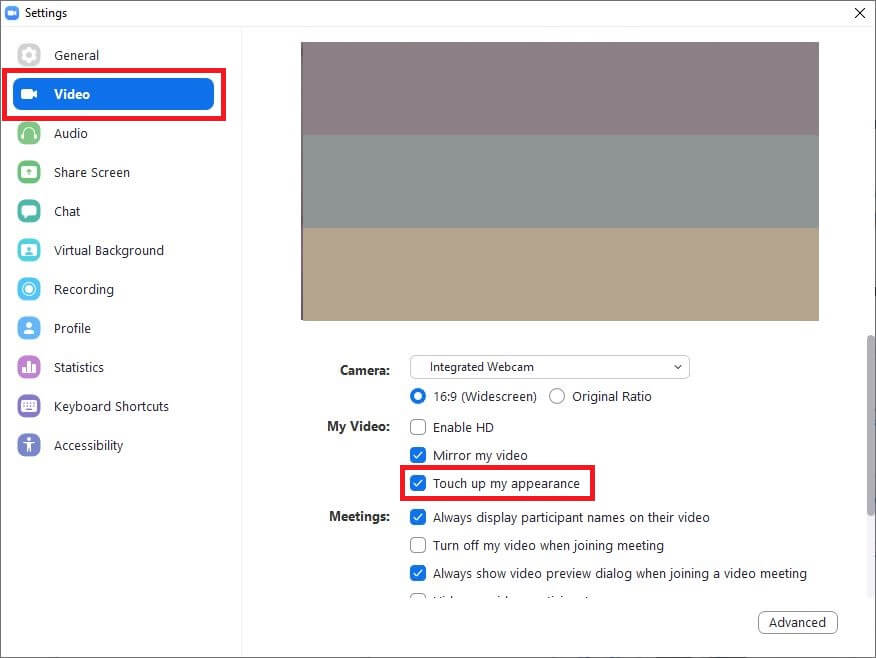
This feature makes the visuals captured by your webcam or camera less crispy. This comes in handy when you don’t want to distract other participants of the meeting with the imperfections your clothes or sleepy face have when you’re right out of the bed. You can enable or disable this function by checking or unchecking the Touch up my appearance box present in the right section of the Video category on the Settings window respectively.
3. Virtual Backgrounds
Virtual backgrounds let you hide those untidy and wrinkled bedsheets or wet towels that are usually scattered around when you’re at home. When enabled, you can choose a pleasant scene or environment that is visible to other participants during your video conferences.
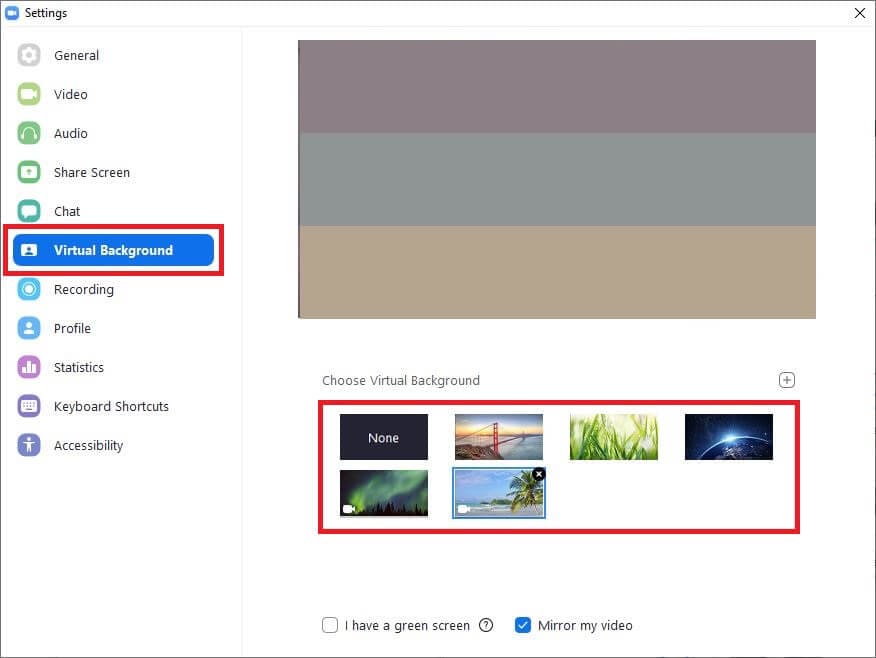
To select virtual background, you can go to the Settings box, click Virtual Background category from the left pane, and choose your preferred background from the right. Zoom might take a while to download the required packs if you’re using the feature for the first time. If you’ve a physical green screen background, you can check I have a green screen, and then select the correct color for it.
Bonus: green screen is widely used in filming and TV shows, you can get more info about this magical skill in Green Screen Tutorial .
4. Prevent Screen Sharing
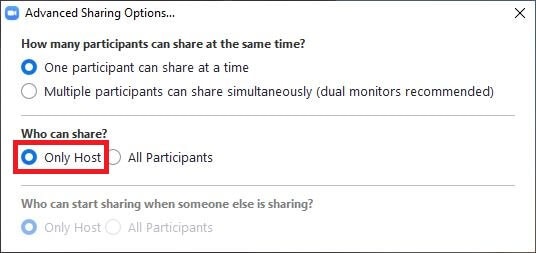
You can keep all the mischievous or ignorant participants from sharing their screen deliberately or accidentally while you’re discussing a serious matter. To do this, while you are in an ongoing conference, click the up-facing arrow next to the Share Screen option from the bottom of the camera window, click Advanced Sharing Options, and select the Only Host radio button from the Who can share section on the box that appears next.
5. Mute Participants
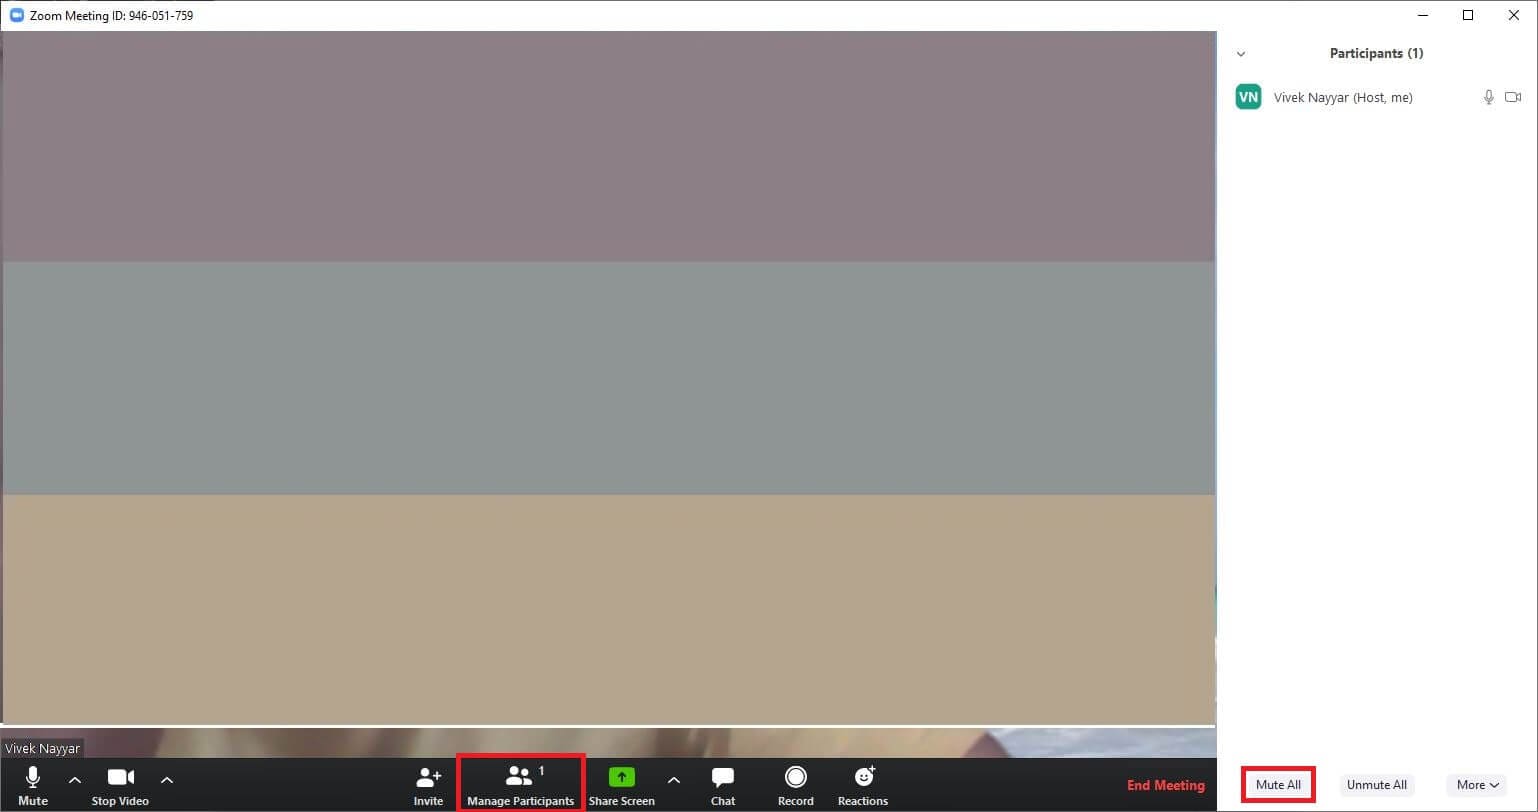
You can prevent all the participants from turning your sophisticated and professional ambiance into a fish market by muting all the of them in one go. To do this, click Manage Participants from the bottom of the camera screen during an ongoing meeting, and click Mute All from the bottom-left corner of the Participants pane that appears in the right. Alternatively, you can click the Mute button present next to each participant’s name in the Participants pane to mute them individually.
Part 3: How to Schedule and Set Up a Zoom Meeting for the Future [Desktop Client]
As a host you can even schedule a conference with Zoom. You can learn how to set up a Zoom meeting for the future by following the instructions given below:
Step 1: Get to the Schedule Meeting Box
Launch Zoom (a Windows 10 computer is used here), and click Schedule from the left section of the interface to open the Schedule meeting box.
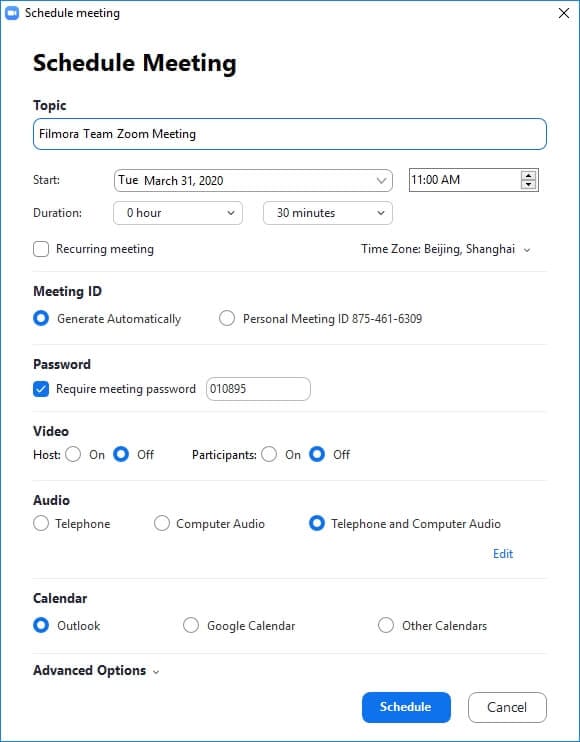
Step 2: Schedule a Meeting
Use the Start drop-down calendar to select a future date you want to schedule a meeting on, use the adjacent box to choose your preferred time of the meeting, play with other self-explanatory options to configure the meeting preferences as needed, and click Schedule from the bottom to schedule a meeting.
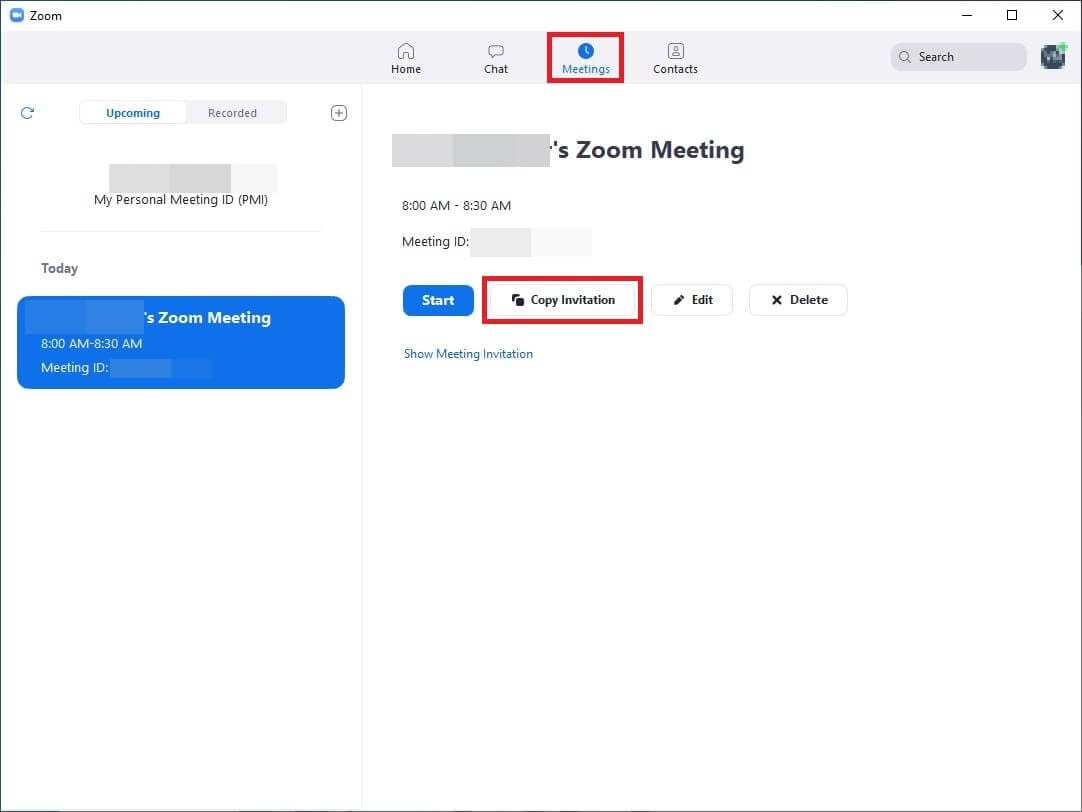
Step 3: Invite Participants to the Scheduled Meeting
Click Meetings from the top of the Zoom’s interface, ensure that the scheduled meeting is selected in the left pane, and click the Copy Invitation button from the right to copy the invitation URL and the meeting ID and password to the clipboard. Next, open your favorite web browser, sign in to your email account, compose an email for all the participants you want to invite, paste the copied content in the message box, and send the invitation to the recipients.
Part 4: How to Set Up Zoom Meetings on Google Calendar
In order to set up a Zoom meeting, you don’t always have to launch the program, and you can get the job done right from Google Calendar itself. However, you must have a Zoom ID, and you must also be signed in to it in order to create an event that leads to a conference.
Need to Sync Zoom meetings to your Calendar? We’ve figured out how to do that on desktop/iPhone/Android phones, you can check it here: Syncing Zoom to Your Calendar
The entire process of how to set up a Zoom meeting with Google Calendar is explained below:
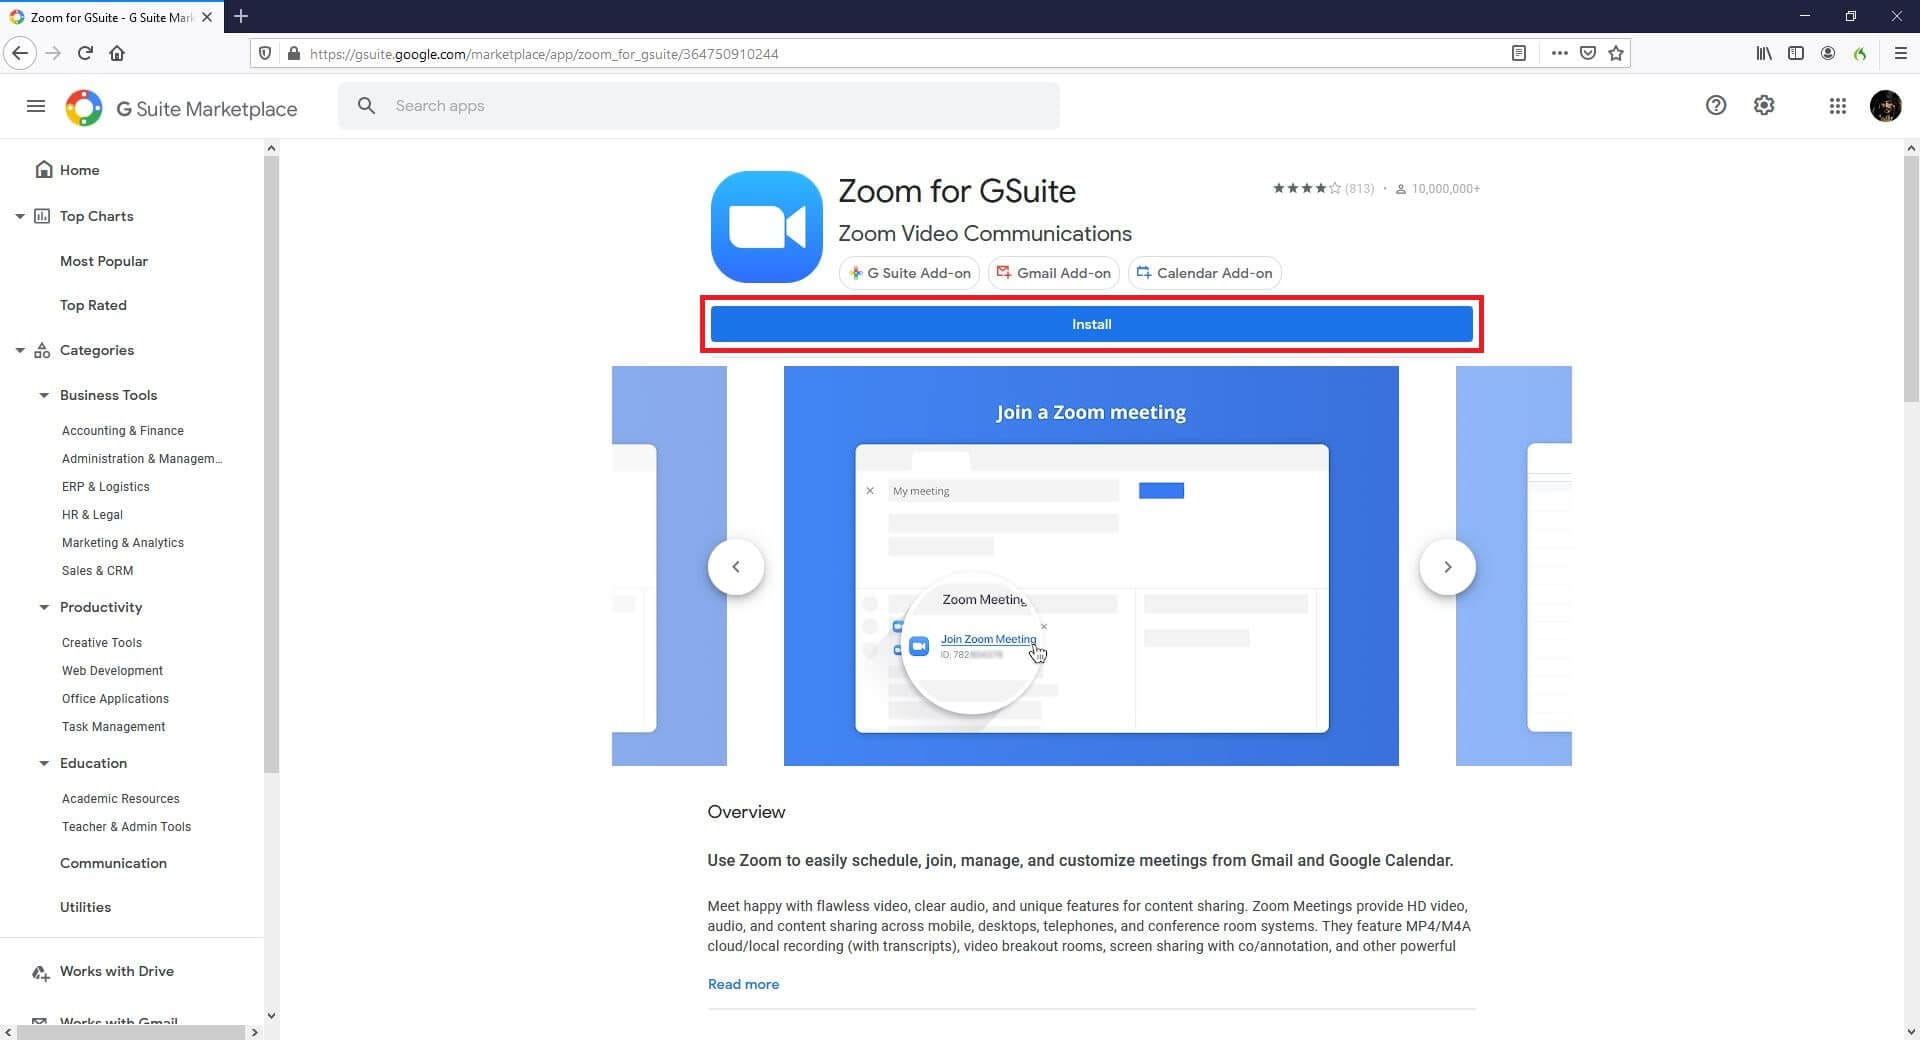
Step 1: Install Zoom for GSuite Add-on
Start your favorite web browser, go to https://gsuite.google.com/marketplace/app/zoom%5Ffor%5Fgsuite/364750910244 , click Install, click CONTINUE from the bottom-right corner of the Get ready to install box that comes up next, and follow the on-screen instructions go install Zoom for GSuite on the browser.
Step 2: Launch Google Calendar and Sign In to Zoom Account
Open a new tab on your browser, sign in to your Google account (Gmail is used here for demonstration), click the Google apps icon from the top-right corner, click Calendar from the available programs, click the Zoom icon from the right most pane and sign in to your Zoom account.
Step 3: Create Event and Set Up Zoom Meeting
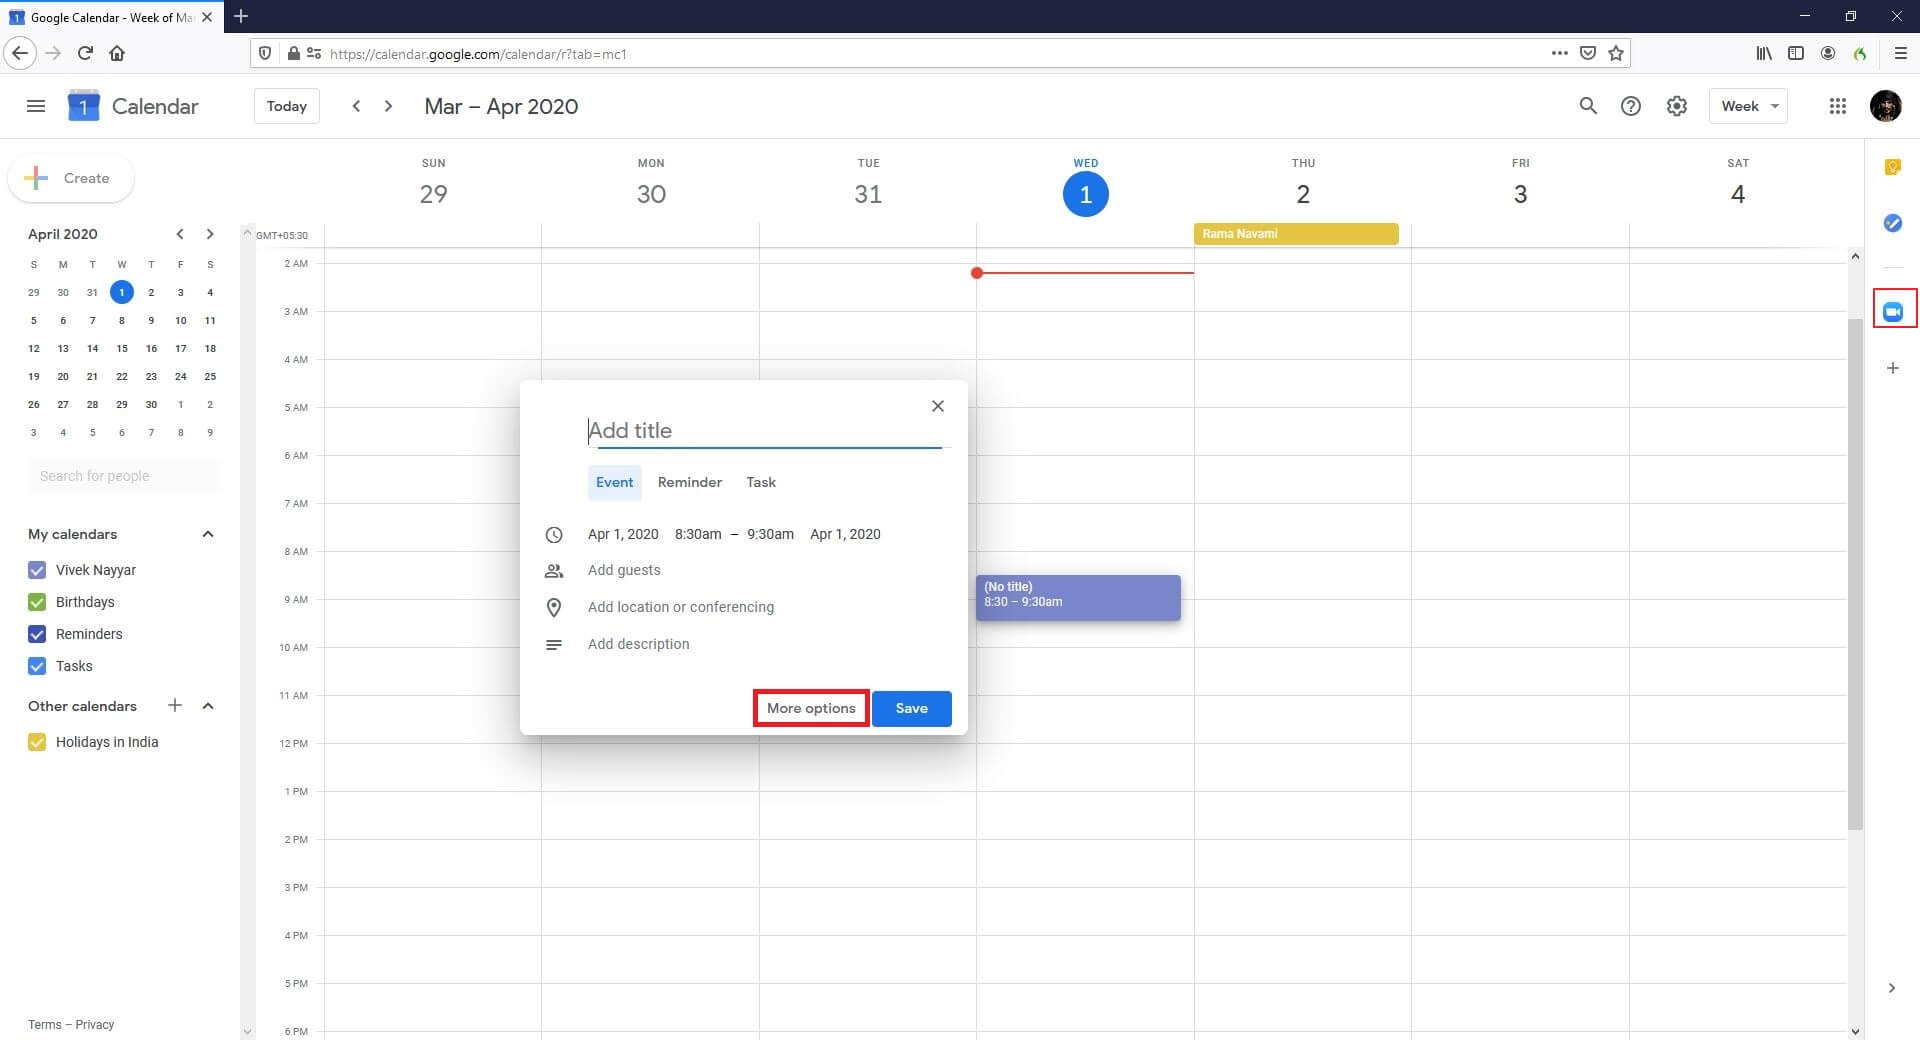
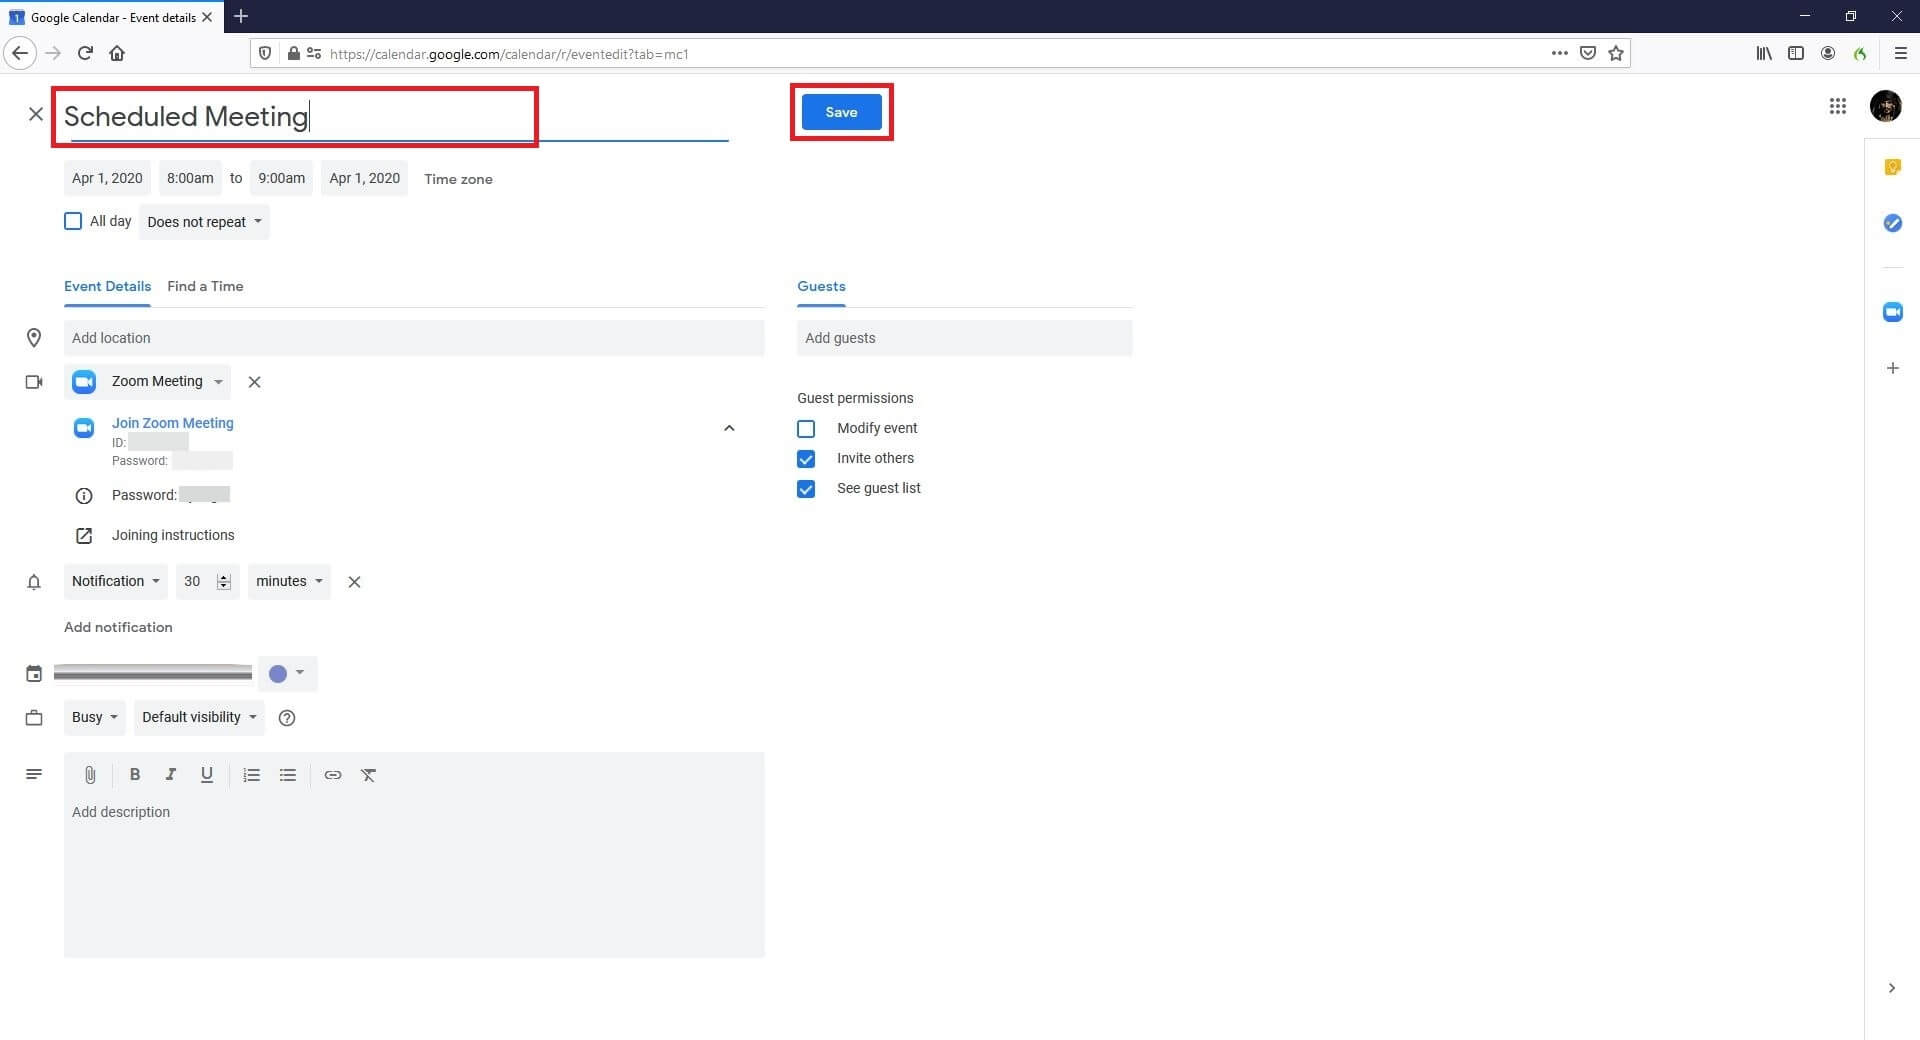
Select your preferred date in the calendar at the left, from the main window, click your preferred time slot of the day you want to host a conference, click More options from the bottom of the event creation box that comes up, select Zoom Meeting from the Add conferencing drop-down list, enter a name of the event in the Add title field at the top, and click Save.
Note: You may need to click Try again for a couple of times to successfully schedule a meeting if you see the Failed to create conference message for some reason.
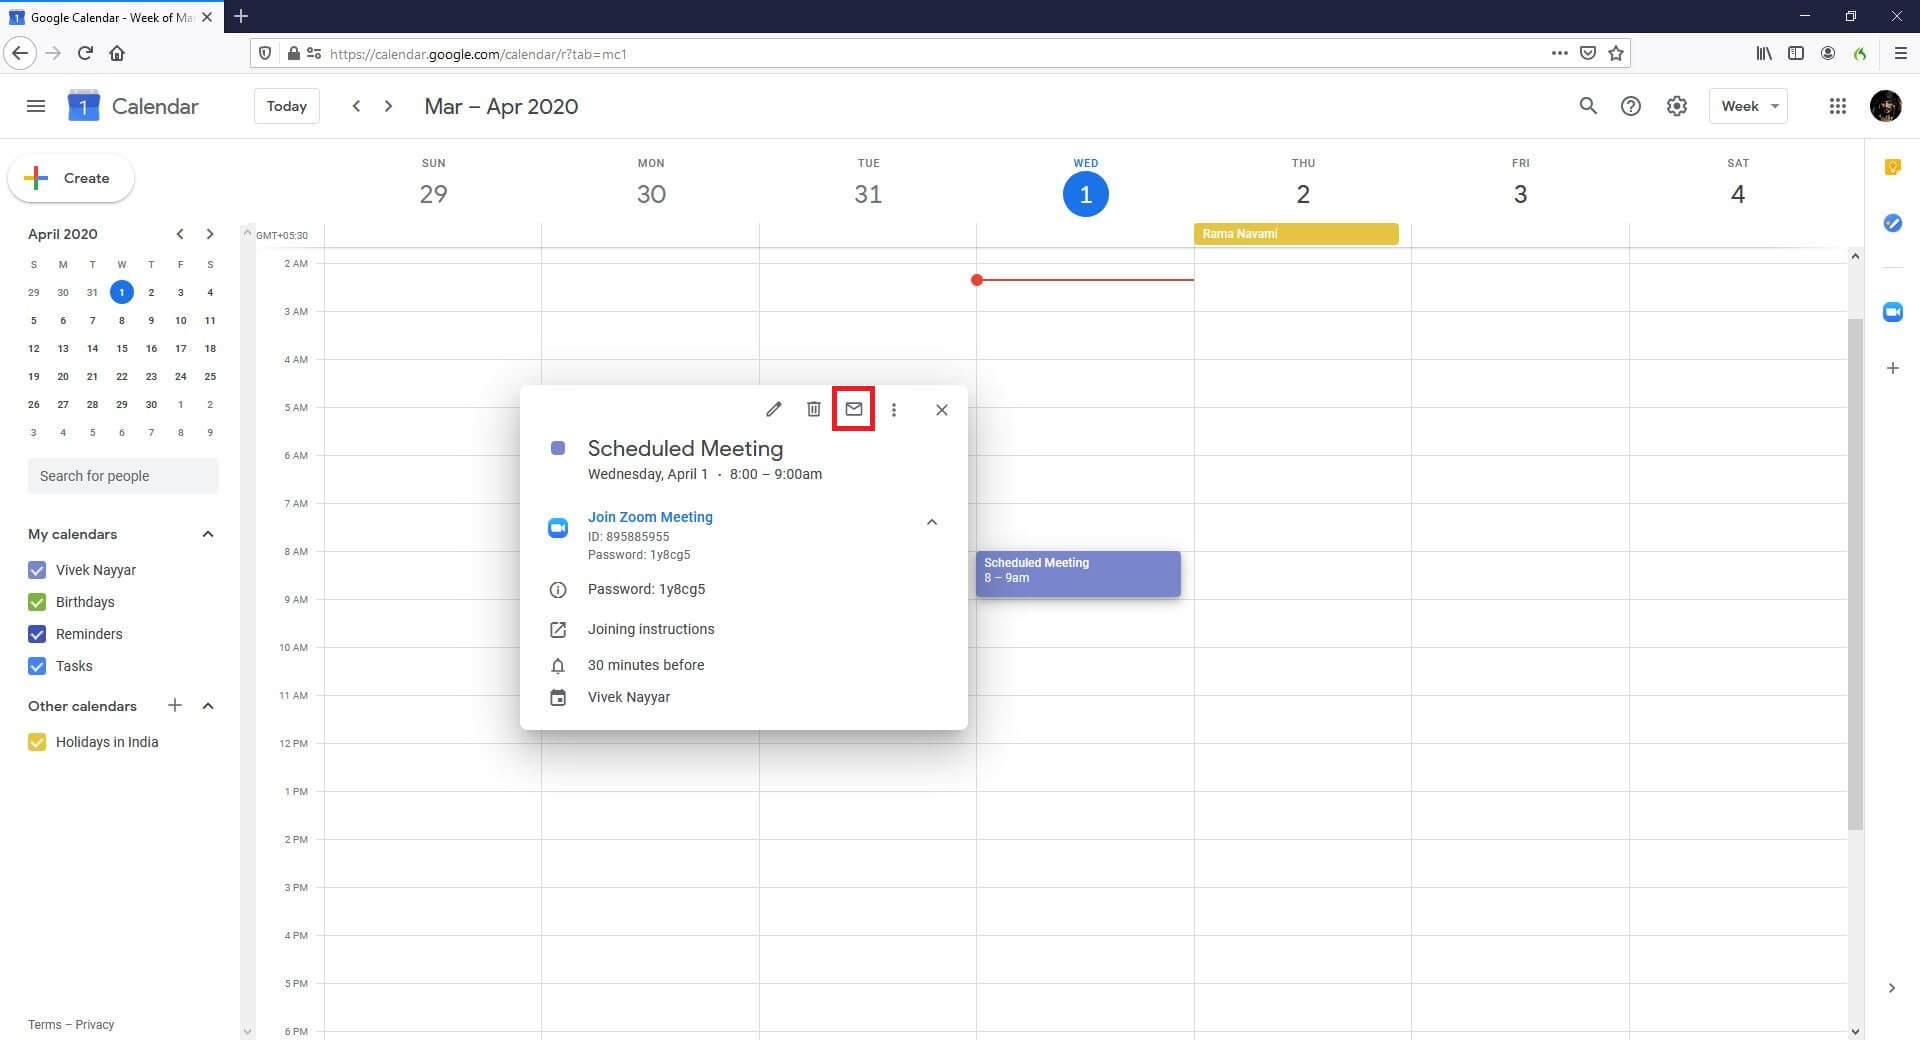
To invite participants to join the meeting, get back to Google Calendar, click the event you just created, click Joining instructions, from the tab that opens up next, copy the entire text message, get back to the Google Calendar tab, click the Mail icon from the top of the event box, paste the invitation details in the message space, and click Send from the bottom-right corner to send the mail to the recipients you want to invite to the meeting.
Part 5: How to Set Up a Zoom Meeting in Outlook
Zoom even lets you set up a meeting in Outlook. Although the desktop version of Outlook can also be used for the purpose, you must have a mapped and synced MS Exchange account to do so. Therefore, the steps given below explain how to set up a Zoom meeting in Outlook (web version):
Step 1: Install Zoom Add-in for Outlook
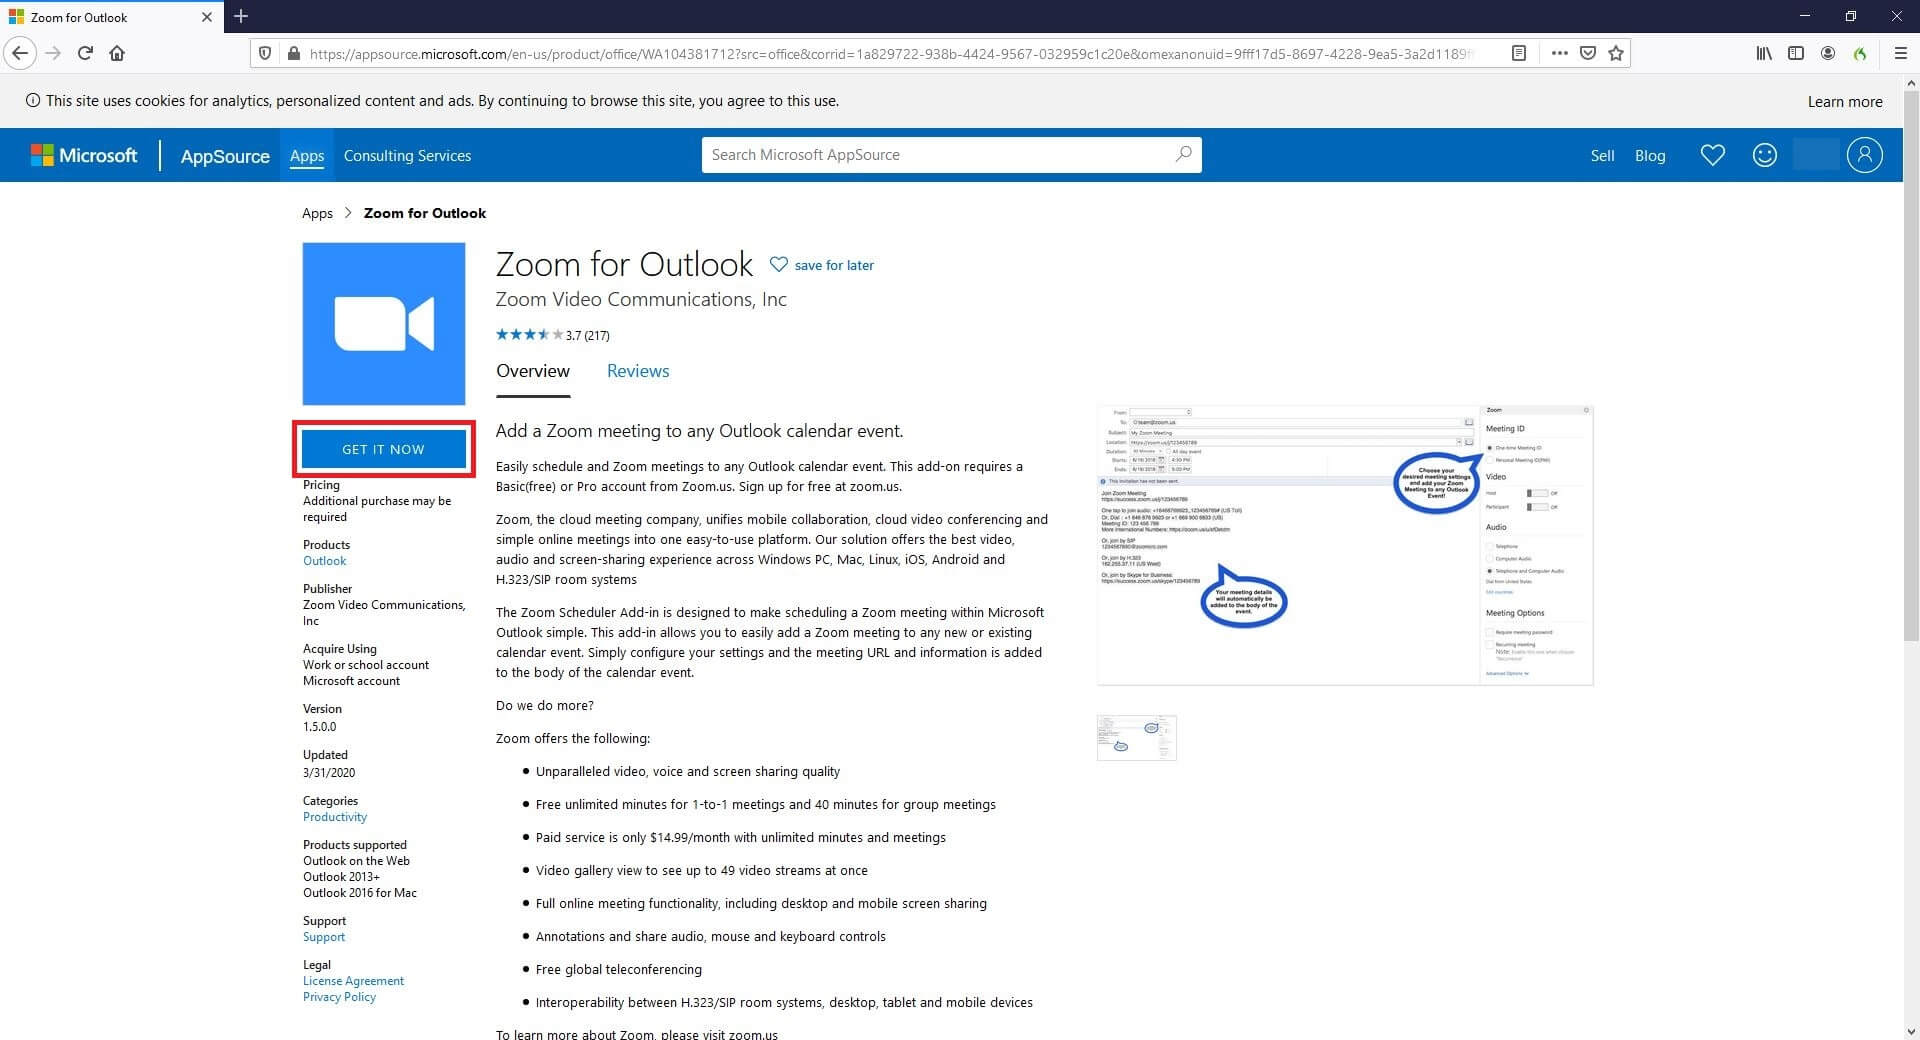
Launch your favorite web browser, click here to go to the Zoom for Outlook add-in page, click GET IT NOW from the left, and follow the on-screen instructions to sign in to your Microsoft Outlook account and install the add-in.
Step 2: Get to Event’s Calendar Box
Go to your Microsoft Outlook account using your web browser, click the Calendar icon from the bottom, on the main window, click the block representing the date you want to schedule a Zoom meeting, and click More options from the bottom-right corner of the box that pops up to go to the Calendar box.
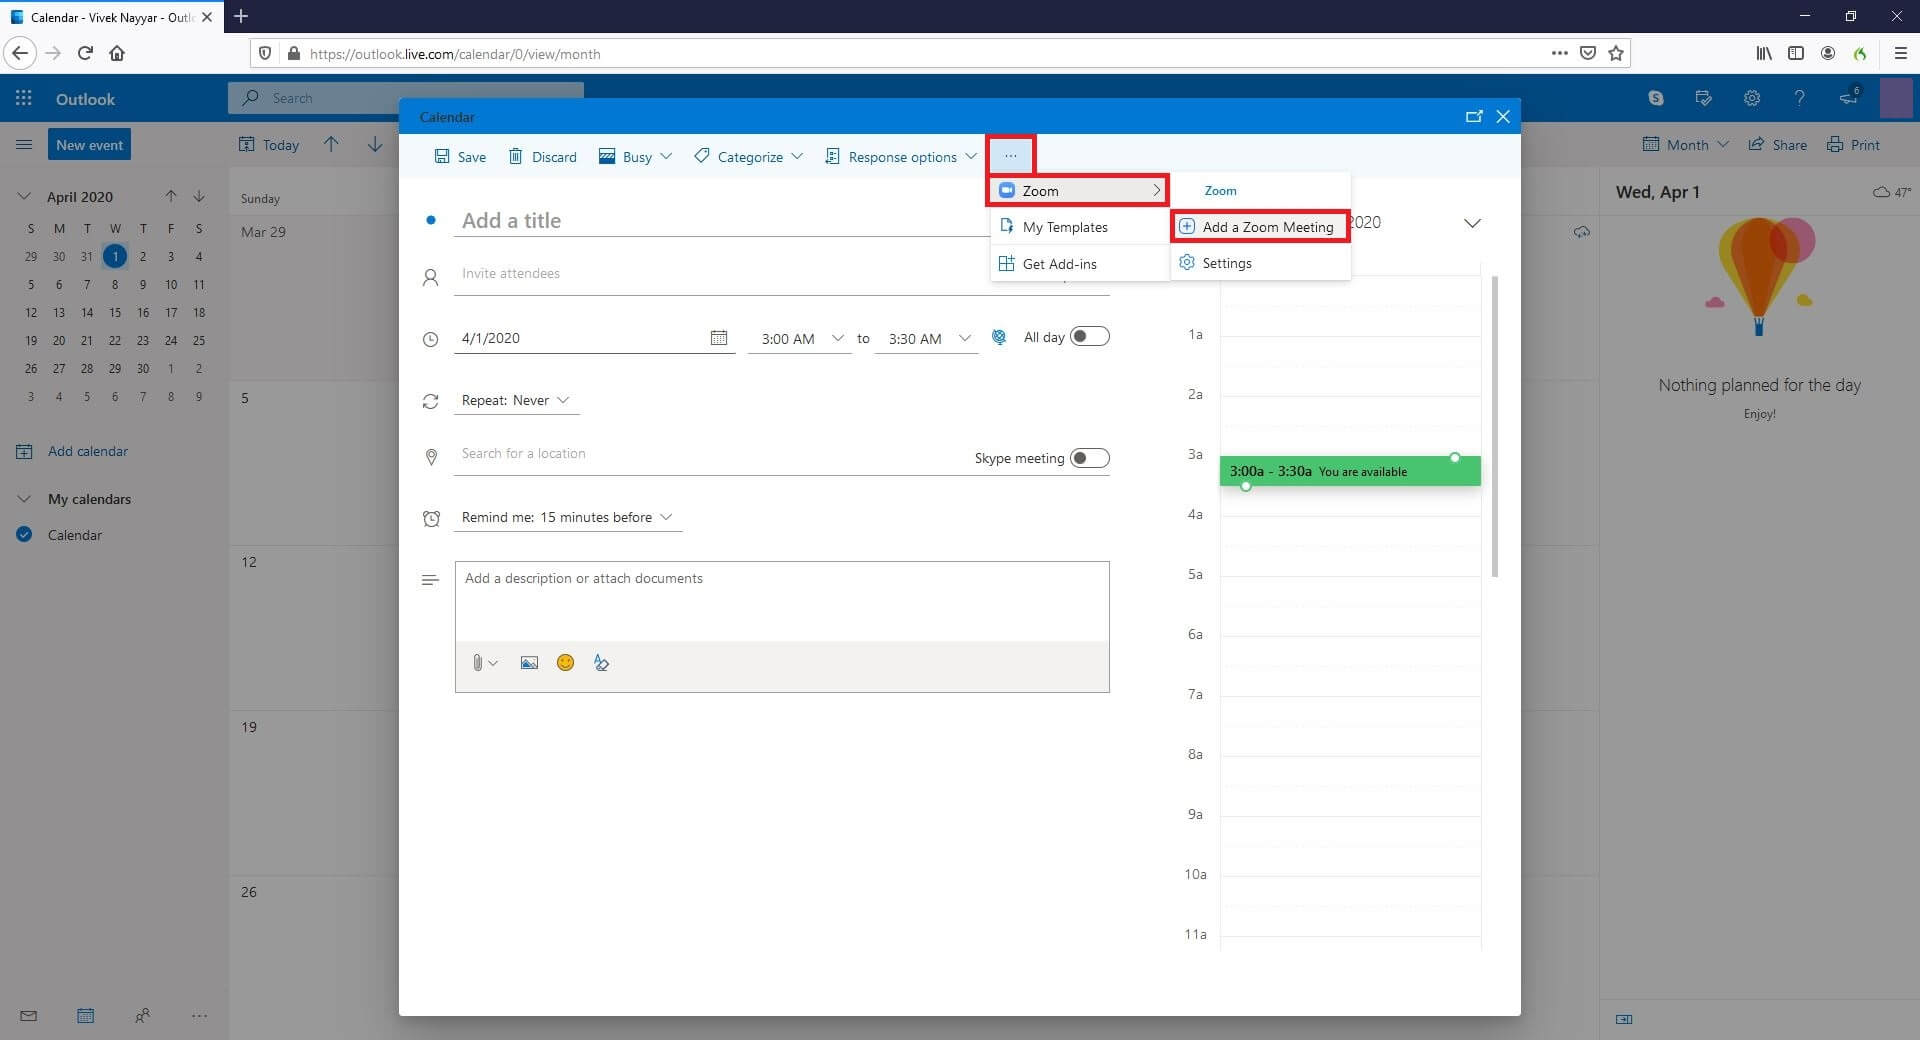
Step 3: Schedule a Zoom Meeting
Click the More icon (with three dots aligned horizontally) from the top, go to Zoom, and click Add a Zoom Meeting. Notice how the message box automatically populates with all the information related to the invitation including the URL, meeting ID, and the joining password.
We’ve composed an article about schedule a zoom meeting on different devices, you can check it here: How to Schedule Meetings on Zoom?
Note: You may need to sign in to your Zoom account if not already done yet. You will be prompted to do so with a link present above the message box. Next, type the participants’ IDs in the Invite attendees field (the IDs must be added to your Microsoft Outlook account’s contact list before they can be added here), and click Save from the top-right corner to schedule a Zoom meeting.
Conclusion
The process of how to set up a Zoom meeting is simple, and to learn how to set up a Zoom meeting in Outlook is even simpler. However, for the latter you need to install an add-in that is freely available from the vendor’s official website. Same is the case when you want to use Google Calendar to set up and/or schedule a Zoom meeting with the participants. To conclude, being one of the cheapest solutions (i.e. free in most scenarios) for virtual business meetings and video conferences, Zoom is appreciated by almost all the corporate professionals around the globe.
Richard Bennett
Richard Bennett is a writer and a lover of all things video.
Follow @Richard Bennett
Richard Bennett
Mar 27, 2024• Proven solutions
You may need to learn how to set up a Zoom meeting when you are on a leave or are told to work from home, but still need to communicate with your colleagues in order to discuss on serious topics and/or to take import decisions.
Available for Mac, iOS, Android, Windows, and Linux platforms, Zoom lets you easily overcome the barriers of distance as the app allows free video conferencing with up to 100 participants irrespective of their geographical location. The limit of 100 participants can be increased to 300 and 1000 with the paid Business and Enterprise Plus subscription plans respectively.
Going further, this guide explains in detail how to set up a Zoom call or conference, and how to make the entire meeting session simplified and more useful by making minor adjustments to the app. Besides, you will also learn how to set up a Zoom meeting in Outlook and Google Calendar, or how to schedule Zoom meetings for the future.
- Part 1: How to Set Up Zoom Meeting
- Part 2: Tips for Better Zoom Meeting Setup
- Part 3: Schedule and Set Up a Zoom Meeting for the Future
- Part 4: How to Set Up Zoom Meetings on Google Calendar
- Part 5: Set Up a Zoom Meeting in Outlook
You may also like: 8 Best Video Conference App for Android and iPhone (Picked)
Part 1: How to Set Up Zoom Meeting
The good news is, if you are merely a participant of a Zoom meeting that has been hosted by someone else, you don’t necessarily need to download and install the app. You can join the conference by following the URL using your favorite web browser, and typing in the meeting ID and password you are provided with via email or any other method chosen by the host.
On the other hand, if it’s you who is hosting a conference (in other words, starting a conference and want to invite others to join the meeting), Zoom must be installed on your device.
You can learn how to set up a Zoom meeting right from the scratch by following the steps given below:
Step 1: Download and Install Zoom
Launch your favorite web browser (Mozilla Firefox here) on your computer (a Windows 10 PC is used here), go to https://zoom.us/download , click Download, and follow the on-screen instructions to download Zoom to your local hard drive. Post this, use the ZoomInstaller.exe file to install the program, and then proceed to the next step.
Step 2: Launch Zoom and Sign Up
Double-click the Zoom shortcut icon on the desktop, click Sign In, and use any of the options given in the right section of the next box to sign up for a free Zoom account. Once this is done, back on the box, enter your email address and password you signed up with in their corresponding fields in the left, and click Sign In to access your Zoom account.
Step 3: Set Up New Meeting
Click New Meeting on the main interface, wait while the app connects to the server, and optionally click Join with Computer Audio to use voice and audio during the conference.
Next, click Invite from the bottom of the screen, go to the Email tab from the top of the next box that comes up, click your email service provider (Gmail for this example), enter the email addresses of the desired participants in the To field on the email draft box, and click Send.
Note: Alternatively, you can use the Contacts tab to invite the participants who are already added in your contact list, or use the Copy URL or Copy Invitation buttons at the bottom to send the invitation manually.
As the target participants receive the mail, they can use the URL and the meeting ID and password to join the Zoom conference. During the process, they can either download the app using the link that the browser displays, or click join from your browser that appears when you click, click here, and follow along using your web browser without installing the program.
Part 2: Tips for Better Zoom Meeting Setup
Learning how to set up a Zoom meeting is fairly easy alright, but do you know that the Zoom meetings can be optimized to get the best remote discussion experience?
Following are a few tips that would help you improve the quality of the conferences, and make the visuals more professionals and/or pleasing to the eyes:
1. Mirror Effect
Enabled by default, the mirror effect lets you flip the video display that the webcam/camera of your device captures during the conference. You can enable or disable the feature by clicking the Settings icon from the top-right corner of the Zoom window (when not in a conference), selecting Video from the left pane, and checking or unchecking the Mirror my video box from the right respectively.
Want to flip or mirror your video footage after recording? Try Filmora to Flip Video Quickly and Easily.
2. Appearance Touchup
This feature makes the visuals captured by your webcam or camera less crispy. This comes in handy when you don’t want to distract other participants of the meeting with the imperfections your clothes or sleepy face have when you’re right out of the bed. You can enable or disable this function by checking or unchecking the Touch up my appearance box present in the right section of the Video category on the Settings window respectively.
3. Virtual Backgrounds
Virtual backgrounds let you hide those untidy and wrinkled bedsheets or wet towels that are usually scattered around when you’re at home. When enabled, you can choose a pleasant scene or environment that is visible to other participants during your video conferences.
To select virtual background, you can go to the Settings box, click Virtual Background category from the left pane, and choose your preferred background from the right. Zoom might take a while to download the required packs if you’re using the feature for the first time. If you’ve a physical green screen background, you can check I have a green screen, and then select the correct color for it.
Bonus: green screen is widely used in filming and TV shows, you can get more info about this magical skill in Green Screen Tutorial .
4. Prevent Screen Sharing
You can keep all the mischievous or ignorant participants from sharing their screen deliberately or accidentally while you’re discussing a serious matter. To do this, while you are in an ongoing conference, click the up-facing arrow next to the Share Screen option from the bottom of the camera window, click Advanced Sharing Options, and select the Only Host radio button from the Who can share section on the box that appears next.
5. Mute Participants
You can prevent all the participants from turning your sophisticated and professional ambiance into a fish market by muting all the of them in one go. To do this, click Manage Participants from the bottom of the camera screen during an ongoing meeting, and click Mute All from the bottom-left corner of the Participants pane that appears in the right. Alternatively, you can click the Mute button present next to each participant’s name in the Participants pane to mute them individually.
Part 3: How to Schedule and Set Up a Zoom Meeting for the Future [Desktop Client]
As a host you can even schedule a conference with Zoom. You can learn how to set up a Zoom meeting for the future by following the instructions given below:
Step 1: Get to the Schedule Meeting Box
Launch Zoom (a Windows 10 computer is used here), and click Schedule from the left section of the interface to open the Schedule meeting box.
Step 2: Schedule a Meeting
Use the Start drop-down calendar to select a future date you want to schedule a meeting on, use the adjacent box to choose your preferred time of the meeting, play with other self-explanatory options to configure the meeting preferences as needed, and click Schedule from the bottom to schedule a meeting.
Step 3: Invite Participants to the Scheduled Meeting
Click Meetings from the top of the Zoom’s interface, ensure that the scheduled meeting is selected in the left pane, and click the Copy Invitation button from the right to copy the invitation URL and the meeting ID and password to the clipboard. Next, open your favorite web browser, sign in to your email account, compose an email for all the participants you want to invite, paste the copied content in the message box, and send the invitation to the recipients.
Part 4: How to Set Up Zoom Meetings on Google Calendar
In order to set up a Zoom meeting, you don’t always have to launch the program, and you can get the job done right from Google Calendar itself. However, you must have a Zoom ID, and you must also be signed in to it in order to create an event that leads to a conference.
Need to Sync Zoom meetings to your Calendar? We’ve figured out how to do that on desktop/iPhone/Android phones, you can check it here: Syncing Zoom to Your Calendar
The entire process of how to set up a Zoom meeting with Google Calendar is explained below:
Step 1: Install Zoom for GSuite Add-on
Start your favorite web browser, go to https://gsuite.google.com/marketplace/app/zoom%5Ffor%5Fgsuite/364750910244 , click Install, click CONTINUE from the bottom-right corner of the Get ready to install box that comes up next, and follow the on-screen instructions go install Zoom for GSuite on the browser.
Step 2: Launch Google Calendar and Sign In to Zoom Account
Open a new tab on your browser, sign in to your Google account (Gmail is used here for demonstration), click the Google apps icon from the top-right corner, click Calendar from the available programs, click the Zoom icon from the right most pane and sign in to your Zoom account.
Step 3: Create Event and Set Up Zoom Meeting
Select your preferred date in the calendar at the left, from the main window, click your preferred time slot of the day you want to host a conference, click More options from the bottom of the event creation box that comes up, select Zoom Meeting from the Add conferencing drop-down list, enter a name of the event in the Add title field at the top, and click Save.
Note: You may need to click Try again for a couple of times to successfully schedule a meeting if you see the Failed to create conference message for some reason.
To invite participants to join the meeting, get back to Google Calendar, click the event you just created, click Joining instructions, from the tab that opens up next, copy the entire text message, get back to the Google Calendar tab, click the Mail icon from the top of the event box, paste the invitation details in the message space, and click Send from the bottom-right corner to send the mail to the recipients you want to invite to the meeting.
Part 5: How to Set Up a Zoom Meeting in Outlook
Zoom even lets you set up a meeting in Outlook. Although the desktop version of Outlook can also be used for the purpose, you must have a mapped and synced MS Exchange account to do so. Therefore, the steps given below explain how to set up a Zoom meeting in Outlook (web version):
Step 1: Install Zoom Add-in for Outlook
Launch your favorite web browser, click here to go to the Zoom for Outlook add-in page, click GET IT NOW from the left, and follow the on-screen instructions to sign in to your Microsoft Outlook account and install the add-in.
Step 2: Get to Event’s Calendar Box
Go to your Microsoft Outlook account using your web browser, click the Calendar icon from the bottom, on the main window, click the block representing the date you want to schedule a Zoom meeting, and click More options from the bottom-right corner of the box that pops up to go to the Calendar box.
Step 3: Schedule a Zoom Meeting
Click the More icon (with three dots aligned horizontally) from the top, go to Zoom, and click Add a Zoom Meeting. Notice how the message box automatically populates with all the information related to the invitation including the URL, meeting ID, and the joining password.
We’ve composed an article about schedule a zoom meeting on different devices, you can check it here: How to Schedule Meetings on Zoom?
Note: You may need to sign in to your Zoom account if not already done yet. You will be prompted to do so with a link present above the message box. Next, type the participants’ IDs in the Invite attendees field (the IDs must be added to your Microsoft Outlook account’s contact list before they can be added here), and click Save from the top-right corner to schedule a Zoom meeting.
Conclusion
The process of how to set up a Zoom meeting is simple, and to learn how to set up a Zoom meeting in Outlook is even simpler. However, for the latter you need to install an add-in that is freely available from the vendor’s official website. Same is the case when you want to use Google Calendar to set up and/or schedule a Zoom meeting with the participants. To conclude, being one of the cheapest solutions (i.e. free in most scenarios) for virtual business meetings and video conferences, Zoom is appreciated by almost all the corporate professionals around the globe.
Richard Bennett
Richard Bennett is a writer and a lover of all things video.
Follow @Richard Bennett
Also read:
- "\"[Updated] Crafting Conversations that Captivate Google Meet Edition for 2024\""
- "\"In 2024, Virtual Broadcast Battle Pitting OBS Against Twitch's Channel Space\""
- "\"[New] 2024 Approved Top Android Worlds A Selection of 15 Engaging Simulations\""
- "[New] In 2024, SpeedySnap LingerShot Videoclip"
- "[Updated] In 2024, FrameFraction Review"
- "\"[New] Quick Start Installing VRecorder Effortlessly\""
- "\"[New] Survival in Shambles Selecting the Top 8 Zombie Classics for 2024\""
- "[Updated] The Insider Look at IO's Video Recording Tools"
- "\"In 2024, Elite Circuit Experiences Best Five Titles\""
- "[New] Record & Evaluate Speech Files"
- "\"[Updated] 2024 Approved The Complete Review of CamStudio Screencap Tech\""
- "\"Perfect Your Xbox Footage 4 Recording Strategies Revealed\""
- "\"OBS Tutorial for Instagram Live Streams Your Ultimate Reference\""
- "[New] IOS Recording Tools Guide for 2024"
- "\"[New] In 2024, Vibrant Discourse Evaluation - Ver. 8\""
- "[New] In 2024, Comprehensive Guide to iOS Screenshotting"
- "[New] In 2024, Leveraging Snap Camera for Better Online Interaction on Google Meet"
- "\"[New] In 2024, Seize Your Online Sessions The Ultimate Browser Recording Tools List\""
- "\"[Updated] Mac Users Speak Out The Real Impact of ScreenFlow Software for 2024\""
- "\"[Updated] Streamlined Strategies Mastering Screen Record on an HP Notebook\""
- "\"[New] Screencast Essentials From Basics to Advanced Tactics for 2024\""
- "\"[New] 2024 Approved Get Real with Your Logitech Webcam Recording\""
- "[Updated] In 2024, The Finest 11 Streaming Sound Recorders"
- "\"[New] 2024 Approved A Brief Guide to Download, Install, and Use EZ Grabber\""
- "[New] Top 6 Cool Minecraft House Ideas"
- "BackupBreeze Professionals Opinion for 2024"
- "[Updated] In 2024, Optimal List of 10 Excellent Spotify Audio Recorders"
- "Analyzing the Full Range of OBS Studio's Capabilities"
- "\"Ranking Video Chat Winning Windows Tools #6-#1 for 2024\""
- "\"[Updated] Screen Recording Showdown Go with OBS Studio or Bandicam for 2024\""
- "\"[Updated] Premier Tools Best Mac Devices for Capturing Videos for 2024\""
- "\"[Updated] In 2024, Frame by Frame Reviews High-Quality Recorder Guide\""
- "Ultimate Scene Seizing Exploration for 2024"
- "[New] Learn iPad's Screen Sharing Basics for 2024"
- "[Updated] Best Free Call Apps on Android, Ranks Them, In 2024"
- "[Updated] In 2024, Leading Chat Apps to Replace Zoom on Desktop/Mobile Devices"
- "\"2024 Approved ITop Screen Recorder Review Should You Install It?\""
- "[Updated] Rival Tools that Outclass ShareX for 2024"
- "\"In 2024, Apocalypse Alert The Ultimate List of Thrilling Zombie Games\""
- In 2024, Top 5 Tracking Apps to Track Apple iPhone XS without Them Knowing | Dr.fone
- Updated Shooting Videos in High Resolutions Can Help You Create Visually Impressive Content Your Followers on Social Media Are Going to Adore. In This Article We Are Going to Take You Through the 10 Best Vid for 2024
- In 2024, How can I get more stardust in pokemon go On Apple iPhone 11 Pro Max? | Dr.fone
- In 2024, Unlock Apple ID without Phone Number From iPhone 15
- Updated 2024 Approved The Top 10 Free Online Subtitle Software Options
- In 2024, Where Is the Best Place to Catch Dratini On Honor 80 Pro Straight Screen Edition | Dr.fone
- New How To Make Talking Emoji on iPhone in Easy Steps
- Cinematic Storytelling with FCPX Tips and Techniques for Stunning Videos for 2024
- Full Guide to Bypass Nubia FRP
- In 2024, How to Transfer Contacts from Tecno Spark 10C to iPhone XS/11 | Dr.fone
- How To Restore Missing Pictures Files from Vivo X90S.
- Top-Rated Stop Motion Software for Windows and macOS
- In 2024, How to Transfer Data from Oppo Reno 8T to Other Android Devices? | Dr.fone
- Updated 2024 Approved Enhancing Video Soundtracks Overcoming the Challenges of Auditory Aberrations
- Updated Ultimate 3 Auditory Enhancement Devices for MP3 Files
- How To Fix Unresponsive Touch Screen on Nubia Z50 Ultra | Dr.fone
- Bypass/Reset Oppo Find N3 Flip Phone Screen Passcode/Pattern/Pin
- How to Unlock Your Apple iPhone 11 Passcode 4 Easy Methods (With or Without iTunes)
- Updated In 2024, Guide to Removing Melodic Elements Focusing on Basslines for Media Projects
- In 2024, How To Leave a Life360 Group On Poco F5 5G Without Anyone Knowing? | Dr.fone
- How To Revive Your Bricked Xiaomi Redmi K70E in Minutes | Dr.fone
- In 2024, Two Ways to Track My Boyfriends Vivo V29 without Him Knowing | Dr.fone
- Updated 2024 Approved Mens Guide to Leading Female Voices with Technology
- Updated In 2024, Green Screen on a Mac Choosing the Right Tool for the Job
- How to Stop Life360 from Tracking You On Oppo Reno 8T? | Dr.fone
- Top 15 Apps To Hack WiFi Password On Xiaomi Redmi Note 12 4G
- How to Soft Reset Samsung Galaxy XCover 6 Pro Tactical Edition phone? | Dr.fone
- In 2024, Lock Your Samsung Galaxy A23 5G Phone in Style The Top 5 Gesture Lock Screen Apps
- Why Your WhatsApp Live Location is Not Updating and How to Fix on your Oppo Reno 8T | Dr.fone
- Top 12 Prominent Realme GT Neo 5 Fingerprint Not Working Solutions
- Updated In 2024, Anonymize Your Media Top 10 Free Face Blurring Apps for PC and Mobile
- How to Send and Fake Live Location on Facebook Messenger Of your Apple iPhone 6s Plus | Dr.fone
- 11 Proven Solutions to Fix Google Play Store Not Working Issue on Vivo Y100A | Dr.fone
- Title: "[Updated] 2024 Approved Navigating Zoom Technology for Professional Use"
- Author: Agatha
- Created at : 2024-05-19 19:41:31
- Updated at : 2024-05-20 19:41:31
- Link: https://video-screen-grab.techidaily.com/updated-2024-approved-navigating-zoom-technology-for-professional-use/
- License: This work is licensed under CC BY-NC-SA 4.0.
