![[Updated] How to Record Screen and Video on Android?](https://thmb.techidaily.com/485101ae8f555e145174a15eda6071c25617b2b00c96089d339b8e4537366b75.jpg)
[Updated] How to Record Screen and Video on Android?
Innovative Solutions: Advanced Mobile Recording on Android
How to Record Screen and Video on Android?

Liza Brown
Mar 27, 2024• Proven solutions
A screen recording of your Android phone can be quite useful if you want to upload a video that shows how to use a certain app to YouTube or if you are passionate about mobile games and you’d like to share your achievements with the online gaming community, or offer demonstrational help to somebody, create a demo about the app you developed or even a to create a walkthrough for a levels of a game.
iPhone users that have iOS 11 running on their devices can use built-in apps that allow them to record their screen, but things are a bit more difficult for Android users in need of a quick way to capture a screen on their Android phone. If you would like to find out how to record your screen on an Android phone or tablet, there are various options on offer such as using an app, connecting to computer via official ADB method and also custom ROMs together with built in facility. Let’s find out what best fits for you.
- Part 1: Using screen recorder apps to capture a screen for KitKat and above
- Part 2: Capture your Android screen with ADB
- Part 3: Capture Android Screen on a Computer with Mirroring Software
- Part 4: Capture Screen on Android with Capture Card
If you are looking for a recording software which also allows you to edit your video footage with plentiful video editing features, we recommend you try Wondershare Filmora based on the following powerful recording and editing features.


- Add Markers to important points during recording
- Record high paced games at up to 120 fps
- Capture video, system audio, webcam and mic at the same time
- Record the entire screen or just a part of your screen
Part 1: Using screen recorder apps on Android KitKat to capture a screen
Almost 12% of all Android devices that access the Google Play, run on Android 4.4 OS, also known as KitKat. This Android OS was released in 2013, and it is the first OS for Android Smartphones that enabled its users to create screen recordings, although only via the Android Developer SDK, with the help of Android Debug Bridge. Furthermore, this option only works if the device is connected to a computer, and you also need to have access to the phone’s Developer mode.
One year after the KitKat OS was introduced to the public Google developed a new version of the Android OS, popularly named Lolipop, which allowed users to record their Smartphone’s screen with an app. The name Lollipop refers to versions 5.0 and 5.1.1 of the Android OS, and in February 2018, 24,6% of all Android devices accessing Google Play had the Lollipop OS. The more recent versions of Android OS, like Android ‘Marshmallow’, also provide support for screen recording apps.
If you have Lollipop or Marshmallow OS installed on your Android Smartphone, you can use the Lollipop Screen Recorder app, although plenty more screen recording apps are available on the Google Play. Let’s have a look at the steps you’ll need to take in order to figure out how to record your screen on your Android phone with Lollipop Screen Recorder.
Step 1 Download and install Lollipop Screen Recorder
Open the Google Play application on your phone and search for the Lollipop Screen Recorder app. You can download it for free, so after the installation of the app is complete, launch it and proceed to adjust the settings for your screen recording session.
Step 2 Fine-tuning the settings
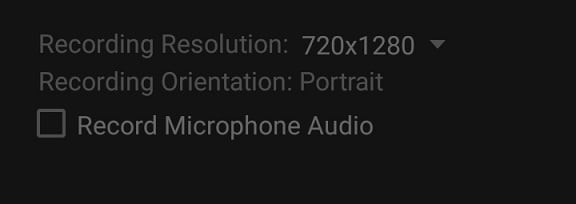
Lollipop Screen Recorder features only three settings, that let you choose whether you want to shoot in Landscape or Portrait mode, change the resolution of the video recording and enable the audio recording feature.
It is important to pay attention to the size of the file you are producing, especially if you want to send it to someone because if you pick the maximum Recording Resolution, the video file of your screen recording is going to be huge. Tutorials in which you show how an app is used or how to fix a certain problem on an Android Phone can benefit from the Record Microphone Audio option because it will enable you to explain the steps with your voice.
Step 3 Recording the screen of an Android device
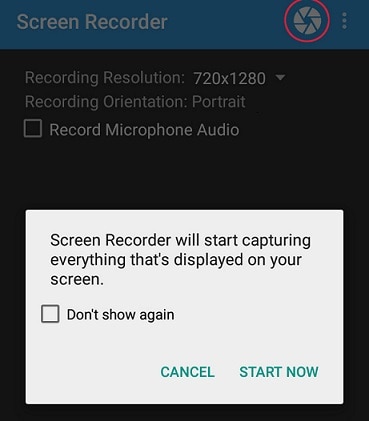
Now that you’ve adjusted all the settings for a screen recording session, you should click on the circular icon located in the upper right corner of the app.
After you tap on the icon a message will pop up on the screen informing you that the app is about to start a new screen recording session. Check the Don’t show again checkbox and proceed to tap on the Start Now button. Once the screen recording session is in progress, you can leave the Lollipop Screen Recorder app and perform all activities you wanted to capture with your Android Smartphone.
Step 4 Finishing the recording session
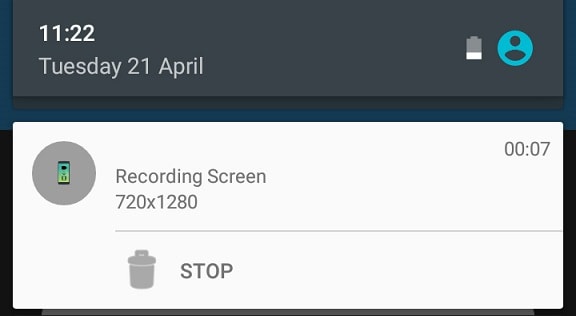
The app’s notification bar is going to be located at the top of the Smartphone’s screen, during the screen recording session, so in order to stop recording you simply need to find the notification with the label ‘Recording Screen’ and press stop.
Go back to the Lollipop Screen Recorder and you’ll be able to find the video file in the app’s main window. You can play the video directly from the Lollipop Screen recorder or you can share it to your Gmail account directly from the app. If you don’t like the screen recording you made, you can tap on the Delete button and start a new session.
Pros: Amazingly easy to use and it lets you capture videos in Portrait and Landscape modes.
Cons: Lollipop Screen Recorder can only capture screens in the device’s native resolution, and it doesn’t provide any customization options.
Find out more video recorders for Android Phones and Tablets
Part 2: Connecting Your Android Devices to Windows PC or Mac to Capture Screen
Using an app to record the screen of your Android smartphone is just one method in which this task can be accomplished. Let’s have a look at a few other methods that can also be used to record an Android Smartphone screen.
Method 1: Capture your Android screen with ADB
This option is great in the event of app doesn’t work for you. Android SDK are available to download from Android developer . This feature allows you to record video via USB with the bundled Android Debug Bridge. To use this feature, your device should run on Android 4.4 or later.
Android Debug Bridge is a command-line utility that can control your Android Smartphone from a computer, copy files and add or remove apps. However, if you want to use ADB you’ll first need to go through the setup process, and even add it to the Windows System PATH.
Step 1: Enabling the ADB
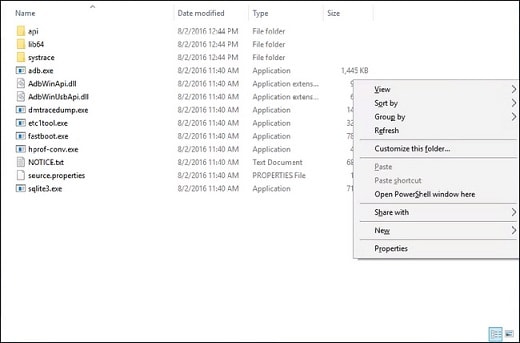
Locate the SDK’s installation folder on your PC, and click on the ADB option in the Platform Tools menu. Hold the Shift key and right-click and then select the ‘Open PowerShell Widow Here’ option. How this message looks like depends on the version of Windows OS you have, so alternatively, it may read ‘Open Command Prompt Here’.
Step 2: Connecting the Android Smartphone to a computer
Use the USB cable to connect your Android device to a computer, and before proceeding any further enable the USB Debugging and Developer features on your phone.
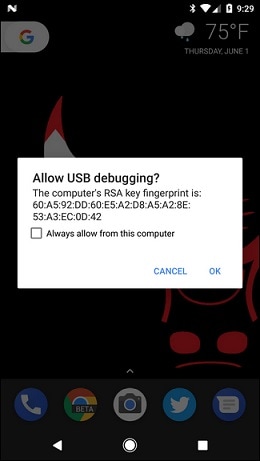
A pop-up message should appear on your Smartphone’s screen asking you if you’d like to allow debugging from the PC to which the device is connected. Click OK and head back to the ADB terminal you launched.
Step 3: Starting a screen recording session
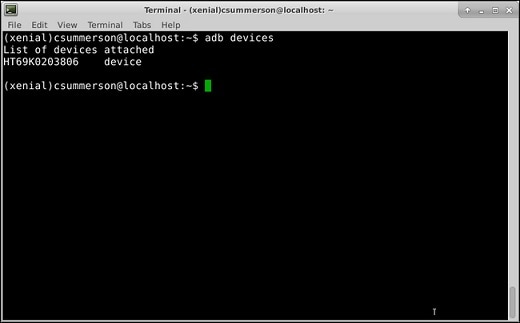
You should be able to see the terminal window on your computer’s screen. Run test commands just to be sure that everything works perfectly, but if everything is in order the terminal should look like this.
Inserting the following command into the terminal: adb shell screenrecord/sdcard/test.mp4 will start a new screen recording session.
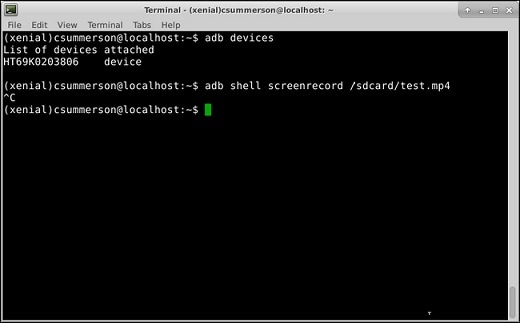
The session cannot be longer than three minutes, but if you want to stop recording sooner than that, you can simply hold the CTRL+C while the terminal window is still active.
Pros: Enables users who have KitKat OS installed on their Smartphones to capture the screen on their device.
Cons: If you choose to record the screen of your Android device using this method, you should be aware of the fact that you won’t be able to record audio and that a screen recording can’t be longer than 3 minutes.
Method 2: Capture Android Screen on a Computer with Mirroring Software
Both the methods I mentioned above require Android 4.1 (Jelly bean) or later on your device. That doesn’t necessarily mean that you can’t record video with older android devices.
In such cases you can use android SDK to mirror the device’s display and record it using a desktop screen-capture software. Mirroring Software will enable you to record the screen on an Android device without rooting. You can use Wondershare MirrorGo software to mirror cast the screen from your mobile phone to a display on your computer. Here’s how to record your screen on Android without rooting.
Step 1: Install Wondershare MirrorGo
Start the process of setting up your screen recording session by downloading the MirrorGo Android recorder software for free from the manufacturer’s website. Launch the software and connect your Android Smartphone to the MirrorGo. You’ll be able to see the screen of your Android device on the PC’s screen. The software will synchronize all actions between two displays.
Step 2: Record the Screen
Locate the Android Recorder button, and click on it to commence the screen recording session. You can play mobile video games or create a detailed tutorial on how to use a certain Android app.
Step 3: Complete the recording and access the video file
Click on the Android Recorder button to stop the session, and once the screen capturing process is finished, a pop window on your Smartphone’s screen will notify you that your video is saved and it will also show you the location on which the file was saved on your computer.
Method 3: Capture Screen on Android with Capture Card
Capture Cards are devices that enable you to record screens on a wide range of different devices including X-box or PS4. Although they are frequently used to capture the gameplay of a video game, capture cards can also be used to capture a screen on an Android Smartphone.
These external video adapters let you connect the Android device and a computer, although you’ll have to spend some time to properly set up a screen recording session with a capture card. Some capture cards can cost as much as $200, so if you want to utilize this method to capture a screen on your Android Smartphone you should be prepared to invest money in such a project.
But the cost is the only downside of this otherwise very effective method of recording a screen on an Android device. The amount of options capture cards offer is staggering, but before you start recording a screen on your Smartphone you must make sure that you have the right hardware and software equipment.
What if this also doesn’t work for you? Don’t give up. You still stand a chance if your android device has an HDMI port. You can connect your device to a digital video camera and do the recording. Failing this, your solution will depend on a PC with HDMI PCI Express card or a USB HDMI adaptor powered with a suitable video capture software.
Sometimes you shouldn’t depend on installing apps. With the help of a ROM flasher, you can get a screen recorded included in your devices ROM. Therefore, if you already have a custom ROM running on your device, better to have a look if a screen recorder is installed. If so, it is a matter of activating it.
Liza Brown
Liza Brown is a writer and a lover of all things video.
Follow @Liza Brown
Liza Brown
Mar 27, 2024• Proven solutions
A screen recording of your Android phone can be quite useful if you want to upload a video that shows how to use a certain app to YouTube or if you are passionate about mobile games and you’d like to share your achievements with the online gaming community, or offer demonstrational help to somebody, create a demo about the app you developed or even a to create a walkthrough for a levels of a game.
iPhone users that have iOS 11 running on their devices can use built-in apps that allow them to record their screen, but things are a bit more difficult for Android users in need of a quick way to capture a screen on their Android phone. If you would like to find out how to record your screen on an Android phone or tablet, there are various options on offer such as using an app, connecting to computer via official ADB method and also custom ROMs together with built in facility. Let’s find out what best fits for you.
- Part 1: Using screen recorder apps to capture a screen for KitKat and above
- Part 2: Capture your Android screen with ADB
- Part 3: Capture Android Screen on a Computer with Mirroring Software
- Part 4: Capture Screen on Android with Capture Card
If you are looking for a recording software which also allows you to edit your video footage with plentiful video editing features, we recommend you try Wondershare Filmora based on the following powerful recording and editing features.
- Add Markers to important points during recording
- Record high paced games at up to 120 fps
- Capture video, system audio, webcam and mic at the same time
- Record the entire screen or just a part of your screen
Part 1: Using screen recorder apps on Android KitKat to capture a screen
Almost 12% of all Android devices that access the Google Play, run on Android 4.4 OS, also known as KitKat. This Android OS was released in 2013, and it is the first OS for Android Smartphones that enabled its users to create screen recordings, although only via the Android Developer SDK, with the help of Android Debug Bridge. Furthermore, this option only works if the device is connected to a computer, and you also need to have access to the phone’s Developer mode.
One year after the KitKat OS was introduced to the public Google developed a new version of the Android OS, popularly named Lolipop, which allowed users to record their Smartphone’s screen with an app. The name Lollipop refers to versions 5.0 and 5.1.1 of the Android OS, and in February 2018, 24,6% of all Android devices accessing Google Play had the Lollipop OS. The more recent versions of Android OS, like Android ‘Marshmallow’, also provide support for screen recording apps.
If you have Lollipop or Marshmallow OS installed on your Android Smartphone, you can use the Lollipop Screen Recorder app, although plenty more screen recording apps are available on the Google Play. Let’s have a look at the steps you’ll need to take in order to figure out how to record your screen on your Android phone with Lollipop Screen Recorder.
Step 1 Download and install Lollipop Screen Recorder
Open the Google Play application on your phone and search for the Lollipop Screen Recorder app. You can download it for free, so after the installation of the app is complete, launch it and proceed to adjust the settings for your screen recording session.
Step 2 Fine-tuning the settings
Lollipop Screen Recorder features only three settings, that let you choose whether you want to shoot in Landscape or Portrait mode, change the resolution of the video recording and enable the audio recording feature.
It is important to pay attention to the size of the file you are producing, especially if you want to send it to someone because if you pick the maximum Recording Resolution, the video file of your screen recording is going to be huge. Tutorials in which you show how an app is used or how to fix a certain problem on an Android Phone can benefit from the Record Microphone Audio option because it will enable you to explain the steps with your voice.
Step 3 Recording the screen of an Android device
Now that you’ve adjusted all the settings for a screen recording session, you should click on the circular icon located in the upper right corner of the app.
After you tap on the icon a message will pop up on the screen informing you that the app is about to start a new screen recording session. Check the Don’t show again checkbox and proceed to tap on the Start Now button. Once the screen recording session is in progress, you can leave the Lollipop Screen Recorder app and perform all activities you wanted to capture with your Android Smartphone.
Step 4 Finishing the recording session
The app’s notification bar is going to be located at the top of the Smartphone’s screen, during the screen recording session, so in order to stop recording you simply need to find the notification with the label ‘Recording Screen’ and press stop.
Go back to the Lollipop Screen Recorder and you’ll be able to find the video file in the app’s main window. You can play the video directly from the Lollipop Screen recorder or you can share it to your Gmail account directly from the app. If you don’t like the screen recording you made, you can tap on the Delete button and start a new session.
Pros: Amazingly easy to use and it lets you capture videos in Portrait and Landscape modes.
Cons: Lollipop Screen Recorder can only capture screens in the device’s native resolution, and it doesn’t provide any customization options.
Find out more video recorders for Android Phones and Tablets
Part 2: Connecting Your Android Devices to Windows PC or Mac to Capture Screen
Using an app to record the screen of your Android smartphone is just one method in which this task can be accomplished. Let’s have a look at a few other methods that can also be used to record an Android Smartphone screen.
Method 1: Capture your Android screen with ADB
This option is great in the event of app doesn’t work for you. Android SDK are available to download from Android developer . This feature allows you to record video via USB with the bundled Android Debug Bridge. To use this feature, your device should run on Android 4.4 or later.
Android Debug Bridge is a command-line utility that can control your Android Smartphone from a computer, copy files and add or remove apps. However, if you want to use ADB you’ll first need to go through the setup process, and even add it to the Windows System PATH.
Step 1: Enabling the ADB
Locate the SDK’s installation folder on your PC, and click on the ADB option in the Platform Tools menu. Hold the Shift key and right-click and then select the ‘Open PowerShell Widow Here’ option. How this message looks like depends on the version of Windows OS you have, so alternatively, it may read ‘Open Command Prompt Here’.
Step 2: Connecting the Android Smartphone to a computer
Use the USB cable to connect your Android device to a computer, and before proceeding any further enable the USB Debugging and Developer features on your phone.
A pop-up message should appear on your Smartphone’s screen asking you if you’d like to allow debugging from the PC to which the device is connected. Click OK and head back to the ADB terminal you launched.
Step 3: Starting a screen recording session
You should be able to see the terminal window on your computer’s screen. Run test commands just to be sure that everything works perfectly, but if everything is in order the terminal should look like this.
Inserting the following command into the terminal: adb shell screenrecord/sdcard/test.mp4 will start a new screen recording session.
The session cannot be longer than three minutes, but if you want to stop recording sooner than that, you can simply hold the CTRL+C while the terminal window is still active.
Pros: Enables users who have KitKat OS installed on their Smartphones to capture the screen on their device.
Cons: If you choose to record the screen of your Android device using this method, you should be aware of the fact that you won’t be able to record audio and that a screen recording can’t be longer than 3 minutes.
Method 2: Capture Android Screen on a Computer with Mirroring Software
Both the methods I mentioned above require Android 4.1 (Jelly bean) or later on your device. That doesn’t necessarily mean that you can’t record video with older android devices.
In such cases you can use android SDK to mirror the device’s display and record it using a desktop screen-capture software. Mirroring Software will enable you to record the screen on an Android device without rooting. You can use Wondershare MirrorGo software to mirror cast the screen from your mobile phone to a display on your computer. Here’s how to record your screen on Android without rooting.
Step 1: Install Wondershare MirrorGo
Start the process of setting up your screen recording session by downloading the MirrorGo Android recorder software for free from the manufacturer’s website. Launch the software and connect your Android Smartphone to the MirrorGo. You’ll be able to see the screen of your Android device on the PC’s screen. The software will synchronize all actions between two displays.
Step 2: Record the Screen
Locate the Android Recorder button, and click on it to commence the screen recording session. You can play mobile video games or create a detailed tutorial on how to use a certain Android app.
Step 3: Complete the recording and access the video file
Click on the Android Recorder button to stop the session, and once the screen capturing process is finished, a pop window on your Smartphone’s screen will notify you that your video is saved and it will also show you the location on which the file was saved on your computer.
Method 3: Capture Screen on Android with Capture Card
Capture Cards are devices that enable you to record screens on a wide range of different devices including X-box or PS4. Although they are frequently used to capture the gameplay of a video game, capture cards can also be used to capture a screen on an Android Smartphone.
These external video adapters let you connect the Android device and a computer, although you’ll have to spend some time to properly set up a screen recording session with a capture card. Some capture cards can cost as much as $200, so if you want to utilize this method to capture a screen on your Android Smartphone you should be prepared to invest money in such a project.
But the cost is the only downside of this otherwise very effective method of recording a screen on an Android device. The amount of options capture cards offer is staggering, but before you start recording a screen on your Smartphone you must make sure that you have the right hardware and software equipment.
What if this also doesn’t work for you? Don’t give up. You still stand a chance if your android device has an HDMI port. You can connect your device to a digital video camera and do the recording. Failing this, your solution will depend on a PC with HDMI PCI Express card or a USB HDMI adaptor powered with a suitable video capture software.
Sometimes you shouldn’t depend on installing apps. With the help of a ROM flasher, you can get a screen recorded included in your devices ROM. Therefore, if you already have a custom ROM running on your device, better to have a look if a screen recorder is installed. If so, it is a matter of activating it.
Liza Brown
Liza Brown is a writer and a lover of all things video.
Follow @Liza Brown
Also read:
- [New] Close-Up Filmmaking Zooming Into Details
- [New] Webcam Wonders - Unveiling Tools for Top Video Quality
- [Updated] In 2024, Strategies to Combat Freezing in High Quality Mode
- [Updated] In 2024, Ultimate Gamer' Writes Top 7 FPS Games List
- [Updated] Video Sims 4 Mastery Guide
- How to recover old videos from your X5
- Inside the Tech Top Reviews for Home Videotaping Tools for 2024
- Mastering the Art of Social Content with ChatGPT: Best Practices for Improved Engagement
- Overcoming BSOD in Windows 11 - Irql Error
- The Soundscape | Free Book
- Top 507 Unique Instagram Caption Ideas
- Title: [Updated] How to Record Screen and Video on Android?
- Author: Agatha
- Created at : 2025-02-06 21:15:46
- Updated at : 2025-02-07 16:19:44
- Link: https://video-screen-grab.techidaily.com/updated-how-to-record-screen-and-video-on-android/
- License: This work is licensed under CC BY-NC-SA 4.0.