![[Updated] In 2024, Joining the Dots OBS & Zoom Pairing Explained](https://thmb.techidaily.com/e086106512b2e9d753e081998408f58f33739fa1f0e7070951ebc50a7e45bfdb.jpg)
"[Updated] In 2024, Joining the Dots OBS & Zoom Pairing Explained"
Joining the Dots: OBS & Zoom Pairing Explained
Open Broadcaster Studio, or OBS Studio, is freeware and features HD broadcasting and recording capabilities. It works well with all major operating systems such as Windows, Linux, and Mac. It sets no limit on the duration of your films, which makes it great for hours-long recordings and video broadcasts. It can interact with video conferencing apps like Zoom smoothly, enabling you to enhance its usefulness and capabilities. All these capabilities of OBS Studio unarguably make it a helpful tool for video conferencing.
Open Broadcaster Software Studio is mostly used by video broadcasters to live stream videos and events. However, it may also be a terrific video conferencing tool that lets you manage what’s on the screen. Today, many companies’ professionals utilize Zoom for organizing video meetings and exploring methods to improve their visual experience. If you are a Zoom user and seeking a means to make your video calls pixel-perfect, there is good news for you. The adaptability of OBS Studio answers your demands and enables you to link Zoom with OBS Studio.
Part 1. Use Roblox Built-In Game Recorder
Part 2. Record Roblox Games with Filmora
Part 3. Record Roblox with Windows Game Bar
Filmora Screen Recorder
Record screen on PC and Mac with webcam
Capture system amd micorphone audio simultaneously
Edit video and audio with built-in tools

Part 1. How to Connect OBS to Zoom
Zoom is one of the most popular video conferencing programs. The greatest thing is that you can live broadcast on Zoom using OBS Studio and even record your Zoom sessions using OBS Studio. OBS is recognized for its enormous community and support for hundreds of third-party plugins. As OBS is an open-source tool, you can expect it to readily connect up with dozens of other software programs, including video conferencing apps such as Zoom. To get things started, the pre-requisites are the newest version of OBS Studio, Zoom, and one of the numerous plugins that offer a virtual camera. The approach outputs OBS Studio as a virtual camera and identifies it as a video source for Zoom.
Steps to Connect OBS to Zoom
**Configure OBS Studio:
**Step 1: Launch OBS Studio and Select and download the relevant plugin depending on your operating system.

**Step 2: Go to the Tools menu. Find and click on the plugin you have downloaded and follow the vizard to replicate OBS output as a virtual camera.
**Configure Zoom:
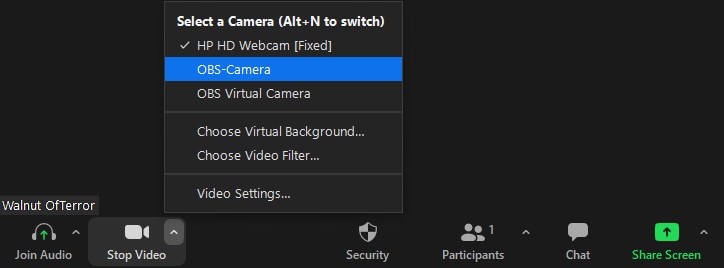
**Step 1: In Zoom, begin a meeting, then pick a video source. The new option introduced by your OBS plugin will display. Select it and then click on the Start Video option.
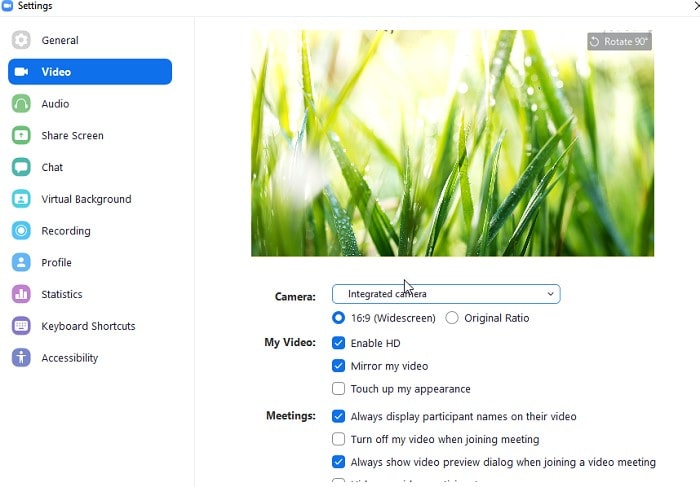
**Step 2: The Zoom’s video will now accept the input from the virtual camera, which is the output provided by OBS Studio.
**Step 3: Most of you will be on a mobile device and mobile device displays are of a different aspect ratio than your PC. Click on the Profile menu on OBS at the top and click on New Profile and name the Profile as per your convenience.
## Part 2\. How to Live Stream on Zoom with OBSTo link the applications, we will have to establish a virtual camera utilized by Zoom as its input. The output of the virtual camera is OBS Studio. One of Zoom’s most popular features is its native video recording. Zoom users may record meetings to either their PC or to the Zoom cloud. You can also obtain separate files for gallery view and full-sized speaker view if you record to the Zoom cloud. Yet, many individuals are adopting choices, such as Open Broadcaster Software, or OBS, to record video meetings. When utilizing OBS to record and manage your Zoom meetings, you can obtain higher-resolution video and audio. While Zoom is acceptable as a live meeting platform, the things you can accomplish with OBS greatly offset the price of setting up the system. Play around with the parameters to achieve the results that work best for you.
Steps to live-stream on Zoom with OBS
**Step 1: Start your Zoom meeting and OBS concurrently and have all guests joined. This step should be done before the go-live time to make sure the settings operate. For audio sources that originate from the online call, you may monitor and control via OBS’s Audio Settings.
**Step 2: Click on the + (Add) button in the Sources section and pick Image. Upload and resize the picture to add your backdrop. You may add a backdrop, face camera frame, text, and screen grab in any manner you wish for the broadcast. It is important to have a backdrop layout ready before adding to your stream.

**Step 3: OBS will catch the complete Zoom window; just trim out to capture only your guests’ face cam. You may select “Start Streaming” if you need to webcast the conference elsewhere.

If you wish to put yourself into the Stream from your PC associated webcam or other video devices linked, utilize the Video Source Option instead of Window Capture and specify your target device when adding the source. Just make sure you have unmuted the Desktop Audio and Mic/Aux or any mic connected to your PC from the Audio Mixed option at the bottom center of OBS.
Part 3. How to Record Zoom Meetings with OBS
You may use the handles to morph the preview and fit it to the screen, or press alt and drag the red handles to crop the preview for one user. Once you clip the preview for one person, you may repeat the above to process to upload the same window capture again into OBS Source and crop out to obtain each other users as well. If you want to record Zoom meetings and preserve them for later, you may obtain amazing results without any third-party software. The only things you’ll need to install are OBS and Zoom The video will have a brief time when Zoom is not in full-screen, and the cascading preview will appear if the OBS is on the same display. You may delete it in post-editing if required. The sound in the recording will be doubled if you’re using speakers since your mic will take up the output sound from your device. Use headphones to prevent this. Here’s what you need to do:
Steps to Record Zoom Meetings with OBS
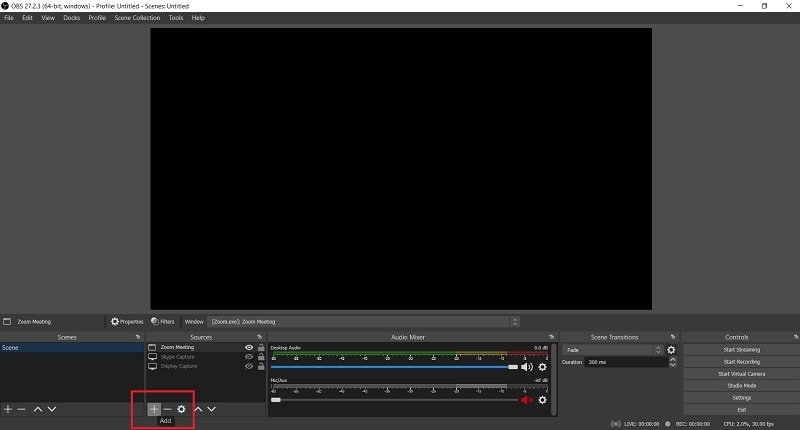
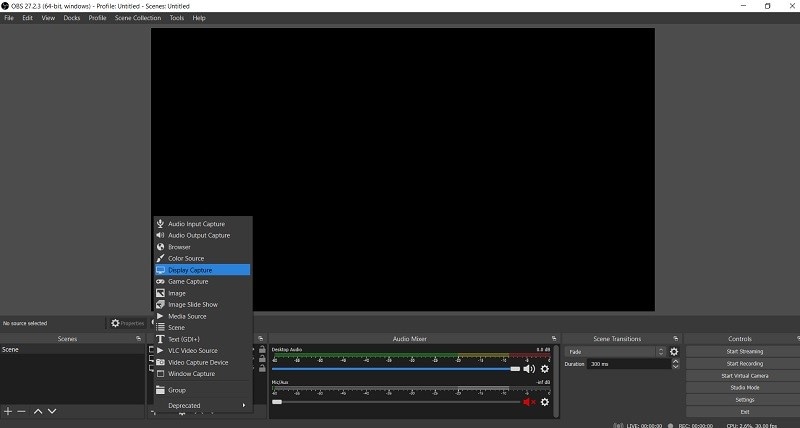
**Step 1: Launch Zoom and OBS. In OBS, under “Sources,” click the Plus button and choose “Display Capture.” This will work best if you have more than one monitor for your PC, but it will still operate if you just have one.
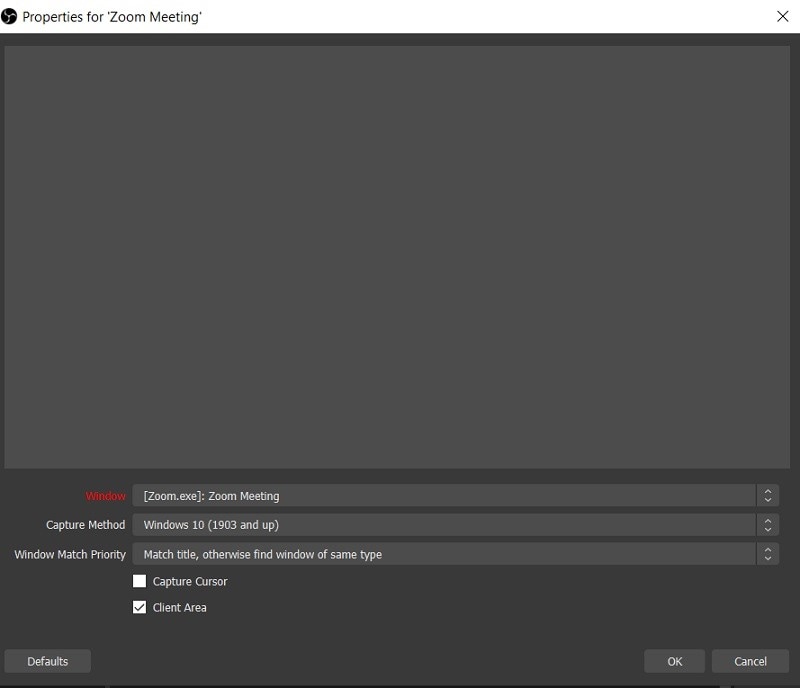
**Step 2: You may use the “Window Capture” option and pick “Zoom.exe” as your source, although this might not always work. Name the capture anything you wish, then click “OK.” You may use the name of the monitor you’re using for Zoom to keep things simple.
**Step 3: In OBS, click on “+” under “Sources” again, then pick “Audio Input Capture.” Rename the capture source if you wish to keep it distinct from the other source and prevent misunderstanding, then hit “OK.” Press “Start Recording.” Maximize Zoom to full-screen mode to make it the only visible application on display.

Conclusion
OBS enables recording into several video formats. But the major reason why you may want to learn how to record Zoom meetings using OBS is that the software may help firms gain a step ahead on their video production. OBS is the software of choice for many, if not most, of today’s internet broadcasters. This free program allows you to create “scenes,” utilizing your camera feed together with any other movies or photos you wish to incorporate. The outcome is subsequently streamed live to your streaming platforms of choice, such as YouTube or Twitch, and/or to a recorder.
Part 2. Record Roblox Games with Filmora
Part 3. Record Roblox with Windows Game Bar
Filmora Screen Recorder
Record screen on PC and Mac with webcam
Capture system amd micorphone audio simultaneously
Edit video and audio with built-in tools
Part 1. How to Connect OBS to Zoom
Zoom is one of the most popular video conferencing programs. The greatest thing is that you can live broadcast on Zoom using OBS Studio and even record your Zoom sessions using OBS Studio. OBS is recognized for its enormous community and support for hundreds of third-party plugins. As OBS is an open-source tool, you can expect it to readily connect up with dozens of other software programs, including video conferencing apps such as Zoom. To get things started, the pre-requisites are the newest version of OBS Studio, Zoom, and one of the numerous plugins that offer a virtual camera. The approach outputs OBS Studio as a virtual camera and identifies it as a video source for Zoom.
Steps to Connect OBS to Zoom
**Configure OBS Studio:
**Step 1: Launch OBS Studio and Select and download the relevant plugin depending on your operating system.
**Step 2: Go to the Tools menu. Find and click on the plugin you have downloaded and follow the vizard to replicate OBS output as a virtual camera.
**Configure Zoom:
**Step 1: In Zoom, begin a meeting, then pick a video source. The new option introduced by your OBS plugin will display. Select it and then click on the Start Video option.
**Step 2: The Zoom’s video will now accept the input from the virtual camera, which is the output provided by OBS Studio.
**Step 3: Most of you will be on a mobile device and mobile device displays are of a different aspect ratio than your PC. Click on the Profile menu on OBS at the top and click on New Profile and name the Profile as per your convenience.
Part 2. How to Live Stream on Zoom with OBS
To link the applications, we will have to establish a virtual camera utilized by Zoom as its input. The output of the virtual camera is OBS Studio. One of Zoom’s most popular features is its native video recording. Zoom users may record meetings to either their PC or to the Zoom cloud. You can also obtain separate files for gallery view and full-sized speaker view if you record to the Zoom cloud. Yet, many individuals are adopting choices, such as Open Broadcaster Software, or OBS, to record video meetings. When utilizing OBS to record and manage your Zoom meetings, you can obtain higher-resolution video and audio. While Zoom is acceptable as a live meeting platform, the things you can accomplish with OBS greatly offset the price of setting up the system. Play around with the parameters to achieve the results that work best for you.

Steps to live-stream on Zoom with OBS
**Step 1: Start your Zoom meeting and OBS concurrently and have all guests joined. This step should be done before the go-live time to make sure the settings operate. For audio sources that originate from the online call, you may monitor and control via OBS’s Audio Settings.
**Step 2: Click on the + (Add) button in the Sources section and pick Image. Upload and resize the picture to add your backdrop. You may add a backdrop, face camera frame, text, and screen grab in any manner you wish for the broadcast. It is important to have a backdrop layout ready before adding to your stream.
**Step 3: OBS will catch the complete Zoom window; just trim out to capture only your guests’ face cam. You may select “Start Streaming” if you need to webcast the conference elsewhere.
If you wish to put yourself into the Stream from your PC associated webcam or other video devices linked, utilize the Video Source Option instead of Window Capture and specify your target device when adding the source. Just make sure you have unmuted the Desktop Audio and Mic/Aux or any mic connected to your PC from the Audio Mixed option at the bottom center of OBS.
Part 3. How to Record Zoom Meetings with OBS
You may use the handles to morph the preview and fit it to the screen, or press alt and drag the red handles to crop the preview for one user. Once you clip the preview for one person, you may repeat the above to process to upload the same window capture again into OBS Source and crop out to obtain each other users as well. If you want to record Zoom meetings and preserve them for later, you may obtain amazing results without any third-party software. The only things you’ll need to install are OBS and Zoom The video will have a brief time when Zoom is not in full-screen, and the cascading preview will appear if the OBS is on the same display. You may delete it in post-editing if required. The sound in the recording will be doubled if you’re using speakers since your mic will take up the output sound from your device. Use headphones to prevent this. Here’s what you need to do:
Steps to Record Zoom Meetings with OBS
**Step 1: Launch Zoom and OBS. In OBS, under “Sources,” click the Plus button and choose “Display Capture.” This will work best if you have more than one monitor for your PC, but it will still operate if you just have one.
**Step 2: You may use the “Window Capture” option and pick “Zoom.exe” as your source, although this might not always work. Name the capture anything you wish, then click “OK.” You may use the name of the monitor you’re using for Zoom to keep things simple.
**Step 3: In OBS, click on “+” under “Sources” again, then pick “Audio Input Capture.” Rename the capture source if you wish to keep it distinct from the other source and prevent misunderstanding, then hit “OK.” Press “Start Recording.” Maximize Zoom to full-screen mode to make it the only visible application on display.
Conclusion
OBS enables recording into several video formats. But the major reason why you may want to learn how to record Zoom meetings using OBS is that the software may help firms gain a step ahead on their video production. OBS is the software of choice for many, if not most, of today’s internet broadcasters. This free program allows you to create “scenes,” utilizing your camera feed together with any other movies or photos you wish to incorporate. The outcome is subsequently streamed live to your streaming platforms of choice, such as YouTube or Twitch, and/or to a recorder.
Part 2. Record Roblox Games with Filmora
Part 3. Record Roblox with Windows Game Bar
Filmora Screen Recorder
Record screen on PC and Mac with webcam
Capture system amd micorphone audio simultaneously
Edit video and audio with built-in tools
Part 1. How to Connect OBS to Zoom
Zoom is one of the most popular video conferencing programs. The greatest thing is that you can live broadcast on Zoom using OBS Studio and even record your Zoom sessions using OBS Studio. OBS is recognized for its enormous community and support for hundreds of third-party plugins. As OBS is an open-source tool, you can expect it to readily connect up with dozens of other software programs, including video conferencing apps such as Zoom. To get things started, the pre-requisites are the newest version of OBS Studio, Zoom, and one of the numerous plugins that offer a virtual camera. The approach outputs OBS Studio as a virtual camera and identifies it as a video source for Zoom.
Steps to Connect OBS to Zoom
**Configure OBS Studio:
**Step 1: Launch OBS Studio and Select and download the relevant plugin depending on your operating system.
**Step 2: Go to the Tools menu. Find and click on the plugin you have downloaded and follow the vizard to replicate OBS output as a virtual camera.
**Configure Zoom:
**Step 1: In Zoom, begin a meeting, then pick a video source. The new option introduced by your OBS plugin will display. Select it and then click on the Start Video option.
**Step 2: The Zoom’s video will now accept the input from the virtual camera, which is the output provided by OBS Studio.
**Step 3: Most of you will be on a mobile device and mobile device displays are of a different aspect ratio than your PC. Click on the Profile menu on OBS at the top and click on New Profile and name the Profile as per your convenience.
Part 2. How to Live Stream on Zoom with OBS
To link the applications, we will have to establish a virtual camera utilized by Zoom as its input. The output of the virtual camera is OBS Studio. One of Zoom’s most popular features is its native video recording. Zoom users may record meetings to either their PC or to the Zoom cloud. You can also obtain separate files for gallery view and full-sized speaker view if you record to the Zoom cloud. Yet, many individuals are adopting choices, such as Open Broadcaster Software, or OBS, to record video meetings. When utilizing OBS to record and manage your Zoom meetings, you can obtain higher-resolution video and audio. While Zoom is acceptable as a live meeting platform, the things you can accomplish with OBS greatly offset the price of setting up the system. Play around with the parameters to achieve the results that work best for you.
Steps to live-stream on Zoom with OBS
**Step 1: Start your Zoom meeting and OBS concurrently and have all guests joined. This step should be done before the go-live time to make sure the settings operate. For audio sources that originate from the online call, you may monitor and control via OBS’s Audio Settings.
**Step 2: Click on the + (Add) button in the Sources section and pick Image. Upload and resize the picture to add your backdrop. You may add a backdrop, face camera frame, text, and screen grab in any manner you wish for the broadcast. It is important to have a backdrop layout ready before adding to your stream.
**Step 3: OBS will catch the complete Zoom window; just trim out to capture only your guests’ face cam. You may select “Start Streaming” if you need to webcast the conference elsewhere.
If you wish to put yourself into the Stream from your PC associated webcam or other video devices linked, utilize the Video Source Option instead of Window Capture and specify your target device when adding the source. Just make sure you have unmuted the Desktop Audio and Mic/Aux or any mic connected to your PC from the Audio Mixed option at the bottom center of OBS.
Part 3. How to Record Zoom Meetings with OBS
You may use the handles to morph the preview and fit it to the screen, or press alt and drag the red handles to crop the preview for one user. Once you clip the preview for one person, you may repeat the above to process to upload the same window capture again into OBS Source and crop out to obtain each other users as well. If you want to record Zoom meetings and preserve them for later, you may obtain amazing results without any third-party software. The only things you’ll need to install are OBS and Zoom The video will have a brief time when Zoom is not in full-screen, and the cascading preview will appear if the OBS is on the same display. You may delete it in post-editing if required. The sound in the recording will be doubled if you’re using speakers since your mic will take up the output sound from your device. Use headphones to prevent this. Here’s what you need to do:
Steps to Record Zoom Meetings with OBS
**Step 1: Launch Zoom and OBS. In OBS, under “Sources,” click the Plus button and choose “Display Capture.” This will work best if you have more than one monitor for your PC, but it will still operate if you just have one.
**Step 2: You may use the “Window Capture” option and pick “Zoom.exe” as your source, although this might not always work. Name the capture anything you wish, then click “OK.” You may use the name of the monitor you’re using for Zoom to keep things simple.
**Step 3: In OBS, click on “+” under “Sources” again, then pick “Audio Input Capture.” Rename the capture source if you wish to keep it distinct from the other source and prevent misunderstanding, then hit “OK.” Press “Start Recording.” Maximize Zoom to full-screen mode to make it the only visible application on display.

Conclusion
OBS enables recording into several video formats. But the major reason why you may want to learn how to record Zoom meetings using OBS is that the software may help firms gain a step ahead on their video production. OBS is the software of choice for many, if not most, of today’s internet broadcasters. This free program allows you to create “scenes,” utilizing your camera feed together with any other movies or photos you wish to incorporate. The outcome is subsequently streamed live to your streaming platforms of choice, such as YouTube or Twitch, and/or to a recorder.
- Title: [Updated] In 2024, Joining the Dots OBS & Zoom Pairing Explained
- Author: Agatha
- Created at : 2024-07-18 08:10:35
- Updated at : 2024-07-19 08:10:35
- Link: https://video-screen-grab.techidaily.com/updated-in-2024-joining-the-dots-obs-and-zoom-pairing-explained/
- License: This work is licensed under CC BY-NC-SA 4.0.