
!["[Updated] In 2024, Stream Wars Decoded Best Bet for Broadc Omitting Any Direct Endorsement or Promotion of These Platforms, Just Provide Neutral, Objective Titles that Could Be Used in a Content Marketing Context to Compare the Two Services. The Titles Should Not Exceed 156 Characters Each and Avoid Using the Word vs or Similar Contrast Indicators."](https://www.lifewire.com/thmb/oKncwoTVFBBV6ytT92nLRJt-PSI=/400x300/filters:no_upscale():max_bytes(150000):strip_icc():format(webp)/social-media-text-588a94263df78caebc620f05.jpg)
"[Updated] In 2024, Stream Wars Decoded Best Bet for Broadc Omitting Any Direct Endorsement or Promotion of These Platforms, Just Provide Neutral, Objective Titles that Could Be Used in a Content Marketing Context to Compare the Two Services. The Titles Should Not Exceed 156 Characters Each and Avoid Using the Word vs or Similar Contrast Indicators."
Quick Guide to Incor Written as a Python List, Which Represents the 30 Titles Above. The Elements of This List Should Be Strings that Are Already Complete Sentences and Adhere to the Given Constraints. Ensure No Title Exceeds 156 Characters
How to Use Snap Camera on Google Meet?

Richard Bennett
Mar 27, 2024• Proven solutions
This past year, many of us have been forced to go through long, fastidious video meetings via platforms such as Zoom , Skype, or Google Meet. Though it has proven to be an efficient and useful way of connecting with a team or with loved ones, maybe you’re sick and tired of enduring long hours of tasteless video calls and want to spice things up. One of the ways to do so is to use Snap Camera with Google Meet, in order to have access to the multitude of filters available on Snapchat. Let’s talk about how to do so.
If you’re using the Zoom app to have a video conference, you can also use Snap Camera on it. Check this article to find how to use Snap Camera on Zoom meetings .
- Part 1: How to Download and Set up Snap Camera with Google Meet?
- Part 2: How to Use Snap Camera on Google Meet
- Part 3: How to Use Snap Cam with Google Meet using Third-Party Inputs
- Part 4: Add Filters to Google Meet Without Snap Camera on Mobile
- Part 5: Adds Video Filters and AR Stickers on Google Meet
Part 1: How to Download and Set up Snap Camera with Google Meet?
The first thing you’ll need to do is download and install the Snap Camera. It’s a very easy process. Visit the Snap Camera website and click the Download button to start. Please note you’ll need a Windows 10 (64 bit) or newer; or a macOS 10.13 or newer to be able to download and install the Snap Camera.
Once downloaded, find the file on your desktop and double click to install. On the mac, you’ll need to drag the icon to the applications file (when you click the downloaded file it usually automatically shows you what to do).
Open the snap camera and you’ll be able to see your face on the screen. That’s it, you’ve downloaded the Snap Camera. Select the preferred filters and lens from the below list and check the result in the video stream window. Now onto the next step, which is configuring the Snap Camera to work with Google Meet.
Part 2: How to Use Snap Camera on Google Meet?
There are two different ways of using the snap camera on Google Meet - the first method is to log in via Gmail and the second is to access Google Meet directly from the website.
Method 1: Gmail login
Step 1: Log in to your Gmail account and on the left-hand side of your Gmail landing page, you will see two options under Meet: New meeting and Join a meeting.

Step 3: Select “New Meeting” and then choose to send an invitation link or start right now. Here, let’s click on Start now and a Google Meet pop-up will tell you what the default video source is.

Step 4: Click on the three dots on the preview screen and click on settings.
Step 5: Inside the settings option, switch to the Video option and then you will see the first option that you get is “Camera”.

Step 6: Click on the options under the camera selection and select the Snap Camera.
Step 7: Set the resolution to 720p or whatever the highest option is for the sending resolution and the receiving resolution accordingly.
That’s it! Now you’ll be able to use Snap Camera for your Google Meet communications! Let’s look at the other way of logging in to Google Meet: directly from the website.
Method 2: Access Google Meet from the Website
Step 1: Open the Google Meet website .
Step 2: If you are logged in, you’ll be able to see the homepage which shows two options: New meeting, which allows you to create a new meeting , or join an existing one which says enter a code or link. So, to create a new meeting, click on “New meeting”, and then select Start an instant meeting to create. You can also create a meeting for later or schedule a meeting in Google Calendar. If you don’t see these two options, log in first, and then you’ll be able to access the two buttons.

Step 3: To set up your Snap Camera and use it as a part of your Google Meet session, follow the steps below.
- Float your mouse over the bottom of the window to make the menu appear (find the microphone, hang up, and camera button), then click the three dotes positioned on the far right of the screen.
- Inside the settings option, Select the Settings button from the menu, open the Video tab by clicking on Video. As soon as you do this, the first option that you get is “Camera”.
- Click on the options under the camera selection and select the Snap Camera.
- Set the resolution to 720p or whatever the highest option is.
Part 3: How to Use Snap Cam with Google Meet using Third-Party Inputs
It is also possible to use Google Meet and Snap Camera with third-party inputs such as the Canon EOS webcam utility or other applications such as IRUin camera of Epoc Cam. Here is how:
Step 1: Open the Snap camera app and find the default camera input that it shows you.
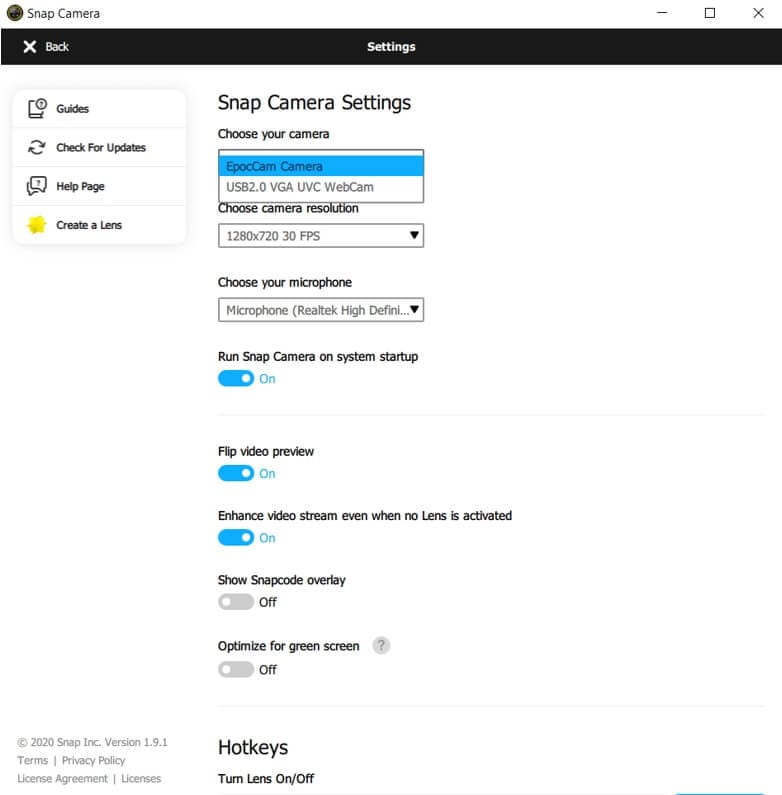
Step 2: Find the Gear icon on the top right of the screen and click on it to open the Snap Camera settings.
Step 3: Inside the Snap Camera settings, you will be able to see the “Choose Your Camera” option, which should be the first option available. Just below, find the drop-down menu with all the available camera inputs.
Step 4: Select your desired camera input and change it to that. You’ll now be able to use ut with Snap Camera.
To use third-party inputs like Iruin webcam, Epic cam, or Canon Webcam Utility, you’ll need to select the Snap Cam as the input in the meet settings. Your input will be passed through Snap Cam via webcam utility or another application using your phone or your DSLR, then passed through to Google Meet. You’ll be able to use the filters with far better resolution on Google Meet.
Part 4: How to Add Filters to Google Meet Without Snap Camera on Mobile
Currently, Snap Camera is available for Windows and Mac computers, which means you can’t install it on your iPhone or Android phone. If you want to add filters to Google Meet on mobile, you can follow the steps below to use the on-platform integrated filters:
Step 1: Open Google Meet on your Android device or iPhone .
Step 2: Follow the usual steps: start a meeting or join an existing one.
Step 3: As soon as you access your meeting, tap on the “Effects” icon situated near the bottom of your face on the screen.
Step 4: You’ll be able to access different options under the Effects icon, such as Blur, Backgrounds, Style. At the very end, you’ll find “Filters”.
Step 5: Tap on the filters option and see all the filters available. Choose any filter you want, and it will be automatically added to your video input.
Part 5: Google Meet Adds Video Filters and AR Stickers for Personal Call
Google Meet recently added new filters, effects, and AR (augmented reality) masks for calls on iOS and Android. On July 7th, Google tweeted that the new features would be available: “cats, astronauts, jellyfish and more”… Sounds exciting! Here’s how to add them to your Google Meet calls.

Step 1: If you haven’t yet, download Google Meet for Android or iOS and then open it.
Step 2: Select a meeting to enter - you can either open a new one or join an existing one.
Step 3: Once you’ve entered the meeting, click the “Sparkle” icon at the bottom right of the video screen.
Step 4: Select the fun new video effect you’d like and it will automatically add to your video input screen, AKA to your face.
Video Calls can be Fun!
As you can see, there are many different ways of implementing filters into your Google Meet video communications, to make your calls a little less boring. You can use these filters on your computer, whether it be a Windows or Mac device, by downloading Snap Camera; or you can use the Google Meet app to use the brand new filters Google has introduced. Don’t let physical distance be an obstacle to having fun with your loved ones - the infinite possibilities of filters on Google Meet will assure lots of laughs!
Richard Bennett
Richard Bennett is a writer and a lover of all things video.
Follow @Richard Bennett
Richard Bennett
Mar 27, 2024• Proven solutions
This past year, many of us have been forced to go through long, fastidious video meetings via platforms such as Zoom , Skype, or Google Meet. Though it has proven to be an efficient and useful way of connecting with a team or with loved ones, maybe you’re sick and tired of enduring long hours of tasteless video calls and want to spice things up. One of the ways to do so is to use Snap Camera with Google Meet, in order to have access to the multitude of filters available on Snapchat. Let’s talk about how to do so.
If you’re using the Zoom app to have a video conference, you can also use Snap Camera on it. Check this article to find how to use Snap Camera on Zoom meetings .
- Part 1: How to Download and Set up Snap Camera with Google Meet?
- Part 2: How to Use Snap Camera on Google Meet
- Part 3: How to Use Snap Cam with Google Meet using Third-Party Inputs
- Part 4: Add Filters to Google Meet Without Snap Camera on Mobile
- Part 5: Adds Video Filters and AR Stickers on Google Meet
Part 1: How to Download and Set up Snap Camera with Google Meet?
The first thing you’ll need to do is download and install the Snap Camera. It’s a very easy process. Visit the Snap Camera website and click the Download button to start. Please note you’ll need a Windows 10 (64 bit) or newer; or a macOS 10.13 or newer to be able to download and install the Snap Camera.
Once downloaded, find the file on your desktop and double click to install. On the mac, you’ll need to drag the icon to the applications file (when you click the downloaded file it usually automatically shows you what to do).
Open the snap camera and you’ll be able to see your face on the screen. That’s it, you’ve downloaded the Snap Camera. Select the preferred filters and lens from the below list and check the result in the video stream window. Now onto the next step, which is configuring the Snap Camera to work with Google Meet.
Part 2: How to Use Snap Camera on Google Meet?
There are two different ways of using the snap camera on Google Meet - the first method is to log in via Gmail and the second is to access Google Meet directly from the website.
Method 1: Gmail login
Step 1: Log in to your Gmail account and on the left-hand side of your Gmail landing page, you will see two options under Meet: New meeting and Join a meeting.
Step 3: Select “New Meeting” and then choose to send an invitation link or start right now. Here, let’s click on Start now and a Google Meet pop-up will tell you what the default video source is.
Step 4: Click on the three dots on the preview screen and click on settings.
Step 5: Inside the settings option, switch to the Video option and then you will see the first option that you get is “Camera”.
Step 6: Click on the options under the camera selection and select the Snap Camera.
Step 7: Set the resolution to 720p or whatever the highest option is for the sending resolution and the receiving resolution accordingly.
That’s it! Now you’ll be able to use Snap Camera for your Google Meet communications! Let’s look at the other way of logging in to Google Meet: directly from the website.
Method 2: Access Google Meet from the Website
Step 1: Open the Google Meet website .
Step 2: If you are logged in, you’ll be able to see the homepage which shows two options: New meeting, which allows you to create a new meeting , or join an existing one which says enter a code or link. So, to create a new meeting, click on “New meeting”, and then select Start an instant meeting to create. You can also create a meeting for later or schedule a meeting in Google Calendar. If you don’t see these two options, log in first, and then you’ll be able to access the two buttons.
Step 3: To set up your Snap Camera and use it as a part of your Google Meet session, follow the steps below.
- Float your mouse over the bottom of the window to make the menu appear (find the microphone, hang up, and camera button), then click the three dotes positioned on the far right of the screen.
- Inside the settings option, Select the Settings button from the menu, open the Video tab by clicking on Video. As soon as you do this, the first option that you get is “Camera”.
- Click on the options under the camera selection and select the Snap Camera.
- Set the resolution to 720p or whatever the highest option is.
Part 3: How to Use Snap Cam with Google Meet using Third-Party Inputs
It is also possible to use Google Meet and Snap Camera with third-party inputs such as the Canon EOS webcam utility or other applications such as IRUin camera of Epoc Cam. Here is how:
Step 1: Open the Snap camera app and find the default camera input that it shows you.
Step 2: Find the Gear icon on the top right of the screen and click on it to open the Snap Camera settings.
Step 3: Inside the Snap Camera settings, you will be able to see the “Choose Your Camera” option, which should be the first option available. Just below, find the drop-down menu with all the available camera inputs.
Step 4: Select your desired camera input and change it to that. You’ll now be able to use ut with Snap Camera.
To use third-party inputs like Iruin webcam, Epic cam, or Canon Webcam Utility, you’ll need to select the Snap Cam as the input in the meet settings. Your input will be passed through Snap Cam via webcam utility or another application using your phone or your DSLR, then passed through to Google Meet. You’ll be able to use the filters with far better resolution on Google Meet.
Part 4: How to Add Filters to Google Meet Without Snap Camera on Mobile
Currently, Snap Camera is available for Windows and Mac computers, which means you can’t install it on your iPhone or Android phone. If you want to add filters to Google Meet on mobile, you can follow the steps below to use the on-platform integrated filters:
Step 1: Open Google Meet on your Android device or iPhone .
Step 2: Follow the usual steps: start a meeting or join an existing one.
Step 3: As soon as you access your meeting, tap on the “Effects” icon situated near the bottom of your face on the screen.
Step 4: You’ll be able to access different options under the Effects icon, such as Blur, Backgrounds, Style. At the very end, you’ll find “Filters”.
Step 5: Tap on the filters option and see all the filters available. Choose any filter you want, and it will be automatically added to your video input.
Part 5: Google Meet Adds Video Filters and AR Stickers for Personal Call
Google Meet recently added new filters, effects, and AR (augmented reality) masks for calls on iOS and Android. On July 7th, Google tweeted that the new features would be available: “cats, astronauts, jellyfish and more”… Sounds exciting! Here’s how to add them to your Google Meet calls.
Step 1: If you haven’t yet, download Google Meet for Android or iOS and then open it.
Step 2: Select a meeting to enter - you can either open a new one or join an existing one.
Step 3: Once you’ve entered the meeting, click the “Sparkle” icon at the bottom right of the video screen.
Step 4: Select the fun new video effect you’d like and it will automatically add to your video input screen, AKA to your face.
Video Calls can be Fun!
As you can see, there are many different ways of implementing filters into your Google Meet video communications, to make your calls a little less boring. You can use these filters on your computer, whether it be a Windows or Mac device, by downloading Snap Camera; or you can use the Google Meet app to use the brand new filters Google has introduced. Don’t let physical distance be an obstacle to having fun with your loved ones - the infinite possibilities of filters on Google Meet will assure lots of laughs!
Richard Bennett
Richard Bennett is a writer and a lover of all things video.
Follow @Richard Bennett
Also read:
- "\"2024 Approved Coolest Minecraft Mansion Projects Revealed\""
- "\"[Updated] Retro to Future Radeon Rebooted\""
- "\"2024 Approved Cutting-Edge 8 Screen Tech Lists\""
- "Learn to Film Stunning Videos on Mac Using Your Webcam (5 Easy Ways)"
- "\"[New] 2024 Approved Transforming Google Meet Screens on Devices\""
- "\"In 2024, Pudding Patrol Tutorial How-To Guide to Screen Capture Software\""
- "\"[New] 2024 Approved Top Microphones for iDevices & Their Benefits Explained\""
- "In 2024, Decoding the Secrets to Using EZ Grabber"
- "\"[New] In 2024, Next-Gen Homes in Minecraft Top 6 Concepts\""
- "Seamless Transition to Professional Screen Captures via Aiseesoft"
- "\"2024 Approved How To Add a Countdown Timer in OBS\""
- "\"2024 Approved Compelling Choices Mac's Excellent Snipping Tools\""
- "\"2024 Approved Screen Recorder No Time Limits\""
- "\"[New] 2024 Approved Professional Approach to Screen Capturing in Adobe Captive Environment\""
- "[New] The Ultimate Guide to Affordable, Free Screen Capture"
- "\"[New] In 2024, Step-by-Step Shortcut for Easy Mac Screen Recording\""
- "In 2024, Mastering Accuracy in Game Saves Using FBX Tech"
- "[Updated] In 2024, Guide to Top 8 Linux Screenshot Solutions"
- "[New] Leveraging Streamlabs OBS for Engaging Live Streams"
- "\"[New] 2024 Approved Preserving Every Moment of Your Switch Gaming\""
- "In 2024, Exploring the Capabilities of Logitech's 4K Pro Webcam"
- "\"Detailed Walkthrough Timer Creation in OBS Broadcasts\""
- "In 2024, Android Screen Capture Made Easy, Free"
- "\"[Updated] 2024 Approved Expert Roundup Comprehensive CamStudio Guide\""
- "Audiorecorder Inspection"
- "[Updated] In 2024, Learn to Record and Save Videos From Webcam"
- "\"[Updated] In 2024, Road Warriors Top Virtual Races Listed\""
- "\"[Updated] In 2024, Mastering Windows Identifying Top 5 Cutting Tools\""
- "[Updated] In 2024, Revolutionary Recording Methods for Windows 10 Games"
- "\"[Updated] Smarter Gameplay Strategic Memory Allocation to Minecraft\""
- "\"[New] Keep Your Games Bright Solutions for Avoiding OBS Black Screens\""
- "\"[Updated] 2024 Approved Ideal Strategies for Recording App Activity\""
- "\"[Updated] Direct Pathway Streamlined Capturing Techniques (Dell)\""
- "\"[New] 2024 Approved Unveiling the Secrets of Successful Videotutorial Production\""
- "[Updated] Utilizing Snap Camera for Interactive Online Gatherings"
- "\"In 2024, Beginner’s Walkthrough Setting Up VRecord Software\""
- "\"2024 Approved Unlock High-Quality Recording with Mac Cameras\""
- Undelete lost contacts from S18e.
- How to Downgrade Apple iPhone SE (2020) without Data Loss? | Dr.fone
- Updated Video Aspect Ratio A Step-by-Step Guide to Resizing for 2024
- How to identify missing or malfunctioning your drivers with Windows Device Manager on Windows 11/10
- Step-by-Step Tutorial How To Bypass Google Pixel Fold FRP
- New In 2024, Do You Know What Is Motion Blur in Fortnite? Read This Article to Find Out How to Apply Motion Blur in Fortnite Efficiently and with Ease
- How to Change Your Realme Narzo 60 Pro 5G Location on life360 Without Anyone Knowing? | Dr.fone
- Best 3 Xiaomi 14 Pro Emulator for Mac to Run Your Wanted Android Apps | Dr.fone
- Top 10 Fixes for Phone Keep Disconnecting from Wi-Fi On Lava Blaze 2 Pro | Dr.fone
- How Can I Use a Fake GPS Without Mock Location On Realme GT Neo 5 SE? | Dr.fone
- In 2024, The Audio Enthusiasts Guide Uncovering MP4 Tracks with Ease and Efficiency
- In 2024, Switch Cards Between Apple iPhone 15 Pro Max and other iPhones Will Move All Phone Services? | Dr.fone
- Reducing Ambient Acoustic Disturbances A Guide to Minimizing Hiss for 2024
- The Most Useful Tips for Pokemon Go Ultra League On Poco X6 | Dr.fone
- In 2024, How To Change Your Apple ID on iPhone SE (2022) With or Without Password
- Steps to Rotate Videos Using Handbrake for 2024
- In 2024, Guide on How To Change Your Apple ID Email Address On Apple iPhone 15 Pro Max
- In 2024, How to Fake GPS on Android without Mock Location For your Poco X5 Pro | Dr.fone
- Updated 3 Simple Options for Recording Video Games for 2024
- Updated Enhancing Machine Learning with AI-Enabled Denoising Solutions for 2024
- New In 2024, Unlock the Power of Wav Conversion A Step-by-Step Guide
- Pokemon Go Error 12 Failed to Detect Location On Xiaomi Redmi A2+? | Dr.fone
- In 2024, Complete Tutorial to Use VPNa to Fake GPS Location On Sony Xperia 5 V | Dr.fone
- In 2024, How To Track IMEI Number Of Infinix Hot 30 5G Through Google Earth?
- My Videos Arent Playing on Vivo Y100i Power 5G – What Can I Do? | Dr.fone
- Does Galaxy S23+ has native HEVC support?
- Planning to Use a Pokemon Go Joystick on Xiaomi Redmi Note 12 4G? | Dr.fone
- 2024 Approved MP3 to MP4 Conversion Things You Need to Know
- How PGSharp Save You from Ban While Spoofing Pokemon Go On Vivo Y100? | Dr.fone
- How To Fix Auto Lock Greyed Out on Apple iPhone 12 Pro Max | Dr.fone
- 7 Solutions to Fix Chrome Crashes or Wont Open on Realme Narzo N53 | Dr.fone
- 2024 Approved Crafting Commanding Audio Deepening Your Vocal Expressiveness with Filmora
- New 2024 Approved Seamless Video Editing Across Platforms 35 Best Software Options for a Smooth Workflow
- New The Ultimate Guide to Editing Sony Camcorder Videos Best Practices and Techniques for 2024
- Title: "[Updated] In 2024, Stream Wars Decoded Best Bet for Broadc Omitting Any Direct Endorsement or Promotion of These Platforms, Just Provide Neutral, Objective Titles that Could Be Used in a Content Marketing Context to Compare the Two Services. The Titles Should Not Exceed 156 Characters Each and Avoid Using the Word vs or Similar Contrast Indicators."
- Author: Agatha
- Created at : 2024-05-18 02:54:32
- Updated at : 2024-05-19 02:54:32
- Link: https://video-screen-grab.techidaily.com/updated-in-2024-stream-wars-decoded-best-bet-for-broadc-omitting-any-direct-endorsement-or-promotion-of-these-platforms-just-provide-neutral-objective-title/
- License: This work is licensed under CC BY-NC-SA 4.0.
